Thursday, September 30

Haunted Milk Carton House


This summer I scored a large bag of Little People for my daughter at the thrift store. Included were animals, knights and Little People dressed in their Halloween costumes. Tallulah has plenty of fun playing with her Little People as is, but I thought why not kick it up a notch and start getting her in the Halloween spirit. We missed the recycling last week so I had cardboard milk cartons starting to pile up and it dawned on me what cute Haunted Houses they would make!


SUPPLIES
Cardboard Milk Carton
Scissors
Paint Brush
Crafty Chica Little Chica Paint Pack
Paint Brush
Sandpaper
Craft Knife
Aleene's Acid Free Tacky Glue
Hambly Overlay
Vintage Photographs
Scrap Booking Paper
Halloween Themed Chip Board
Trim


The first thing I needed to do was use sandpaper to get the waxy topcoat off of my milk carton so I could paint it black.


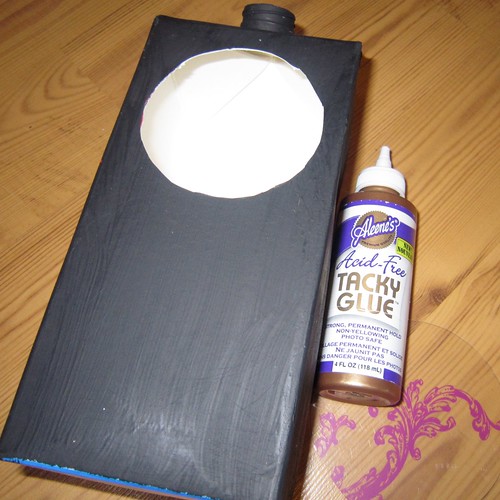
Every haunted house needs a door and a window so your Little People can go inside and play. I used a craft knife to cut out the shapes from my milk carton.


I decided to use Aleene's Tacky Glue to attach a piece of clear Hambly overlay inside my window. From here hot pink and black became my theme.


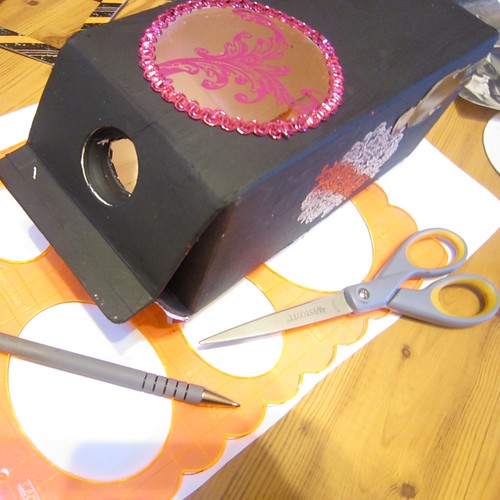
I decked out my window in sparkly pink trim for a little extra some-somethin'.


To keep up with the hot pink theme I used some Hambly rub-on's that look like doilies/spider webs on the sides of my haunted house. I used Aleene's Acid Free Tacky Glue to adhere some vintage photographs of children that were kinda creepy.


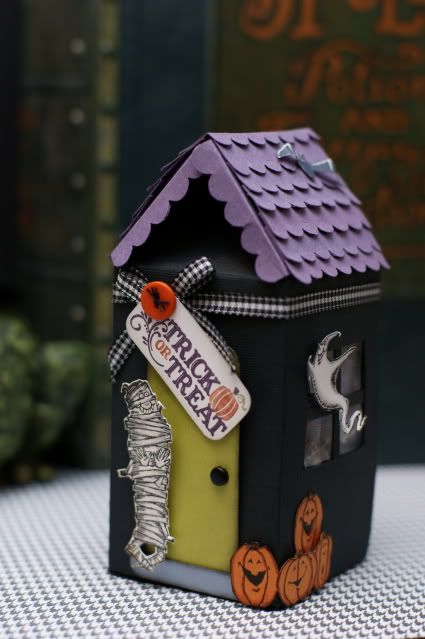
I used a scalloped edge template and scissors to cut out paper shingles for the roof of my haunted house. I used Aleene's Tacky Glue to attach alternating strips of paper.


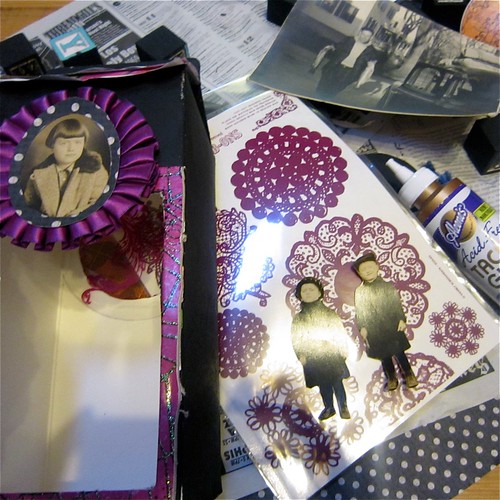
I added a few last minute frills like chipboard around the door and a rosette with another creepy kid over the door.

Seems like a lot of work, but actually a milk carton was transformed into a creepy casa in a couple of hours and most of that was paint and glue drying time.


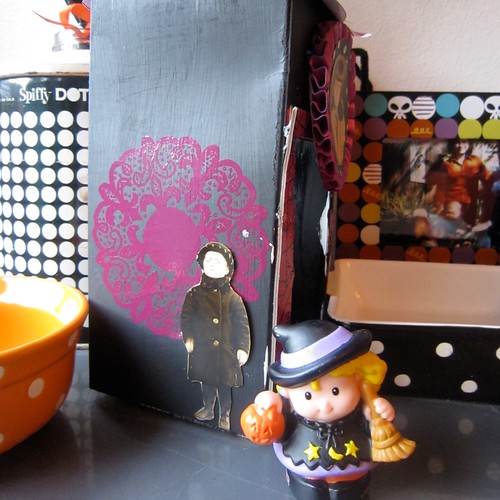
All that is left to do is bust out the Little People and the haunted house is ready for action!

Have some extra milk cartons lying around? Check out these other crafty up-cycled options!

Halloween Cartons by Stampin Addicts


Halloween House by Little Lovely


Haunted Milk Carton by The Little Room

Craft on!Click here for today's daily giveaway!

Skull Bookmarks


Flashy Fabric Bookmarks

Designed by Kathy Cano-Murillo
We all know reading is more fun with fancy bookmarks, right? Here is a sparkly way to liven up the whole page turning experience!


Craft on! Click here for today's daily giveaway!

Wednesday, September 29

Crocheted-covered sneakers!


Crafter Chelly Sellinger made these awesome sneakers with yarn and Fabric Fusion! It looks like she crocheted and then glued and then affixed appliques to the sides. So cute, perfect for a fall look!

Canvas High Top
2 different yarns for sides and trim
coordinating shoelaces
matching appliquets 

 
Craft on! Click here for today's daily giveaway!

Tuesday, September 28

We love GLEE! Mr. Tacky guest appearance!


 Last season, Mr. Tacky made a guest appearance on GLEE!!

Craft on! Click here for today's daily giveaway!

Contribute to our gallery!


Did you know we have an iLoveToCreate Community Gallery that is all about YOU? This is where we post projects made by our consumers! If you have made anythingusing any of our brands, please sign up and send in some pictures. We'll show them off for you!

Craft on! Click here for today's daily giveaway!

Monday, September 27

DIY Russian Nesting Doll Purse + Enter to Win it!


Check out this video of designer Cheryl Ball and this fabulous Russian Nesting Doll purse she made for a past issue of Haute Handbags! Cheryl tells us how she made this cute bag (you won't believe what it's made out of! All it took was a little ingenuity, Aleene's Fabric Fusion, and fun glitter and accents!

And today, September 27th, 2010, enter to win this amazing purse on ilovetocreate.com to show off with your outfit or display! It is a definite conversation piece!! Click here to win in our daily giveaway!

How to use Aleene's Flexible Stretchable Fabric Glue


LINK

Craft on! Click here for today's daily giveaway!

Friday, September 24

Girls Gone Wild with Tulip® Fashion Graffiti!


Today I spotted Chloe and Allee making a very girly hat using the Tulip® Fashion Graffiti Spray Cannon and Tulip® Fabric Spray Paints™ ! I ran and grabbed my camera and filmed away. I was kinda excited to see what they were gonna do, so I apologize for the shaky camera at the start of the video! The hat turned out so cute...just see for yourself!

Craft on! Click here for today's daily giveaway!

Flower Power Tee


Flower Power Tee

Rock the flower power look with this vibrant floral tee, perfect for springtime fun! Just use Tulip® Cool Color Block™ to draw your favorite spring blossom onto a basic white tee and spritz on Tulip® One-Step Fashion Dye™ in green … fashion creativity has never had it so easy!

CLICK HERE FOR THE SHOPPING LIST & DIRECTIONS


Craft on! Click here for today's daily giveaway!

Thursday, September 23

Sweater Clips


After last week's I Love to Create post about monogrammed sweaters I thought it was only appropriate to follow up this week with another cardigan accessory, sweater clips! Antiquated to some, but to others the ultimate way to sass-a-fy your sweater set.


PINK FOREST FRIENDS SWEATER CLIPS
Supplies

Fabric
Felt
Sweater Clips
Fabric Fusion Glue
Scissors


Just because I used a forest friends fabric does not mean you have to. Take a stroll through the fabric aisle and see if something else with graphic images catches your eye. I chose a pink fox and porcupine to use for my sweater clips. I roughly cut them out and using Fabric Fusion Glue adhered them to a piece of stiff black felt. Allow the fabric and felt to dry completely.


When the glue is dry cut out your images. Gluing the fabric to the felt should help prevent fraying. Glue your fabric graphics to your sweater clips. These little babies are not only cute, but they keep your cardigan together.

Let's make another pair out of felt!


NESTING DOLLS SWEATER CLIPS
Supplies

Felt
Scissors
Fabric Fusion Glue
Sweater Clips


Again nothing says you have to make Russian Nesting Doll Sweater Clips, use your imagination and create something else. The felt possibilities are endless. I have made felt sweater clips that were telephones, lipstick and cute little faces and hearts. Cut out your shapes, glue them together, attach them to your sweater clips and presto magic!

In case you are feeling inspired I thought I would show you a few other sweater clip examples. Wondering where the heck to get sweater clips? Well you can easily make your own with alligator clips and chain or you can find some ready made ones in my Etsy store!


Craft on!Click here for today's daily giveaway!

Tree of Life Purse and “Sole” Full Shoes by Candace Marquette


Tree of Life Purse and “Sole” Full Shoes

Designed and decorated by Candace Marquette
No need to spend a fortune on a new handbag … Save money and make an Upcycle statement by turning that boring old bag in the back of your closet into something worth toting around! Create this Tree of Life Purse with Tulip® Soft Fabric Paints™ and Tulip® Spirit™ Markers. Add a fun necklace to the handles for extra fabulous flair!

Put a little soul in your step! Let your creative flair shine bright with a pair of artsy kicks! Dress them up with Tulip® Soft Fabric Paint™ and Spirit™ Markers. Add Tulip® Fashion Bead Paint™ for a sole full of dimension!


Craft on! Click here for today's daily giveaway!

Wednesday, September 22

ILoveToCreate Teen Crafts: Spooktacular Halloween Party Invitation


Spooktacular Party Invitation by Avalon Potter for ILoveToCreate Teen Crafts

Avalon has another fab teen craft for you this week. She made a gorgeous Halloween pop up party invitation that is perfect for the season. Pop up cards are surprisingly easy and fun to make and this design could easily be modified for any number of holidays and special occasions. Avalon loves working with paper to make dimensional projects and this one really rocks!

Spooktacular Party Invitation

Avalon Potter for ILoveToCreate
“Teen crafted, mom approved”

With September coming to an end I thought it was time to do a Halloween craft. At my age more of us go to parties then trick or treat so I decided to create a Halloween party invitation. This is fun to make and then a few weeks later you will have even more fun at your party! Making cards is simple, enjoyable, and a great way to kick off October.


Materials
Decorative black and white scrapbook paper
Orange cardstock
Halloween themed ribbon
Martha Stewart rickety fence edge punch (or other decorative Halloween themed edge punch)
Googly eyes
Aleene’s Tacky Glue
Aleene’s Tacky Glue Stick

Tools
Computer
Printer
Paper cutter
Craft Knife
Paper Scissors
Bone Folder

Step one: Once you have all of your materials cut your decorative scrapbook paper to 11 ¼” x53/8” inches. Fold your cut cardstock in half, the card fold is in the center of the 11 ¼” length. Make sure there is some of the decorative cardstock left over you will need it later. Use a bone folder to crease the card.

Step Two: Punch the fence from the orange cardstock. Make sure you have punched a little over 5 3/8 inches so if by accident you trim a little more paper off of your fence it won’t be a problem.

Step three: Cut the fence to fit the bottom edge of your card, attach with Aleene’s Tacky Glue stick. Any excess fence can be trimmed with your scissors.

Step four: Now get your ribbon, Aleene’s Tacky Glue, and scissors. Cut your ribbon so it won’t overlap your rickety fence, around 5 inches long. Apply it to your card by putting Aleenes tacky glue on the back then sticking on the left hand side of the card.

Step five: Take your orange cardstock and scissors. You will cut a piece of cardstock about 4 ½ inches long and 4 ¾ inches wide and then the paper about ¼ of an inch long on both sides so that you can use those flaps to attach the paper to the card


Step six: Now take the flap from and bend the ends into flaps. Bend a 1” fold and a 2.5” fold. This becomes the base for your pop up element. Use the glue stick to attach one flap on the bottom of the card and one on top so that when the card is open it makes a rectangle. See photo. Make sure when the card closes it bends with the card.

Step seven: Now take your remaining orange card stock and cut out a pumpkin to about 3 ¼”x4 ¼”. You could switch the pumpkin to a skull, spider, or black cat. This is the part where you can feel free to be creative.

Step eight: Use your craft knife to cut out a jack-o-lantern mouth with a small tooth at the top. You could also add a nose if you want to.

Step nine: Adhere the googly eyes to the pumpkin using Tacky Glue. Allow to dry.

Step ten: Using a fancy font (I used King and Queen font from dafont) write You are cordially invited... in 16 pt.. Then write the date, the address, the time span of the party and the R.S.V.P date in 8 pt.. Print. Don’t feel obligated to use black as the font color try red or maybe orange.

Step eleven: Use your paper cutter to cut out the printed material. The larger front element is 4.5”x1.25”. The invitation information is 3”x2.5”. Use the glue stick and glue the invitation into the pumpkins mouth with the tooth overlapping at an angle. Glue the pumpkin onto the front of the pop out piece of paper you glued to the card in step six, the invitation should almost rest on the bottom of the card when fully opened.

Step twelve: Apply the greeting on the front of the card with your glue stick. Glue it on an angle to give it a creepy affect.

Step thirteen: Punch a second fence element using the decorative scrapbook paper. Glue this to the inside of the card at the bottom.

'Hope in My Heart' Cap


Hope in My Heart Hat


Designed by Cheryl Ball
Think hopeful thoughts as you wear a hat dedicated to breast cancer awareness. Turn a white cap into one that makes a statement with Tulip® Fashion Art products. for more information about breast cancer, visit http://www.breastcancer.org/

Craft on! Click here for today's daily giveaway!

Tuesday, September 21

Love Note Pillows

IMG_3004

Before I moved from Oregon to San Diego to be near my boyfriend (my now husband) we maintained a long distance relationship. A big part of that relationship was writing letters, email and LOTS of little love notes sent back and forth. We both saved all those letters and notes and once in while we will pull them out, spend time shaking our head and laughing while reading them- so naive and silly we were! These days (insert 10 years) we still write each other notes and letters. There is just something so wonderful about a hand written note.

For a while I've wanted to do something creative with some of those notes and came up with the most simple idea to make little love note pillows.

FYI- I am OBSESSED with pillows and believe that you can never have too many around the house (they are EVERYWHERE) so adding a few more to the collection is always a good thing.


IMG_2968

I started by selecting a couple of notes and letters that I scanned.
Or they could be photographed

IMG_2977


Screen shot 2010-09-20 at 3.05.52 PM


I pulled the documents over to Photoshop and adjusted the brightness and contrast- this could really be done in any photo editing program.


Screen shot 2010-09-13 at 4.06.17 PM

I added a warming filter for a subtle sepia look.


IMG_29712

I enlarged the document so that I obscured entire sentences- for a little mystery :)


Screen shot 2010-09-13 at 4.31.06 PM

I then flipped it horizontal to prepare to print.


vb

I used Tulip's photo transfer paper and loaded it into my ink jet printer.


IMG_2978

I printed it out.


IMG_2980

I then placed the transfer face down on unbleached muslin.


IMG_2982

I covered it with a piece of scrap fabric and following the directions, ironed it down.


IMG_2983

I let the transfer cool and I peeled off the top sheet to reveal my love note.


IMG_2984

I used my craft iron to melt away any obvious edges that were showing.


IMG_2986

Next I cut it out

IMG_2987


IMG_2988

and sewed it onto the surface of another piece of muslin that I had pre cut for my pillow.


IMG_2992

I sewed the all of the sides together (with wrong sides facing).


IMG_2994

and left a hole open to so I could stuff the pillow and then sew the hole up.


IMG_3016


IMG_3002


IMG_2997


IMG_3011

ilovetocreate-blog-header-alisa
Clicky Web Analytics
Pin It button on image hover

Subscribe to our newsletter

* indicates required
I am interested in products and inspiration for...
Close