Saturday, March 31

Silly Kids Craft - A-Craft-A-Day with Pattiewack for National Craft Month

I thought it would be fun to end the month on a silly note with these funny spoons I made into monsters!  I love crafting with kids, and I know they will get a kick out of this fun craft.  You probably have everything you need in your craft stash.  But if you need the deets on how to make these, go to iLoveToCreate.com.

I hope you've had as much fun as me during National Craft Month, and that I sparked up a little creativity for you and your friends and family.  
Happy Crafting!
Pattiewack
Craft on!

Friday, March 30

Monogram Bag - with Pattiewack for National Craft Month!

I simply love this bag, and when I designed it, I was tickled to death with the color.  Of course I had to have a "W" on it, but you can put any letter and any font you want on yours by just printing it off your computer.  And then grab your favorite die cutting system and cut out tons of felt flowers for the bottom.  The instructions are on iLoveToCreate.com and more project ideas are there too.


Visit us on Facebook!
Craft on!

Thursday, March 29

Toddler Easter Basket


Easter is a mere 2 Sundays away, do you have your kid's Easter basket filled? Sure I've hit the dollar spot at Target to load up like all the other mother's, but I also made a slew of activities to include in the basket. My goal for this year's Easter basket was to not load up on cheap toys and junk that I would throw away in a week, but to look for items that would get used, played with and educate. I was inspired by a Creative Play Easter Basket I saw on Modern Parents Messy Kids and ran with the theme. Today for I Love to Create I am going to show you my own version of a toddler Easter basket. Next Thursday I will have the baby version.

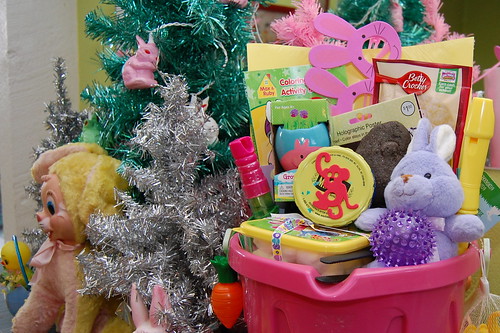
First up I used a sand pail instead of a basket. I have a friend who every Easter gives her kids a sand pail filled with a new swimsuit, beach towel, float toy - you get the drift. I thought I would steal the bucket part. I must confess I also broke down and got a smaller basket from Target for Tallulah to use at the 3 egg hunts we have coming up in the next week. I should also mention no cheap Easter grass around these parts.


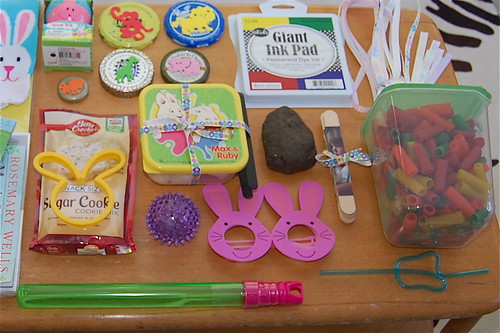
Not everything in my toddler Easter basket is homemade. Here is a quick list of the readymade items...
Coloring Book (Max and Ruby themed, they are bunnies after all)
Construction Paper (crafts, crafts and more crafts)
Glue (toddlers love glue)
Max and Ruby Book (her fave show)
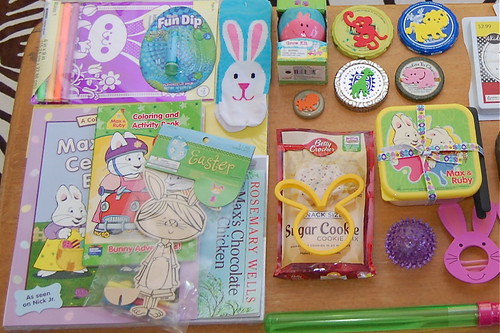
Bubbles (big bubbles in wand form)
Grow Kit (mini garden in an egg shaped planter)
Lip Gloss (every toddler needs lipgloss)
Train Tracks (Thomas needs to feel the wind in his hair)
Curly Straw (kick milk up a notch)
Easter Socks (I can never find a pair so I keep buying more)
Recorder (more instruments for her pretend rock band)
Ball (it lights up!)
Stuffed Bunny (she loves a snuggly stuffed animal)
Cookie Cutters (for playdoh)
Cookie Mix (she loves to bake)
Various Craft Kits (at $.99 a pop, who can say no)
Bunny Glasses (futures so bright, I gotta wear bunny shades)

Ok, onto the stuff I did make!


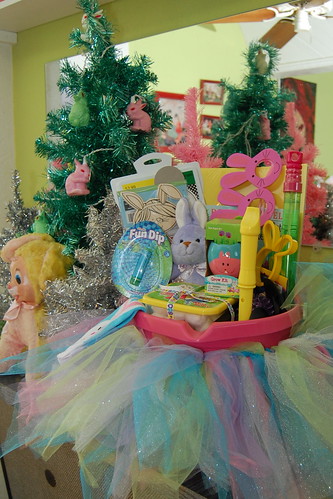
First up, the obvious is the Easter colors tutu. Tallulah is going through a ballet phase and often wants to listen to classical music and dance. I love to encourage a little dramatic play. I made a Halloween no sew tutu a few years ago with a full blogged tutorial.


To go along with the dance theme I also made some ribbon rings. I have seen these all over Pinterest and thought they would be fun for Tallulah.
SUPPLIES
Wooden Rings
Ribbon
Crafty Chica White Paint
Paint Brush
Liquid Fusion Glue


These were super easy. First I removed the small screws that came in my wooden rings. You could also use the metal rings from Mason Jars or shower rings. Next I painted my rings white. After the paint dried I attached some festive Easter ribbons. I used a little Liquid Fusion Glue to hold my ribbon in place. Let the maypole dancing begin.


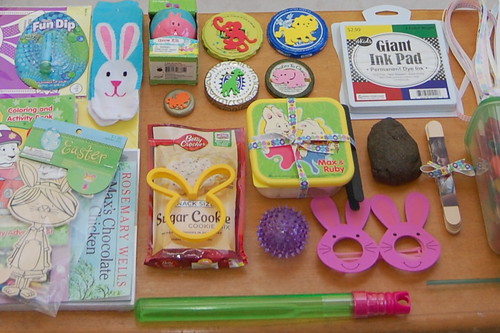
I finally found a way to recycle all those old lids I had been saving. Using foam stickers I made them into stamps. I also bought an extra large stamp pad to put in the basket.


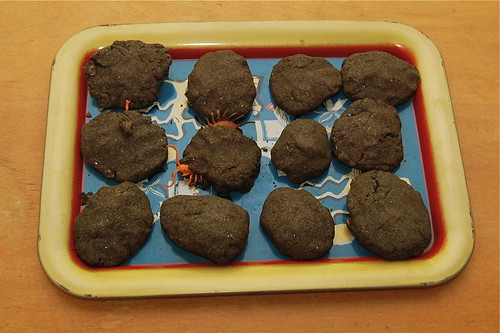
Tallulah loves dirt and dinosaurs so a batch of dinosaur eggs were in order. I used a recipe from Projects for Preschoolers.


I have long dreamed of making a popsicle stick puzzle since I first started seeing them floating around on Pinterest. I probably originally saw the idea in Halloween theme from Saltwater Kids. I used a photograph from Easter last year to make my puzzle.

SUPPLIES
Craft Sticks
Aleene's Tacky Double-Stick Sheets
Craft Knife
Masking Tape
Photograph


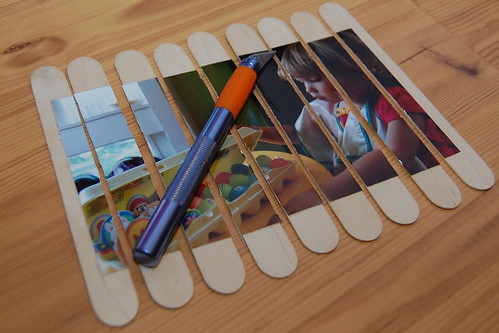
The first thing you need to do is line up enough craft sticks so that you can fit your photograph on top of them. Line your sticks up super straight and add a little tape to keep them together. Flip the sticks over. Add a sheet of Aleene's Tacky Sticker Sheets to the back of your photo. I had to use 1.5 sheets for mine. Center your photo over the sticks and press. Flip your sticks back over tape side up and using a craft knife cut the sticks apart. Remove the excess tape off the back, tie in a bow and stick in your Easter Basket.


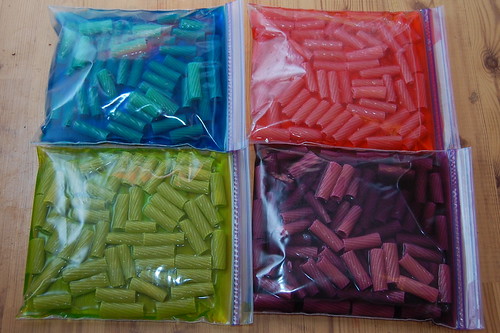
Yet another project I found on Pinterest is dyed pasta. Most folks seem to fill sensory bins with it, but Tallulah like her mother, loves to make jewelry. We have been on a kick of making straw necklaces around here and I thought we would upgrade from white straws to colorful rigatoni. All you have to do is place uncooked noodles, food coloring and rubbing alcohol in a baggie for a few hours. I put them in a tupperware container with some yarn for threading.


I went a little crazy at Target when they had Max and Ruby stuff in the dollar aisle. It is Tallulah's favorite show therefor making it also Baxter's favorite show since he has no choice. Anyway I was glad I loaded up on the little pieces of tupperware. This cute little container is filled with cotton balls and wrapped up with a set of small tongs. I'm going to tell her it is a game called 'bunny tails' where she picks up the bunny tails with the tongs and moves them to another container. Fun and practices motor skills and hand eye coordination.

So there you have it. My husband will say I went overkill as he always does (and most times he is right). However, I think this is a wonderfully entertaining candy-less basket to behold. What are some things you are putting in your toddlers Easter basket? I still have another week and a little bit of room left.

Remember to stop back by next week when I show you the baby Easter basket I am making for Baxter!


Looking for other suggestions of handmade toddler gifts that would go great in an Easter basket? How about playdoh, lacing cards, bubbles, soap, wash rag puppet, crayon cupcakes, rubbing plates - check out the kids section for more suggestions.

***This is a sponsored post by I Love to Create - I was compensated & given free supplies. Mama has gotta pay the bills somehow and really who in their right mind would say no to free craft supplies***

Visit us on Facebook!
Craft on!

Nature Collection - A-Craft-A-Day with Pattiewack for National Craft Month!

One of the things I like about a nature walk, is picking up the things that interest me and I want to examine more closely.  But then what to do with them?  Kids are the same way, and this idea is great since it's a recycled pizza box, a sheet of paper, some post-it labels, and your finds.  There's more ideas on iLoveToCreate.com and tons of kids crafts.  See you again tomorrow, and the rest of this month for National Craft Month!


Visit us on Facebook!
Craft on!

DIY Screenprinting Video with the NEW Tulip ScreenIt!


Screenprinting is not hard, when you use the NEW Tulip ScreenIt from iLoveToCreate!

This quick screenprinting tutorial was so much fun to tape at the 2012 CHA Tradeshow in January.  It was shot by the folks at When Creativity Knocks, and is one of the 'manufacturer must haves' at the trade show. It's actually an introduction to this really amazing new machine that we are happy to announce.

I'm serious when I say that it's super easy to do screenprinting with this fabulous ScreenIt machine, and I will be using one of these at home and at iLoveToCreate for cool t-shirts, totes, home decor, and more!  You'll need to check back later for the date on when it will be available on our website, and some really fun projects, so be on the look out for it!

Visit us on Facebook!
Craft on!

Wednesday, March 28

Tutu Dress-up - National Craft Month with Pattiewack

 
Little girls love wearing tutus, don't they?  And this little dress-up outfit is too-too fun!  I did a graffiti shirt, hair band, and over-the knee socks with vibrant colors, with a little attitude.  You can find all the instructions and supplies on iLoveToCreate.com and pick the colors your tutu wearing girlie girl will love.


Visit us on Facebook!
Craft on!

iLoveToCreate Teen Crafts: Spring Flowers Felt Make-up Bag

Visit us on Facebook!
Craft on!

Avalon Potter for iLoveToCreate Teen Crafts
Spring Flowers Felt Make-Up Bag
"Teen crafted, mom approved."

Avalon has a small collection of make-up all mixed up in a cluttered drawer, so this was a perfect way for her to get it all organized. This project was all her idea, I just helped with some advice and am posting the instructions! It is so easy to turn a few pieces of craft store felt and some ribbon into a delightful decorative pouch using Aleene's Tacky Glue. You can style this however you choose, I love the chocolate brown with the pops of orange and fuchsia Avalon selected.


Materials

Brown Craft Felt
Hot Pink Craft Felt
Fuchsia Craft Felt
Genevieve Gail Boho Felt Flowers (1 die cut orange and one solid yellow)
3/8" Fuchsia grosgrain ribbon (Offray)
5/8" Medium rick rack orange (Simplicity)
1 Tulip Glam-it-up blue metallic crystal
Aleene's Super Thick Tacky Glue
Layered flower die
6 grommets

Tools
Die Cutter (I used a Sizzix Big Shot)
Grommet setting tool (I used a Crop-a-dile)
Scissors


The body of the bag is a full piece of brown felt folded in the middle. The bottom flowers are pre-cut, use die cutter to cut the layered top flowers. Glue and stack flowers.


Add grommets to sides and center of pouch on both sides using grommet setter. Glue edges of pouch together, add flowers and rick rack ribbon trim with glue. Attach crystal to center of flower with glue. Place something inside of pouch and on top of flowers to prevent glue seepage and lay under a large book and allow glue to dry.


Add ribbons. Tie ribbons through grommets at both sides, you can secure this with a dab of glue and optionally add Aleene's Stop Fraying to ribbon ends. Tie a knot in a 6" segment of ribbon and thread into grommet in center, repeat for opposite side. This will allow you to tie pouch closed.


Enjoy!

Tuesday, March 27

Upcycled Paperclip Chain Necklace!

Here's to a colorful and elegant twist on that old office cube classic: the paperclip chain. I was inspired to make it after spying a similar necklace that my friend Rebecca was wearing in the office a couple of weeks ago.

When she told me that she scored the amazingly simple accessory while on vacation in Cambodia earlier this year, that's when I experienced the creative flash of an I-could-so-make-that moment: Seeing as I won't be able to afford travel to Cambodia anytime soon (I wish!), I decided to set out on a far more affordable trip...to the local 99-cent store!


Materials:
-box of paperclips
-all-purpose scissors
-ruler
-woven plastic material (laundry bag from the dollar store, an Ikea shopping bag, all-purpose tarpaulin from the hardware store)*
-Aleene's Jewel-It Embellishing Glue


Make it:
1. Link 38 to 48 paperclips in a chain. Hang the chain around your neck, see if you like the length, and add or subtract paperclips to your liking.

2. Measure and cut one 1 1/2" by 1 1/4" rectangle from the woven bag. Use that rectangle as a template to cut more rectangles. Cut as many rectangles as there are paperclips in your chain.

3. Select one rectangular piece. Fold the long sides in 1/4" and crease. Then fold the piece in half lengthwise, crease it, and unfold. Fold the two short ends into the center line and crease again.

4. Refold the center crease, pinching the piece around the center of a paperclip in the chain to create a sort of "bead."

5. Squeeze the glue generously along the open edge (the motion is sort of like mustard on a hotdog). Pin it in place with a spare paperclip to dry.

6. Repeat with the remaining rectangular pieces until every link on the paper chain is covered by a bead. Let the beads dry completely before removing the spare paperclips.

7. Remove the paperclips, touch up any finicky beads with an extra dab of glue, and repeat the entire process as many times as desired to create multiple colorful chains.

8. Drape them around your neck, and off you go!

Happy National Craft Month!! 

*Incidentally, these necklaces are made from the same sort of bags that Rami made his chic challenge-winning Project Runway All-Stars dollar store dress from, below! What a cool material to play with.


All photos by Megan Nicolay except for the Project Runway screenshot, via SheKnows.com.


Visit us on Facebook!
Craft on!

Pencil Crafts - with Pattiewack for National Craft Month!

Who knew pencils could be so cute!  Kids go crazy for crafting when you have a project that's this fun.  I loved making these with craft foam.  And of course, the googlie eyes are the best part.  For a printable project page, go to iLoveToCreate and get crafting!

Craft on!

Monday, March 26

Dolls! Cool2Craft TV


It's super cool! Cool2Craft TV March 26, 2012: Dolls! Dolls! Dolls! - We're celebrating creativity with doll themed ideas this week! EcoHeidi Borchers is sharing her eco-creativity by transforming a tube of Aleene's glue and a cardboard box into a Glue Tube Art Doll on a Textured Glue Throne featuring Aleene's Platinum Bond Super Fabric Textile Adhesive, Savannah Starr is glittering up doll shoes with Aleene's Tacky Glue Pen, Tiffany Windsor crafts a free-pour art doll, Candace Jedrowicz add cool texture to an eco robot and Heather Valentine stitches up a super cute doll that you and the kids will love.
It’s easy to watch the Cool2Craft TV Channel right from your computer. Airing Monday March 26, 2012 9am Pacific/10am Mountain/ 11 am Central/ Noon Eastern. Go to http://cool2craft.com and you'll see the Livestream player and chat box. See you Monday!
Visit us on Facebook!
Craft on!Craft on!

Water Bottle Carrier - A-Craft-A-Day with Pattiewack for National Craft Month!

What I loved about making this water bottle carrier, is the BUGS!  My grandson Zane is fascinated with bugs, and I think he would love this to poke his water into and take to kindergarten.  You could even make it larger so you could stick a snack in there too.  If you need a pattern to paint your bugs, go to iLoveToCreate.com and while you're there, check out the oodles of crafty projects that kids would love.


Visit us on Facebook!
Craft on!

Sunday, March 25

Hipster Tie Dye Bag - National Craft Month's A-Craft-A-Day with Pattiewack

Tie dye isn't just for t-shirts anymore, and the quilters have gotten on the tie-dye-wagon, too!  These blocks of tie dye are really cute when they're sewn with blocks of plaid fabric.  This is a bag you'll want to make duplicates of, so you can share with your friends.  It's the perfect size for books, or a fun day at the beach.  You can go over to iLoveToCreate and pick up your dye and all the details.
See you again tomorrow!
Pattiewack

Visit us on Facebook!
Craft on!

Saturday, March 24

Teacup Bird Feeder - A-Craft-A-Day with Pattiewack craft for National Craft Month!

This teacup bird feeder is so preeeety, you'll want to make lots of them for your yard or to give away this Spring.  You'll have fun going through your mismatched dishes or garage sales to find the cups and saucers.  For more details about the adhesive and how to attach the copper pipe to the bottom of the saucer, go to iLoveToCreate.com where you'll find tons more projects, and a place to shop. 


Visit us on Facebook!
Craft on!
Clicky Web Analytics
Pin It button on image hover

Subscribe to our newsletter

* indicates required
I am interested in products and inspiration for...
Close