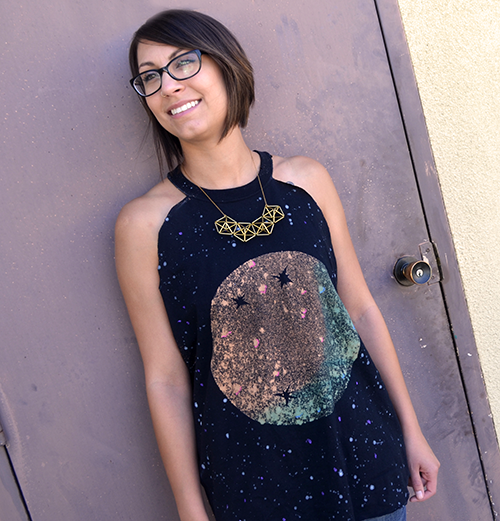
When I was first asked to create a galaxy shirt, I wanted to create
something different from what I had seen before. My original thought was to create
a galaxy inside of the shape of Saturn, but once I bleached the shirt, I
realized it looked more like the moon and decided to just work around it.


– Tulip One-Step Spray Dye Kit (Brights)
– Tulip Fabric Spray paint (Snow)
– Tulip Soft Fabric Paint in pink, purple and neon blue
– Large black Gildan t-shirt
– Freezer paper
– Fabric Scissors
– Craft Knife (like an X-acto)
– Light-colored chalk
– 50/50 Bleach/water mix in a spray bottle
– Paintbrush
1) First you’ll want to cut a sheet of freezer paper large enough to cover your shirt then draw & cut out a circle in the middle of the sheet with the craft knife. 2) On another sheet of freezer paper, draw and cut out three stars. 3) Place the circle piece aside and iron on the large sheet of freezer paper and three stars onto your shirt. Now use an iron on cotton setting and iron-onto your shirt. 4) Next spray a bleach/water mixture over the open circle on the shirt and let it sit until you have the desired look you want. It will remain more of a red/brown color. Remove the freezer paper then rinse the shirt out and let dry.
5) Add water to the Turquoise dye bottle and shake. Spray only the bottom
right section of the shirt to create the look of shadow. Let it set for 6-8
hours and rinse and dry again.
6) I used the circle
freezer paper to cover up the moon shape for the next step. I removed the top
to the Tulip Fabric Spray paint and splattered the paint all the around the
shirt to create the look of stars. 7) Once that was dry I went back with a brush and used Purple Tulip Soft Fabric Paint and added dots to add more color to the starry night. 8) I used the last two Tulip Soft Fabric Paint colors, Pink & Neon Blue and used them to accent some of the craters on the the moon.
9) Use a piece of chalk and draw guidelines for cutting to make a halter-style tank. 10) Use your fabric scissors to cut along those lines. Don't worry, the chalk comes right off!
11) Flip your shirt over and repeat the chalk-drawn lines to resemble the front. 12) Cut with fabric scissors.
13) Draw a chalk line on the bottom and scallop the edges off. 14) Now cut! Yay! You're done!
I paired it with a cool himmeli necklace that my friend Alexa bought for me for my birthday. I thought it was the perfect touch to add to my galaxy shirt!

Here's a closer detail of the finished look! I love how the shadow turned out on my moon :)
I plan to pair this shirt with a pair of black legging and some turquoise flats! I can't wait to wear it for a night out with my friends.
Head over to our TIE DYE YOUR SUMMER site for even more inspiration, how-to's, and fun videos to get you mega-inspired for some DIY summer fun!


8 comments:
Very creative! Thank for this awesome idea.
The moon or Saturn is just beautiful! I didn't know bleach can do that! Thanks for sharing this :)
Very Cool!
prescription gaming glasses are designed to combine stylish looks with top-quality eye protection.
Stay focused on the game with syghtglass latest glasses collection which block blue light micron anti-blue ray protection eye strain. Buy best computer screen glasses uk.
Greetings! Very useful advice within this article! It’s the little changes which will make the largest changes. Thanks for sharing! 야한동영상
Click this link
야설
Many thanks for starting this up. This website is something that is required on the web, someone with a bit of originality. 한국야동닷컴
Click this link
국산야동
What an interesting story! I'm glad I finally found what I was looking for Excellent reading 중국야동넷
Click this link
야설
What colour did you use to splatter the stars? The snow white? It's not clear. Thanks.
Post a Comment