
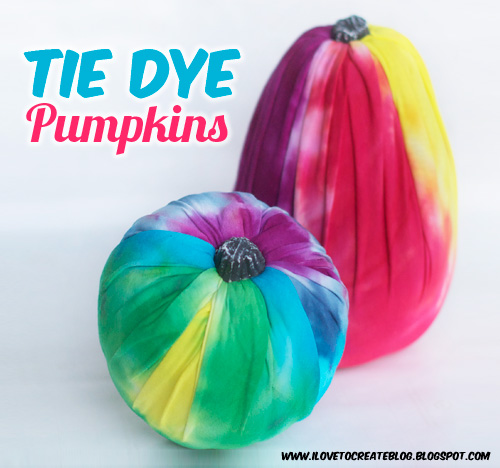
If you didn't know us here at iLoveToCreate, one thing we absolutely love is TIE DYE! So we jumped at the chance to make some super cool pumpkins using leftover tie dye fabric from our many Tulip One-Step tie dye endeavors. Are you ready to step outside the box this Halloween with pumpkins that pack a HUGE punch? Here's how you make them!
What you need:
What you do:What you need:
- – Tulip® One-Step Tie-Dye Kit™ (Vibrant Colors kit)– Aleene's® Fast Grab Tacky Glue™
– Fabric Scissors– Craft knife– Self-healing cutting mat (to protect work surface)
– (2) XL white T-shirts - 100% cotton– (2) Foam pumpkins - small and medium– Measuring tape
1. Tie dye cotton shirts using desired technique and instructions from Vibrant kit instruction guide. Launder as instructed.2. For small pumpkin, cut an 18” square from the tie-dyed T-shirt material; for large pumpkin, cut a 22” square of dyed fabric. Lay flat.
3. Carefully cut stems from pumpkins using craft knife. Set aside.
4. Lay fabric squares flat on work surface, right sides down. Center coordinating pumpkin on each fabric piece.
5. Pull the fabric up tightly around pumpkin and wad into a ball at the top of the pumpkin, then insert it into the hole left from the stem. Stuff all the fabric into place; you may have to reposition the fabric a few times to get the wrinkles and folds to fall into place as desired.
6. Use your craft knife to shave off more foam from around the base of stem. Lightly press into the hole to make sure it fits. Cut off more around the stem if needed.7. Add a line of Fast Grab Tacky Glue around base of stem and press into place back on top of pumpkin. Let dry.
Here's a video our resident pumpkin expert Alexa (who also created these pumpkins) did that explains steps 5-7 of this process. She just uses a different type of fabric from the tie dye.

And here's the finished result...bright, bold pumpkins you might even want to display after Halloween!

What a cool way to break away from the traditional pumpkin this year!

No comments:
Post a Comment