

I don't know about you but my favorite time of the year is the SUMMMER! I love the sun, the smells and wearing fun whimsical clothes. One thing about me is I like to create my own clothes and add personal touches to them that you will not find anywhere else. Today I will show you a fun technique using wax and tie dye. This tutorial will get you thinking of so many other things to create, I promise!
Let's get started...

You will need:
*Tulip One Step Tie Dye
*Fabric Fusion Permanent Fabric Tape
*Black and White Pants
*Scissors
*Candle
*Lace

If you are not familiar with Tie-Dye then you have to check this out. It's my favorite dye mainly because the powder comes inside of the bottle and all you have to do is fill the bottle with water! It's that simple.

I love this brochure that comes with the tie-dye. It gives you tons of different examples on how to dye your clothes.

To start you will need to get a pair of gloves, rubber bands and your dye. The good news is, all of these things come in the pack.


Step 1: Fill your bottle with water to the black line then shake till it's all dissolved.

Step 2: Lay out the pants you want to cut on a flat surface. If you have another pair of shorts you like, place them on top of the pants.

Step 3: Grab a good pair of scissors and cut your pants using the bottom of shorts as a template.

Tadah! We now have cute lil shorts!

This next technique requires candle wax. I know what you are thinking, FUN!
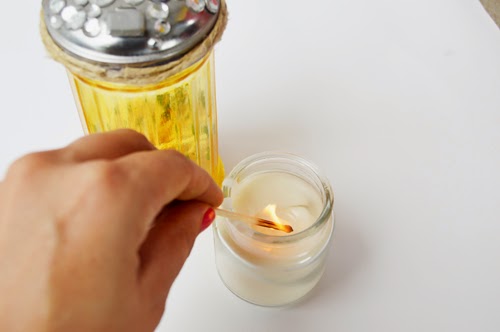
You can let you candle sit for a minute to create a puddle of wax or you can hold a match inside of the candle and create hot wax quickly.

Step 4: Raise the candle high in the air and slowly allow the wax to fall from the candle while splattering onto the your jeans. Make sure to move the wax all around the shorts.

Your shorts will start to look like this. Not to mention they will start smelling real good! Wanna know what the wax will do? When you dye your shorts wherever there is wax the dye will not touch the jeans.

Step 5: Grab your rubber bands and tie the shorts together like the picture below. I am using a pair of black and white pants so if you don't have any you can create your own.
Simply get a pair of white pants, add strips of tape from the top to the bottom creating long sections, then paint with black tulip fabric paint. You can make your stripes as big or small as you like.

Step 6: Lay your shorts on a flat surface and start squirting your tie-dye on your shorts.

Step 7: You can leave a little bit of white showing or you can completely cover all of the white spots.

Step 8: Decide what other colors you will be using and finish dying the shorts.

Gradually the dye will bleed into the other colors and create an ombre effect. Leave them bundled up for a full night, or a full day in the sun.

Step 9: Unroll the shorts and make sure they are completely dry. If they are not you can throw them in the dryer.

Step 10: Use a heat tool, or a blow dryer and heat up the wax while blotting with a paper towel or wash cloth. It heats up very easy with direct heat on them.

This is what they will look like once all of the wax it off! Cool huh! Notice all of the white spots... That is where the wax was!

On to the next step. I am using Aleene's fabric fusion permanent fabric tape. I love this stuff because it's double sided and does not require a sewing machine or an iron. Hello! I will take that any day.

I love how the roll is compact and you can literally keep it in your purse for last minute emergencies.

Step 11: Lay down the fabric fusion along the bottom of the shorts.

Step 12: Press firmly then peel the paper off of the shorts. What will be left behind is a clear tape.

Step 13: Carefully start placing the fabric you want on the bottom of the shorts.

This is what they will start to look like. I think it's super cute and dresses them up nicely!

Here is the finished product. What I love the most is that I will never find anyone else wearing these exact shorts. You can pair these with a white button down, a black tank top, a blue jean top, boots or flip flops. It's very bohemian and I love them that much more!

Love, Love, Love!

I hope you enjoyed this tutorial and if you have ANY questions feel free to leave them in the comment section below! Big hugs! Hey! Wanna learn how to finger knit, come see!
Huge glittery hugs, JADERBOMB


2 comments:
Jade, I love these!
I am happy with your article, Fajartoto think your website is pretty good. Many articles are very useful for everyone. I am sure your website will grow in the future. Fajartoto will always support your website, hopefully more advanced. keep the spirit... thanks
agen togel terpercaya
togel online
bandar togel terpercaya
situs togel online
bandar togel terbaik
fajartoto
judi roulette online
situs togel terbesar
bocoran togel sgp
live draw hk
Post a Comment