Showing posts with label DIY apron. Show all posts

Thursday, April 28

I Love to Create Live Plastic Bag Craft Smock for Kiddlets


I hope you were able to tune in to I Love to Create Live today. Don't worry if you missed it, you can catch the whole thing on Ustream. In case you are just now hearing about this whole shindig, let me fill you in. I Love to Create sent several crafters, myself included, a swag bag full of their crafty goodies. The challenge was to make something unique and different. Leave it to me to be drawn to not only the supplies, but also the hot pink bag it came in.


Feast your eyes on the selection of goodies that arrived on my doorstep. Where has that owl stencil and the Beads in a Bottle been my whole life? I was inspired and so was my daughter Tallulah. She loves to paint and craft with mommy so she immediately started helping me sort through the box. The first thing that came to my mind was to recycle the pink plastic bag and make her a craft smock.


The problem is as you know I am not much of a seamstress. That being the case my mother, AKA my hero, offered to help me out. I mailed my bag of goodies and my smock plan to North Texas and hoped for the best. What she sent back was amazing! I just asked her to sew me a smock, but my mother that crafty devil went a step above and beyond. For the bias trim she created a polka dot using Tacky Glue as a resist. She squirted various dots of glue on the trim and once it had dried to point of skimming over she sprayed the bias tape with Tulip Spray Dye. She then dried the dye with a hair dryer and washed the glue dots off in the sink. It's like Tacky Glue batik!
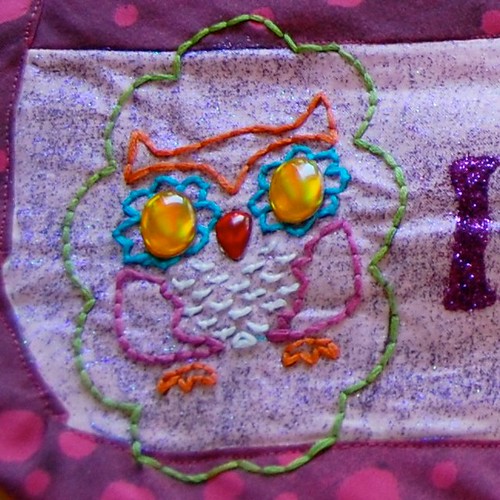

When the smock returned to Austin there was a giant white pocket for me to adorn. I painted the pocket with the lavender Tulip Soft Fabric Paint first. Next I added a top coat of Tulip Fashion Glitter Shimmer Fabric Paint. Once the paint had dried I applied the letter and owl stencil to the smock and this is when disaster struck, sort of.
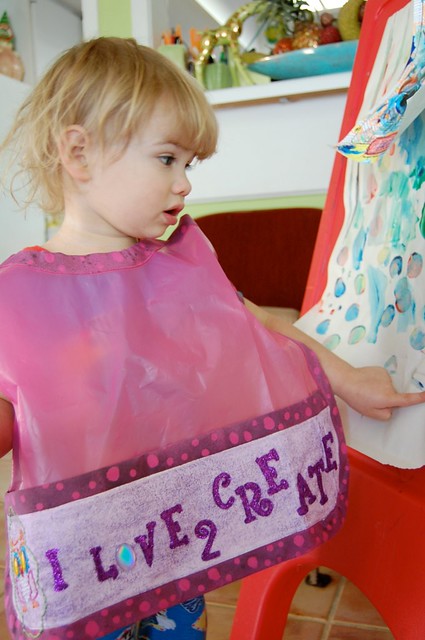

I had visions of embroidering everything on Tallulah's new craft smock, but that didn't happen. Please note Tallulah's unbrushed hair and Thomas the Train PJ's. I made the poor kid model while she was sick. when you have a sick toddler and a newborn, embroidering is a little tricky. I had already finished the owl, but since I was under a deadline for the live cast the letters were not going to make it. No worries I just painted them with Tulip Fabric Paint and covered the wet paint with tulip Fashion Glitter.

Tallulah is on the mend and seems to like her new smock. Hopefully we will be giving it a test run this weekend!


Check out more I Love to Create projects right here.
Visit us on Facebook!
Craft on! Click here for today's daily giveaway!

Wednesday, February 23

ILoveToCreate Teen Crafts: Kiss the Cook Apron

Visit us on Facebook!
Craft on!Click here for today's daily giveaway!

(Mom says, "Avalon does it again with this super cute apron! Am I a proud mom, you bet I am!")

ILovetoCreate Teen Crafts

Kiss the Cook Apron
Avalon Potter
"Teen crafted, mom approved."

Sticking with the baking theme, this weeks project is a “Kiss the Cook" apron! I love to bake and I was in need of an apron so what better way then to make my stylish chef couture into something everyone can wear. So stick that soufflĂ© in the oven and get to work!

Materials

Iron on transfer paper
Tulip Glam it Up Iron-on Studs
Apron (Preferably white)

Tools
Tulip Cordless Heat Setting Tool
Iron
Computer/Inkjet printer
Scissors

Instructions

1. Gather all of your materials.

2. Go onto your computer and chose the size and font of your letters in Microsoft Publisher or your program of choice.

3. Print it out onto the transfer paper. Make sure to follow the directions for printing and click on “mirror image” in the settings. I found the lips in clip art.

4. Heat up your iron to high and set your lips and words in a position you prefer.

5. Iron your words and lips to the apron. You might want a little help with ironing. On the first try the transfer burned. Actually my Dad did the ironing on the first one and burned Mom’s new kitchen table! (Mom here, "ARGH...can't I ever have ANYTHING nice? Wah, wah.") To protect the surface underneath put a pillow case or a cardboard t-shirt form under your apron while ironing.

6. Place the colored studs around the lips and words; bright pink around the lips, black around the words, and if you have a pocket or other major detail use red around it. Set the studs with the Tulip heat tool or your iron.


Wednesday, December 22

Rudolph the Retro Reindeer Apron

Designed by Cheryl Ball
Go retro this Christmas with a blast from the holly jolly cinema past! Capture the magic of everyone’s favorite reindeer tale on this hostess apron with Tulip® Fashion Glitter® and Tulip® 3D Fashion Paint™.

Materials List

  • Tulip® Fashion Glitter™

    23550 Silver Fine Jewel
    23551 Pink Jewel
    23555 Apple Red Jewel
    23559 Emerald Fine Jewel
  • Tulip® 3D Fashion Paint™

    65000 White
  • Tulip® Fashion Glitter Bond™

  • Miscellaneous

    •   Self-adhesive shelf paper
    •   Low-tack masking tape
    •   Scissors
    •   Permanent felt pen
    •   Foil
    •   Stiff brush
    •   Sewing pins
    •   Scratch paper
    •   Sewing machine with matching thread
    •   Grosgrain ribbon – 1½” wide fuchsia – 3 yards
    •   (2) XL T-shirts – white and red
    •   Measuring tape
  • Patterns


    Instructions

    1. Use scissors to cut across red and white shirts, just under sleeves.
    2. Cut red shirt along one side seam, determine width of apron then cut off excess. Cut white shirt on side seam, measure and cut to fit on front as shown.
    3. Use sewing machine to sew along side seams on both pieces. Layer pieces together and pin along top edge to secure.
    4. Cut a two-yard length from ribbon then cut another piece 17” long.
    5. Find center of long ribbon and place a pin. Find center of apron then pin ribbon in place. Measure out 8” from each side a place a pin. Equally pleat and pin top edge of apron to fit within pins. Center shorter section of ribbon to backside of apron, fold ends of shorter ribbon under at back then pin in place, sandwiching apron between ribbon strands. Sew along edges of ribbon on all four sides, creating waistband with long ties.
    6. To create stencil, place a piece of shelf paper slightly larger than design shiny side up over pattern, then use felt pen to trace over design. Carefully cut out inside of designs, leaving edges intact.
    7. Place apron flat on work surface and slip scratch paper under white fabric. Carefully remove paper backing from deer stencil then press into place where shown. Run a fingernail along inside cut edges to prevent paint seepage.
    8. Squeeze a puddle of Glitter Bond onto foil. Use flat end of wedge sponge to apply an even coating within stencil. Immediately pour Apple Red Glitter over glue then use fingers to lightly press glitter into glue. Let sit for about a minute then lift apron and pour excess glitter onto scratch paper to be reused. Carefully peel off stencil. Let dry.
    9. Cut out tree stencil, press in place where shown then add Green glitter. Pounce off excess and remove stencil.
    10. Use sponge to pounce glue under trees and around deer as shown. Sprinkle on Silver Glitter then shake off excess.
    11. Use masking tape to tape off a 1” strip along lower edge on red apron. Working in short sections at a time, pounce on glue then add Pink Glitter. Complete strip then pounce off excess glitter and remove tape. Let dry.
    12. Start flow of White Slick 3D Fashion Paint on paper towel, using an even pressure on bottle for a smooth line. Create several snowflakes where shown then sprinkle on Red and Pink glitter. Let thoroughly dry then pounce off excess. After everything is thoroughly dry use a stiff brush to brush off all excess glitter.
Visit us on Facebook!
Craft on! Click here for today's daily giveaway!

Sunday, September 19

Big City Apron


Big City Graffiti Apron
Designed by Kathy Cano-Murillo
When it comes to sewing, any kind of fabric goes. So why not basic cotton dishtowels transformed into a colorful apron?


Craft on! Click here for today's daily giveaway!

Tuesday, March 23

Pops of Polka Dot Apron


Make your time in the kitchen extra fun with pops of colorful polka dots! Stitch this vibrant apron with little effort and add floral embellishments with Aleene’s® Fabric Fusion™.

Materials
Aleene's® Fabric Fusion™ Permanent Dry Cleanable Fabric Adhesive
– Sewing pins
– Iron
– Pinking shears
– Low-tack masking tape
– Orange Mini Dot – ¼ yard
– Scissors
– Jumbo rick-rack – bright pink
– Red Dot Tonal – ¾ yard
– Yellow Transitions – 1/3 yard
– Sewing machine
– Ruler or tape measure
– Green Fancy Floral – ¼ yard
– Lime Polka Dot – ¼ yard
– Fuchsia Polka Dot – 1/3 yard
– Craft brush – ½” flat
– Thread to match
– White Lace – ¼ yard
– Needle
– Paper towels
– Foil

1. Measure and cut a 30” x 18” rectangle from red fabric. Fold short sides over ½” then another ½”, iron flat then sew in place.
2. To create bottom hem, fold over ½” then 1” and sew in place.
3. To create apron ties, cut two 5” x 30” strips of pink fabric. Fold over lengthwise, right sides together, and sew along sides, sewing an angle at one end and leaving other end open. Trim seams, turn right side out and iron flat.
4. Measure and cut two 16½” x 3” yellow sections for waistband. Fold over ½” along one long edge and iron flat. Lay one of the yellow waistband pieces right side up on work surface and pin pink apron ties at each end of piece. Pin other yellow waistband piece right side down on top of first piece, sandwiching ties in between, then sew along one long side and two short sides. Trim seams, turn right side out and iron flat.
5. Pin top of apron inside open end of waistband, folding equally spaced pleats at the top of apron until excess fabric fits. Sew in place. Hand sew folded edge on backside of waistband in place on apron, covering sewing line.
6. Layer several pieces of red fabric then pin large scallop pattern in place. Use pinking shears to cut around pattern. Cut six red scallops then repeat step, creating two smaller sections from pink, orange and yellow. Refer to photo.
7. Squeeze a puddle of Fabric Fusion on foil. Place a pink section right side down on a paper towel. Dip flat brush into glue then brush on a thin, even coat to back of fabric piece. Carefully center on red section then press to secure. Repeat with all scallop pieces. Let dry.
8. Use pinking shears to cut a 4” circle from orange and red fabric. Pin each section onto lace then loosely cut around lace, leaving a wavy 1” border around each.
9. Flower: Cut a 4” x 30” strip from pink fabric and a 3” x 30” strip from yellow. Fold in half lengthwise, placing wrong sides together, and iron smooth. Use a needle and thread to sew a basting stitch along cut edge, gathering fabric along the way. Gather tightly then sew a few stitches to hold in place at other end. Roll strip, lining up edges along sewn side then sew through gathers to hold flower together. Repeat with other strip.
10. Leaves: Cut two 4” squares from green fabric then three 3” squares from lime and one 3” square from green fabric. Fold a square in half wrong sides together then bring top corners to center. Slightly overlap then hold with a pin to secure. Sew a gather stitch along cut edge. Tightly gather then add a few stitches to secure. Repeat with all squares.
11. Position scallops along hem of skirt, alternating colors and placing about ½” under hem. Glue in place. Brush glue to back of lace sections then press in place at bottom of apron as shown.
12. Position fabric circles in place then position leaves where desired. The cut edge of leaf will be covered by edge of fabric circles. Glue leaves in place accordingly. Brush glue to back of fabric circle then press in place, covering ends of leaves adjusting as needed. Let dry.
13. Glue flowers in place. Let dry.
14. Cut rick-rack to width of hem then add three additional inches and cut. Working in short sections at a time, apply a thin bead of glue to back on one end of rick-rack strip, fold 1” or so to back and hold with a small piece of tape. Glue rick-rack in place along bottom hem of apron, holding in place with tape as needed until dry.
Clicky Web Analytics
Pin It button on image hover

Subscribe to our newsletter

* indicates required
I am interested in products and inspiration for...
Close