Showing posts with label Glam it up Crystals. Show all posts

Tuesday, December 16

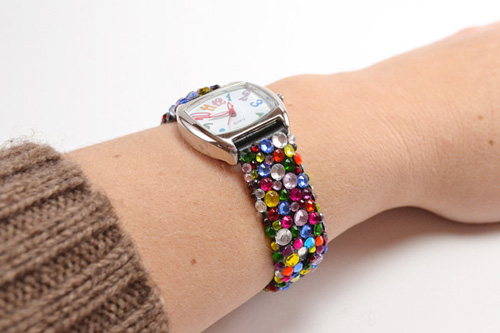
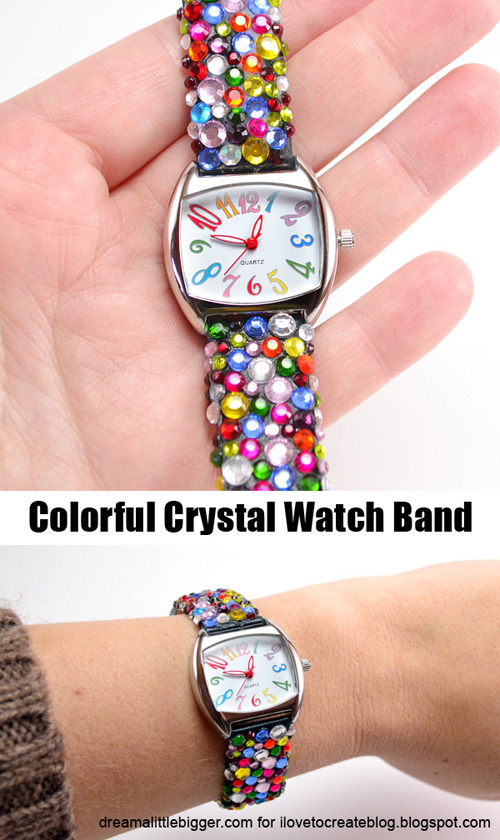
Colorful Crystal Watch Band

header-crystal-watch-band-dreamalittlebigger

I have a jumbo thing for watches. They're functional so I can wear them any time and there is something comforting about the way they wrap around my wrist. So I thought a personalized, crystallized watch band would make an amazing gift. 


Unfortunately I've decided to gift myself with this one because I LOVE it! Oops!

 011-crystal-watch-band-dreamalittlebigger

Saturday, November 22

Crystal Art Embroidery Hoop

I have a pile of embroidery hoops in my garage and decided to put them to work. Because I don't exactly have time to whip out a needle and thread these days, I went for a short cut - crystals and sequins! Perfect for this time of the year, right? 
Read on to see how I did it using Tulip Glam It Up Iron-On Crystals and Fashion Sequins!

Friday, December 21

CRAFTY CHICA: How To Apply A Crystal Monogram Using Tape

LINK

Last week I was at the iLoveToCreate headquarters in Fresno, CA hung out in the design studio all week. It's a crafter's paradise, let me tell you! Product everywhere, finished pieces all around, designers working on new projects, brainstorming meetings, product development think tanks - it is creative stimulation overload and I love every second of it!

Whenever I'm in town, my desk is next to that of Lauri Eaton's. She is a recent grad from FIDM, and is teeming with techniques and ideas. She was working on some ornaments and needed a quick way to make monograms using our Tulip Glam It up Crystals...her brilliant idea? Well, just watch the video to see for yourself!

Wednesday, December 19

MAYA IN THE MOMENT: Holiday Press-On Nails!

 
I've been wanting to try all kinds of nail art but the problem is that I can't grow my nails long! I was looking on Pinterest the other day and saw that a lot of people are buying the press-on nails and decorating them. You can buy a set of 100 nails for under $6 at the grocery store, that is right in my price range!

What I like best about this method is that you can decorate the nails on a table instead of on your fingers, which gives you more control. And you can pop them on and off as you like. Think of them as jewelry that you can make and switch in and out as you wish.

You'll need blank nails, nail glue, plus nail polish. Then get some Puffy Paint, Tulip Tweezers and Tulip Glam It Up Crystals.

Here is something I didn't think of - I bought the loose nails as opposed to the ones connected to a strip of plastic. No prob, I just used a strip of Aleene's® Fabric Fusion® Peel and Stick Tape™
to hold down the nails as I painted them. Choose the nails by trying them on your finger to get the right size, trim with scissors if needed.
Paint the base coat with nail polish, then clear polish and let dry. Add a tiny dot of Puffy Paint, then use the tweezers to pick up a crystal and drop in the center of the paint. Do this for all the nails and let dry.
When they're dry, simply pop them off, add the nail glue and press on your fingertips. I decorated two sets and mixed and matched them. It's addicting! And you can do a set to give as a gift for Christmas.
I love my nails! I'm excited to make more!

Thanks for checking out my project! Come visit me on my Facebook page! http://facebook.com/mayainthemoment

And here is a Christmas song for you too. :-)


Wednesday, February 15

MAYA IN THE MOMENT CRAFT: Naughty & Nice Dog Collars

ChaCha models her new sparkly, hot pink glittery collar!
 Lady and the Tramp came out last week on DVD and it's one of my all-time favorite films! I love how the ultra pampered Lady hangs out with the streetwise Tramp and learns how to toughen up. A little bit naughty and alittle bit nice. 

It got me thinking about my two girl dogs - ChaCha and Bianca. 

I found two dog collars that would make you think they go with rowdy dogs and I glammed them up for ChaCha and Bianca. One of the has spikes and the other says "Bad to the Bone."
That way it reflects the spirit of both Lady... and Tramp too!
 Here is what you need: 
1 dog collar
 Squeeze out some of the glitter adhesive and use the brush to apply it on the collar. If the surface is not porous, then rub it gently with sandpaper so the glue and glitter will grip. While the glue is still wet, pour the glitter all over.

 Let it dry and then add dots of glue and place crystals on top of the glitter. let dry.

 OK, for the second collar, I used Tulip 3D Glitter Dimensional Paint and added dots all over and then set crystals on top of the them. Let it dry. The paint acts as a glue and gives a glittery background!


Visit us on Facebook!
Craft on!

Monday, January 17

Frilly Feather Earrings

Take your look to new heights with a pair of feather earrings bedazzled with Tulip® Fashion Art products and your glittery personality!

Materials List

  • Tulip® Fashion Glitter™

    23550 Silver Fine Jewel
  • Liquid Fusion® Clear Urethane Glue

  • Tulip® Glam-It-Up!™ Fashion Art Tweezers™

  • Tulip® Soft Fabric Paint™

    BI15799 Holiday Green
  • Tulip® Glam-It-Up!™ Iron-On Crystals™

    23078 300 Multi-color Pack
  • Tulip® Fashion Glitter Bond™

  • Miscellaneous

    •   Feather earrings
    •   Small paintbrush
    •   Toothpicks
    •   Scratch paper
    •   Foil 

    Instructions

    1. Squeeze a small puddle of Holiday Green Soft Fabric Paint onto foil. Use small brush to lightly apply a thin layer at top of earring feathering paint as shown. Let dry.
    2. Squeeze a small puddle of Glitter Bond onto foil. Dip clean brush into adhesive then very lightly brush into areas over paint. Immediately sprinkle Silver Glitter over surface and then pounce excess onto scratch paper. Let dry.
    3. Squeeze a small puddle of Liquid Fusion onto foil. Working in sections at a time, use toothpick to add a dot of glue along spine of feather as shown. Use Fashion Art Tweezers to set Iron-On Crystals into glue, starting with Blue at the top and transitioning to Green then Clear at the bottom. Add a few clear crystals randomly around top as shown. Let dry.


Visit us on Facebook!
Craft on! Click here for today's daily giveaway!

Friday, December 10

CRAFTY CINEMA: The Tourist-inspired Neck Collar

Inspiration for the necklace design! Here is Angelina, wearing the original neck collar in the film, The Tourist.

Jeweled Neck Collar

Designed by Kathy Cano-Murillo
In the psychological thriller, The Tourist, Angelina Jolie plays a mysterious English vixen that enters the life of an American tourist (Johnny Depp). But she’s not there to help him read a map or find the nearest diner. Instead she is bent on using him to help her get revenge on a former flame. There is one pivotal scene where Angelina dazzles the dance floor while wearing a gorgeous diamond-encrusted neck collar. It’s as brilliant as the plot twists in the flick. Here is a crafty DIY version of that stunning necklace!

Materials List

  • Tulip® Fashion Glitter™

    23550 Silver Fine Jewel
  • Tulip® 3D Fashion Paint™

    65079 Silver
  • Tulip® Glam-It-Up!™ Fashion Art Tweezers™

  • Tulip® Glam-It-Up!™ Iron-On Crystals™

    23123 300 Clear Pack
  • Miscellaneous

    •   Chain
    •   White felt (stiff sheet)
    •   Craft Knife
    •   Market or pencil
    •   ¾ inch circle as a pattern.
    •   Needle nose pliers
    •   1-inch round circle as a pattern
    •   Lobster clasp, jump rings 

    Instructions

    1. Use the circles to draw the collar shape on the felt. Overlap them just a bit.
    2. Use the craft knife to cut out desired areas.
    3. On three of the circles (every other one), add Dimensional Paint around the edges and use the tweezers to pick up small crystals and drop them on the paint. Let dry.
    4. Use Dimensional Paint on the remaining circles to add a line and larger crystals around edges.
    5. Coat the “x”s with the paint and pour glitter over wet paint. Let dry.
    6. Use pliers to add chain and jump rings to each end, add lobster clasp.

FREE SHIPPING through December 13, 2010. Craft on! Click here for today's daily giveaway!

Monday, August 30

'Free the Beat' Jeans


'Free the Beat' Jeans

Designed by Allee Marderosian

Walk to the beat of your own fashion-forward drum with a pair of jeans that rock! Give an old pair edgy new personality with Tulip® Fashion Graffiti™ products and a hint of sparkle from Tulip® Glam-It-Up!™ Iron-On Crystals™.

CLICK HERE FOR THE REST OF THE POST AND FOR PROJECT DIRECTIONS

Thursday, May 27

Birthday Crown-Bands!

DSC01094

My daughter Clover's 1st birthday is on friday which in our house means, time for a celebratory accessory! I thought about sewing her a Fabric Birthday Crown like the ones I made earlier this year for Craft Apparent but decided it might be fun to work up a sassier, no-sew version that would work well on her smaller head. Since Miss Clo is a little light in the hair department, she (read, I) loves headbands. Enter, the Birthday Crown-Band!

To commemorate her big 0-1, I used some hot pink vinyl along with fabric I had left over from her birth announcement collage. Whatever you have laying around your craft stash will do, though! Whip one up in no time flat and let the headgear hilarity begin!

DSC01084

Materials
1/8 yd Vinyl
1/8 yd Contrasting Fabric
1/8 yd Iron-On Adhesive
Small piece of Tulle
Hot Glue & Gun OR Needle & Thread
Scissors
Pen
Iron
Ruler or Straight Edge
Glitter Paper
Alphabet Scrapbooking Letter
Headband

How-To
  • Cut out 5"x 10" strips of vinyl, fabric and iron-on adhesive.
  • Following the iron-on adhesive manufacturer's instructions on the package, adhere the wrong sides of fabric and vinyl together.
  • Use a ruler and pen to draw the the points (see below) of the crown on the fabric side of the piece. Cut out.
  • Draw and cut out the number on glitter paper that corresponds with the year your child is celebrating. Glue on to center of vinyl side of piece, Fabric Fusion. If desired, glue a scrapbooking letter of your child's initial on top of the number. Let dry.
mosaic9844994058b57a849e8c012188b9d9c363e4d746
  • Roll piece into cylinder shape; use Fabric Fusion to glue in place. Let dry.
  • Glue Glam-it-Up Crystals to each crown point.
  • Using hot glue or needle & thread, attach a tulle bunch to headband. Repeat for crown to tulle. Let dry, then let your little royal bask in their birthday glory!
DSC01097


Crafat.Rock.Love,

Thursday, December 17

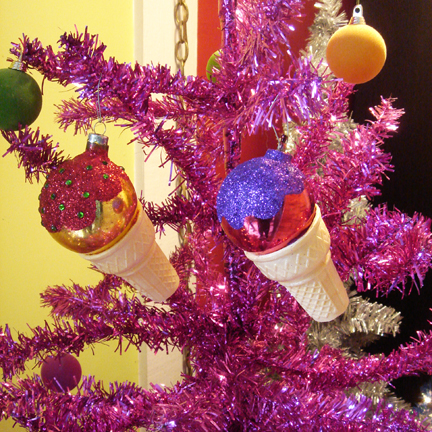
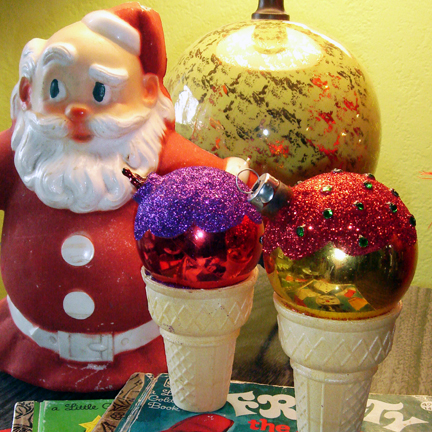
Christmas in an Ice Cream Cone


As a little girl my very favorite Christmas ornament was one that my babysitter Janet Maxwell gave to me. Janet was cool and would tell me about the U2 and Go-Go's concerts she would go to, she drove a blue car with yellow polka dots and she was a cheerleader. To me Janet hung the moon so when she made my sister and I Ice Cream Cone Christmas ornaments you know I thought they were they best thing to happen to December 25th since Rudolph.


I had long since forgotten about Janet and her crafty cones until I was recently flipping through a copy of Better Homes and Gardens Christmas Ideas for 1961. The kitschy holiday pictures and crafts had me turning the pages like this baby was straight off the New York Times Best Sellers List. Then there it was... the Ice Cream Cone Tree on page 27 and the memories of Janet and her ornament came rushing back. As you might recall from my customized cartons, loquat and pumpkin flavors and even painted tights - I kind of have a thing for ice cream cones. Maybe it all started with Janet and her ornament. Today for I Love to Create I am going to show you how to make your very own!


SUPPLIES
Ice Cream Cone
Liquid Fusion Glue
Crafty Chica Little Chica Paint Packs
Tulip Fashion Glitter
Tulip Glam It Up Iron On Crystals
Christmas Ball Ornament


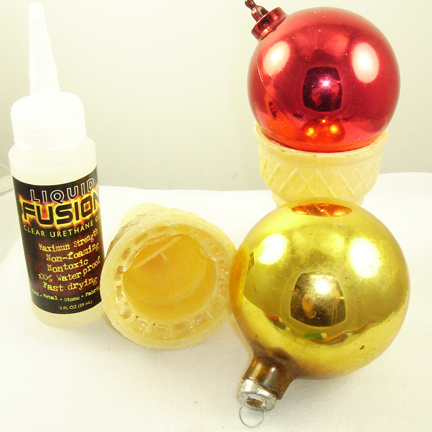
BALLS + CONE + GLUE = ORNAMENT
The first thing you need to do is glue your ornament into your ice cream cone. Remember you can use a plastic or glass ornament, solid or printed - you name it. You just want to be sure to leave the part with the hanger out of the cone. Speaking of cones if you are more of a sugar cone guy or gal go for it! I used Liquid Fusion Glue along the rim of my cone to anchor my ball in place.


WITH SPRINKLES ON TOP
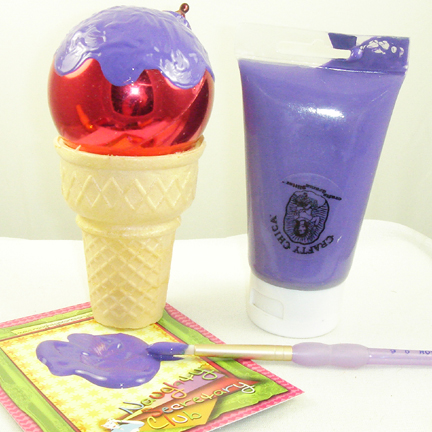
You could stop there, but why? I like to think if you are reading the Naughty Secretary Club blog you too are a firm believer in the more is always better philosophy. That being the case let's put some topping on that cone. I used Crafty Chica paint and free handed a yummy topping onto my Christmas ball. While the paint was still wet (and fairly thick) I sprinkled on Tulip Fashion Glitter. Allow to dry.


YUMMY TO MY CRAFTY TUMMY
If you are going to take the step of adding an ooey gooey glittery faux candy dipping sauce, what's a few rhinestones? Using your Liquid Fusion Glue add small dots randomly around your cone and stick in your rhinestones. Allow to dry.


DECK THE HALLS
These ornaments look good enough to eat, though I would not recommend it. Speaking of, just because you would not eat these ice cream cones does not mean someone (or something) else wouldn't. When storing your cones I recommend a zip lock bag so hungry little attic vermin don't decide to snack on your cone during the other 11 months of the year.

Buy yourself a pack of cones, some crafting supplies a cheap box of ornaments and get crazy! You can use all kinds of color combinations, leave off the glitter if you want, glue a fake cherry on top, what about a double dip cone? The possibilities are endless.

Friday, June 19

Our heat tool was on The Fashion Show on Bravo!

The other day, we were flipping through channels when we came upon our very own Tulip® Cordless Heat Setting Tool™ on Bravo's The Fashion Show! They had a great challenge where the contestants were each given a backpack with contents that described a particular high school clique. They ranged from jock, to mean girl to tree hugger. They were then asked to create a graphic tee for a student presidential election based on that clique.

One contestant had "Preppies" and decided to accent his shirt using crystals (we're not %100 sure they were ours, but the Tulip® Glam-It-Up!™ Iron-On Crystals™ were created to go hand in hand with our heat setting tool)! Check out the heat tool and our crystals in the fashion aisle the next time you are there! It's a super cool that lets you apply mini crystals quickly and easily, just like James-Paul did on his pink and black design!

Tuesday, June 9

A peek inside our crafty world!

People have often referred to our company as "the Willy Wonka Factory of Crafts", so we wanted to give you a little glimpse into our crafty world. There are a lot of products from paints to glues to bottles of glitter that we use on a daily basis, so we have to be well-stocked to meet a last minute rush project! Of course, like other crafty places, we sometimes make the occasional craft store run. Even with our many supplies, sometimes we still can't seem to find a white piece of felt or the exact pink ribbon we need!

But as far as our own products go, we usually have plenty to choose from. Case in point, check out this stash of Tulip® Glam-it-Up Iron-On Crystals™ that I noticed today at Cheryl Ball's craft desk!


I asked Cheryl why she had so many and she said, "Well, there's always one color we seem to be out of, so we have all of these on hand."

So in our craft decorating department, it's crystals that are a girl's best friend!

Check out this cool technique! We show how to apply our crystals here!
Clicky Web Analytics
Pin It button on image hover

Subscribe to our newsletter

* indicates required
I am interested in products and inspiration for...
Close