Showing posts with label ceramics. Show all posts

Tuesday, September 15

Dashes and Dots DIY Floral Mugs


Not too long ago I rocked out some polka dot and floral mugs with the awesome, permanent and totally food safe Painted by Me markers. Rob and I have talked about having lots of dishes where nothing matches but there is a common theme of black and white. Well, actually, I told him about it and he thought the idea was good enough to get behind so it's all systems go!

I'm not sure if you've ever looked for unique pieces within a very strict color scheme but it's a royal pain in the neck. Even with a color scheme as simple as black and white I'm having a hard time filling the cabinet with enough dishes for a service of 2 let alone a party of 8. And that is a good part of why I'm totally digging Painted by Me. I now have 6 mugs that match even though they don't "match" and it's perfect! Today I'm going to show you how to rock these suckers out!


Thursday, July 9

Easy Air Dry Clay Embellished Pottery


One of my crafty life goals is to learn how to throw pottery on a wheel. I can just see myself all Ghost style making ceramic magic. As a warm-up I have been playing with a lot of air-dry clay. You can make all kinds of fun things with this stuff. I thought I could embellish store bought pots by just adding a bit of clay. I was almost right, all I needed was some Tacky Glue.

Monday, May 18

Father's Day Ceramic Plate


Hi everyone! Kathy here! Today I have a really fun paint-on-pottery project that is perfect for Father's Day! It's a fun one for the kids to make for Dad! 

Here's how I made it and the story of WHY I made it!

Friday, March 13

Fused Ceramic Trays


I'm still going strong with ceramics! This time around, I played with Duncan EZ Strokes Translucent Underglazes, they are pure pigment and that got me pretty dang excited. I also had fun fusing these pieces together with Duncan French Dimensions to make jewelry or food trays!


Here is my video tutorial!

Friday, February 20

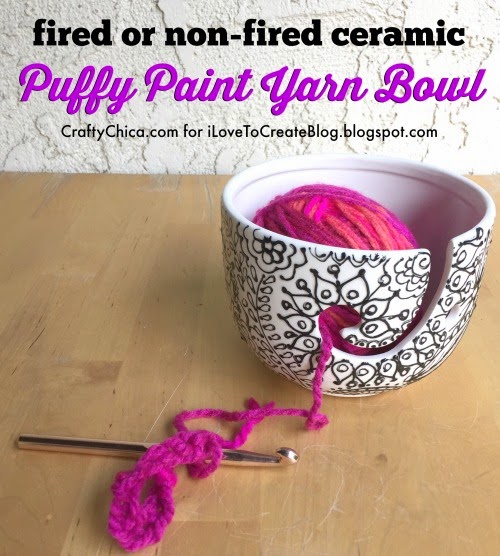
Puffy Paint Yarn Bowl


My crochet life is more orderly now that Duncan Ceramics now has a yarn bowl bisque design available for purchase! What the heck is a yarn bowl, you ask? It's a bowl with a slit cut in it so you can keep your yarn ball in place while you knit or crochet. My problem is when I sit down in front of the TV to crochet, my yarn bounces all over the floor, sometimes the dogs even grab it and all heck breaks loose. Now I can keep my yarn at my side with this bowl!

Whether you are into fired ceramics or not, you can make this bowl, read on to see how!

NOTE: To buy a blank bisque yarn bowl to decorate, contact your local Paint Your Own Pottery location.

Friday, March 7

Ceramic Affirmation Plates

I have an awesome project for you this week! Straight from mi corazon! I spent last week at the iLoveToCreate studios and taught a ceramic mug class for an event called Ceramajam. My good friend, Laura, from http://thepeculiarpalette.com taught a class too - a mixed media piece. I was lucky enough to take her class and make a cool plate! Even if you don't do fired ceramics, you can do this style on canvas or glass, whatever inspires you! Ok, let's get started...

Thursday, February 27

Some Bunny Loves the Cracked Up Chicken Ceramic Platters


Can you believe it's time to start thinking about Easter? Is it just me or does time seem to be flying by even faster than usual this year? Well, you know what they say...time flies when you're having fun. I guess that means my 2014 is off to a good start! I hope yours is too!


Thursday, December 26

Valentine's Day Pet Bowls

 I can't believe it's time to start thinking about Valentine's Day already! I'm excited, though, because this year I get to combine my love for my two favorite things....ceramics and my fur children.
  

Friday, November 16

Thursday, June 14

MAYA IN THE MOMENT: Father's Day Dish Set!


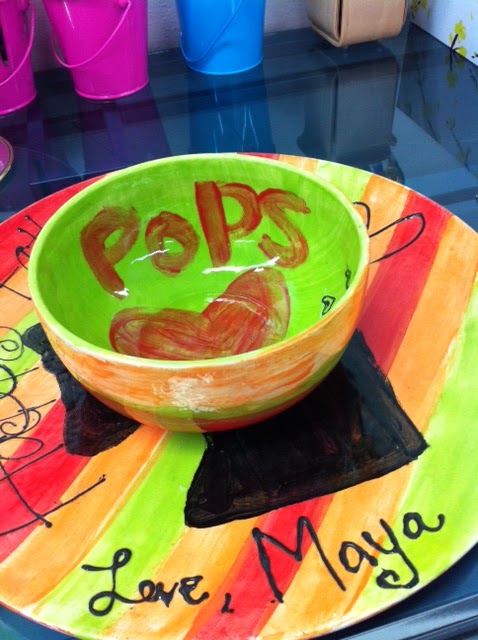
This week I got to spend some time in Fresno at the iLoveToCreate studios. I decided to make a dish set for my dad using Duncan Bisque and Concepts paints! My dad's favorite colors are red, yellow and green, so I started from there. If you like this idea, visit your local ceramic orpaint on pottery studio and do a set for your pop too! I'm not the best at drawing, but I just let myself have fun!


Here are the supplies I started with - paints, bisque, assorted brushes!

You can use blue painter's tape to create stripes. On this plate, I traced my dad's profile to make a silhouette.

Here is the bowl!


Once you finish the design, you have tomake the dishes food safe and to do that, you need to add a coat or two of Pure Brilliance. This will act as a clear glaze on top of your painted designs. Fire in the kiln at cone 6.


 Finished pieces! I love them, I hope my dad doesn't read this so he'll be surprised on Sunday!


Please visit me on my Facebook page - http://facebook.com/mayainthemoment


Happy Father's Day!!!

Friday, May 6

Crafty Chica's Talavera-inspired Painted Mug Set

It's Cinco de Mayo week, but that doesn't mean I'm into the stereotypical tequila shots. Instead, I decided to celebrate a traditional art form from the state of Puebla, Mexico (where the Battle of Puebla took place) - Talavera pottery! Known for the cobalt blue painted accents, it usually has a color story of deep reds, earthy greens and oranges. Here are directions for my "crafty chica" version so you can visit your local paint-on-pottery store and make your own!

 I started with Duncan bisque and a pencil. I also printed out some Talavera images for inspiration and guidance. Basically, it is a lot of swirls and flowers. And then I simplified because it was my first time!

 Once I finished sketching on the bisque, I filled in with Duncan® Concepts® Underglazes for Bisque and Majolica. First I filled in the inside spaces and then added the background color - and then I went over all the edges for a refined look. I added some lighter shades on top of darker shades for definition. I trimmed the ridges in blue, keeping with tradition. The last step is to outline all the designs with a VERY thin liner brush with black.

 Let it dry and then dip or brush on pure•brilliance™ Clear Glaze on both sides. Let dry.


 Fire in the kiln, cone 6.

 Here is my finished piece, I signed the bottom because I had faith it would come out just the way I wanted and I wanted proof that I made it!

Here is the saucer. I used an orange background, I was hoping for more of a tan-orange, but I still like it!


  I painted the inside of the mug Really Red.

 Close up of one of the designs.

 Happy me with my new mug! I'm inspired to paint a whole dinner set now! I hope you are too!
Visit us on Facebook!
Craft on! Click here for today's daily giveaway!

Monday, February 7

Love Begets Love Plate

Designed by Suzie Shinseki
Certainly love is something that multiplies throughout our lives and this plate exemplifies that exact sentiment. You’ll love expressing your creativity with Duncan® Oh Four® Bisque and Duncan® Concepts® Underglazes on a plate your loved ones will treasure year after year.

Materials List

  • Duncan® Concepts® Underglazes for Bisque and Majolica

    CN 253 Dark Black
    CN 291 Light Purple
    CN 341 Light Pink
    CN 507 Neon Red
  • Dinnerware Bisque Designs

    23888 Asian Square Sushi Plate 8.5" x 8.5" x .75"
  • Signature Brushes

    SB 803 No. 4 Liner
    SB 806 No. 6 Round
    SB 807 No. 6 Fan Glaze
    SB 812 No. 10 Round
  • pure•brilliance® Clear Glaze

  • Miscellaneous

    •   Painter’s tape
    •   Ruler – 12”
    •   Pencil
    •   Foil or foam plate for palette
    •   Tracing paper
    •   Graphite paper
    •   Container for water
    •   Potter’s sponge
  • Patterns

    Instructions

    1. Wipe ware with damp sponge to remove bisque dust.
    2. Trace pattern onto tracing paper.
    3. Place plate on work surface with indentation running vertically on left side. From top of plate, use ruler to measure down and mark with pencil the following measurements: 2¾”, 4½”, 6” and 7¼”. Draw a horizontal line across plate at these measurements from indented strip to right edge.
    4. Place graphite paper on plate. Position tracing paper with traced pattern on top and pencil over letters and hearts to transfer to plate.
    5. Place strip of painter’s tape directly under the penciled line at the 2¾” mark and one down the inside right side of indentation.
    6. Pour puddle of Light Pink. Using No. 6 Round, paint three coats Light Pink into “LOVE” letters. Let dry after each coat.
    7. Place a strip of tape under the 4½” mark.
    8. Using No. 6 Round, paint “LOVE” with three coats of Light Grape. Let dry after each coat.
    9. Move strip of tape below the 6” line. Paint three coats Light Pink into the “LOVE” letters. Let dry after each coat.
    10. Place a strip of tape below the 7¼” mark and one over the 6” mark. Use No. 10 Round and paint three coats Light Grape in the open space. Let dry after each coat.
    11. Place tape above the 7¼” mark. Paint the bottom stripe with three coats Light Pink. Let dry between coats.
    12. Using graphite paper, transfer “Love” in script in the Light Purple space.
    13. Use Liner to paint three coats Black into script “Love”. Let dry after each coat.
    14. Transfer heart pattern onto bottom stripe and one in each “O”.
    15. Paint one good coat Neon Red inside hearts. Let dry.
    16. Paint three coats Neon Red in the areas around the “LOVE” letters in the vertical stripe on the far left side of the plate. Let dry after each coat.
    17. Paint three coats Black into the vertical “LOVE” letters and around the open spaces of the three other “LOVE” words. Let dry after each coat.
    18. Use Fan Glaze brush to paint three coats Black to back of plate. Let dry after each coat.
    19. Use Fan Glaze brush to apply one thin coat Pure Brilliance to front and back. Let dry.
    20. Stilt and fire to witness cone 06.

Visit us on Facebook!
Craft on! Click here for today's daily giveaway!

Friday, October 22

Dia de los Muertos Mug


Dia de los Muertos is a 3,000 year-old Mexican holiday where you celebrate the cycle of life. Held on November 1st and 2nd, you honor loved ones who have passed away by creating a beautiful ofrenda to them with all their favorite foods, hobbies, music, and photos and more. There is always coffee or some kind of hot drink involved because part of the tradition is to set out pan de muerto (bread of the dead) - it is a sweetened bread. Yummy!

Crafts are also a big part of the festivities! From hand cut paper banners to decorated sugar skulls - creativity abounds! On that note, I made this mug in honor of Dia de los Muertos!

Supplies:
Duncan Dinnerware Bisque 12-oz Plain Mug
1 tube of French Dimensions™, black
pure•brilliance™ Clear Glaze
SB 807 No. 6 Fan Glaze
Pencil, eraser

Directions:
1. Use the pencil to sketch designs all over the mug.
2. Go over the designs with the French Dimensions. Let dry completely.
3. Coat inside and out with glaze, let dry and apply a second coat.
4. Stilt and fire to witness cone 06.


Craft on! Click here for today's daily giveaway!
Clicky Web Analytics
Pin It button on image hover

Subscribe to our newsletter

* indicates required
I am interested in products and inspiration for...
Close