Showing posts with label collage jewelry. Show all posts

Monday, April 1

DIY Collage Pendants

These boutique chic collage pendants are easy peasy lemon squeezy to create!  Collage Pauge, Aleene's jewelry glue and some pretty vintage inspired papers and decorative elements from Cosmo Cricket are adhered to light weight wooden tags and sealed for durability with Aleene's Spray Acrylic Sealer.  This is a great girl's night in project and a fun DIY to do with your teens.  And the best part, you can share your own unique message in a pretty pendant you can wear!
What you need:
-Collage Pauge Glossy
Aleene's Jewelry and Metal Glue
Wooden jewelry tags with drill holes
Decorative papers (Cosmo Cricket)
Decorative fabric brads (Cosmo Cricket)
Tiny text stickers or print your own (Cosmo Cricket)
Jump rings
Chain
Clasp
Scissors
Bent and chain nose pliers
Flush cutters
Pencil
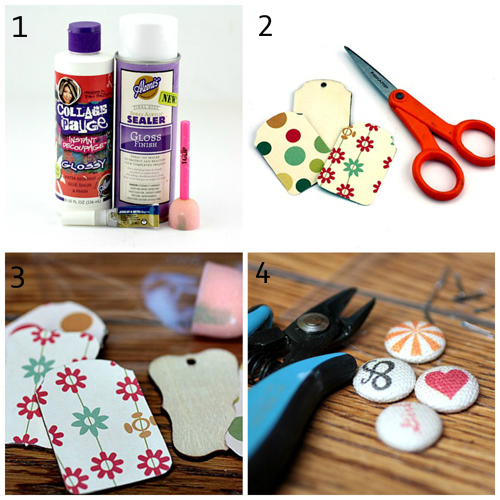
1.) Gather materials.  2.)  Trace and cut papers to fit tags.  3.  Attach paper to wood with decoupage medium.  Add tiny text to tags.  Make sure you line up items on front so tag hole is at the top! Paint two coats of medium on top.  Allow to dry.  4.  Cut metal shanks off of brads.  
5.) Attach brads to tags with jewelry glue.  Allow to dry. 6.) Punch hole in paper, carefully working the hole punch into the pre-existing hole in the back of your pendant.  7.)  Spray one coat of acrylic sealer on pendants.  Allow to dry.  8.) Attach jump rings. 
These turned out so cute, I can't wait to make more.  Adding that acrylic sealer means you won't have to worry about the decoupage medium being sticky on humid days.  I live in the Southeast, it gets hot around these parts!  Try making these with buttons, old jewelry pieces, cabachons, crystals...collages are little miniature artworks and each one should be a reflection of you!

Monday, June 4

iLoveToCreate: Retrofabulous Mini-Frame Pendants


iLoveToCreate Retrofabulous Mini-Frame Pendant 
Margot Potter 
"These are your grandmother's crafts, ya gotta problem with that?"

Making these miniature wearable paper artworks is easy peasy and a ton of fun.  Old book pages make great collage backgrounds and you can find images in Dover Books titles or do this with upcycled new magazine pages for a more modern look.  No matter how you do it, Aleene's Dry Adhesives and Jewelry Glue make this a breeze!


Materials
Miniature Frame (HHH Enterprises)
Tiny metal Tim Holtz idea-ology flower
4mm crystal AB SWAROVSKI ELEMENTS round
Old book page
Red construction paper
Artistic Wire mesh black
Aleene's Tacky Tape Runner
Aleene's Tacky Sticker Sheets
Aleene's Jewelry and Metal Glue
Chain
Clasp
Jump rings

Tools
Chain nose pliers
Small scissors
Pencil
Trace background paper to fit frame and cut with small paper scissors. 

Cut out and adhere tiny collage elements using Aleene's dry adhesives.

Use Aleene's Jewelry and Metal glue to attach flower and crystal.  (Be sparing, a little goes a long way!)

Cut a small section of mesh and tie a bow, pull mesh tubing on both sides to create bow shape.


Visit us on Facebook!
Craft on!

Tuesday, March 2

Margot Potter for ILoveToCreate: Newsworthy Bracelet


iLoveToCreate 
Newsworthy Bracelet
Teen Crafts
Margot Potter a.k.a. The Impatient Crafter™
"Mom crafted, kid approved."

Clear lucite is the hot trend this spring in fashion jewelry, but why not have a little fun with it?  These inexpensive clear plastic beads are just begging for a little embellishment.  Collage Pauge is the perfect medium to make quick work of upcycled magazine page beads.  Teens will love this idea and they can take it in so many directions.  Why not use magazine pics of their favorite celebs or printed out pics of their friends?  Use a flat surface like a microscope slide or acrylic tile, try this with glass, use old chandelier components, do this on larger clear acrylic sheets for collages you can frame...use clear plastic game chips...can you see where I'm going with this? 

Materials
Recycled Magazine Pages (text and/or images)
Collage Pauge Instant Decoupage™
Faceted transparent plastic (or transparent crystal/glass) beads 
22 gauge silver plated rose Artistic Wire
6mm sp jump rings
Sp lobster clasp

Tools
Paint brush
2 pairs chain nose pliers
Round nose pliers
Wire cutters

1.  Select beads and background text or images, since the beads will flip when worn, try to use paper with text and image on both sides.  Using a bead with a somewhat flat surface on each side works best.

2.  Paint a coat of Collage Pauge on the back of your bead.

3.  Stick bead into paper and mold paper around bead.  Tear to release from page.

4.  Paint a coat of Collage Pauge on the back of the paper and allow to dry.

5.  Use your fingers to remove the excess paper from around the edges of the bead, there should be a large section of paper left on bead, seal the edges with Collage Pauge.  Allow to dry.

6.  Thread the bead on the wire, keeping the wire on the spool.  Leave a .5" tail coming out of one end of your bead.

7.  Create a wrapped loop.  Cut off excess wire.  Create a wrapped loop on the opposite side, but DON'T cut the wire.


8.  Wrap the wire around the bead two times and then around the coiled section on the opposite side of the bead twice to secure.  Cut off excess, removing wire from spool.  Tuck tail into coil.

9.  Use round nose pliers to gently bend the wires, working along each one to create tension front and back.  Take your time so you don't nick the wire. 

10.  Connect the wired beads to create a bracelet using jump rings.  The number of beads needed depends on your wrist size.  Attach a clasp to one end and a jump ring to the other.

(If you don't know how you can learn how to open and close jump rings and wrap wires on my YouTube Channel in our Crafty Quickies videos.)
Clicky Web Analytics
Pin It button on image hover

Subscribe to our newsletter

* indicates required
I am interested in products and inspiration for...
Close