Showing posts with label halloween inspiration. Show all posts

Monday, October 1

Look at what we have brewing up this month at iLoveToCreate.com!

Hop on over to our mother site iLoveToCreate.com and check out the amazing projects created by our craft designers. Each month, they make anywhere from 10-15 projects to showcase on our site. This month is one of our favorites...HALLOWEEN!  We had a lot of fun making both cute and spooky creations that we hope will inspire you to create for the season!  Follow the links below for each project to find full instructions.


And here's a hole other helping of amazing projects from iLoveToCreate.com to get your Halloween on. Find Halloween ideas here or click image below!

Thursday, October 15

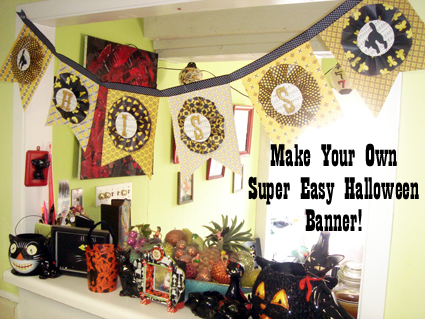
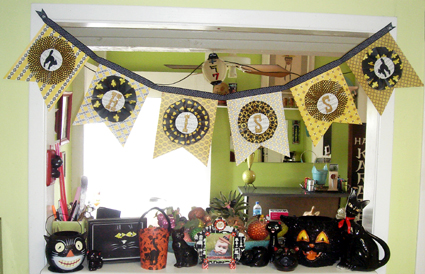
Black Cat Halloween Banner


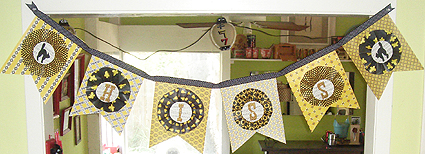
Today’s I Love to Create Column is a two for one special! Not only do I have a fun Hissing Halloween Banner how-to for you I also have a book review.


First things first let’s talk about the books. I have been a fan and a customer of Repro Depot for a good long while now so when I head they had a set of books and stationary coming out there was no doubt in my mind that they would be good. Good was a bit of an understatement. The two Repro Depot Pattern Books in Folk and Floral are chocked full of just that patterns. The fun part is all the patterns also come on a disc making it easy as pie to print these patterns out for craft projects like say a Hissing Halloween Banner. There are actually a few pages of crafty inspiration at the back of the book with ideas for the paper including place mats, greeting cards and light switch covers. I opted to work with all black and yellow and patterns, but there are tons of color options in the book. All the patterns and the colors do seem to have the distinct feel of crafting in the fall of 1973. Each book has oodles of patterns with little people, southwest designs, pears, roosters and even nuts. The forward is by Grace Bonney of Design Sponge giving Repro Depot and the pattern books two thumbs up and we know she has great taste. There is also a set of greeting cards available from the line. The blank cards are adorable as is or would be a great foundation for further embellishments (check out our how-to for Thank You and Christmas Cards).


SUPPLIES
Repro Depot Pattern Books
Printer
Printer Paper
Scissors
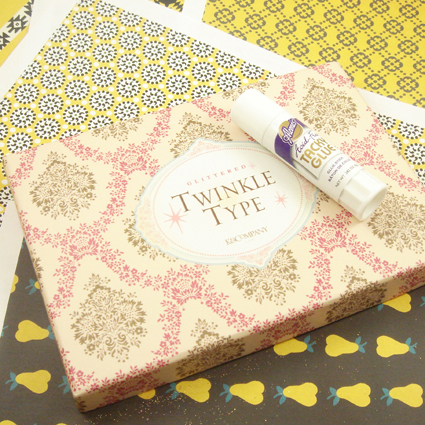
Twinkle Type Letters
Ribbon
Aleene’s Acid Free Tacky Glue Stick
Aleene’s Tacky Transparent Tape for Crafters
Aleene’s Hot Glue Gun
Aleene's Liquid Fusion Glue
Sheet Music
Craft Knife
Cutting Mat
Black Cat Silhouette

CHOOSE YOUR PAPER
It’s a hard choice but you need to choose a theme and color scheme for your banner that will dictate which patterns you choose. I opted for black, white and yellow patterns since my banner was going to have a black cat Halloween theme. Print your patterns onto 8.5 X 11 printer paper with your printer setting on best.


ROSETTES
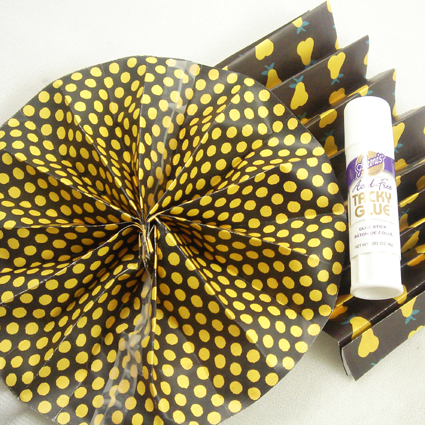
Yup, it’ an accordion fold just like you did in kindergarten. First trim the white edges off of all of your pattern sheets. Next cut your paper into two rectangular strips. Use your Aleene’s crafters tape to attach the two ends together. Next accordion fold the strips with the folds being about 1” wide. Once you have gotten to the end bring your accordion together and attach the two ends with tape. I also used a glue stick to make extra sure it stuck together. Thanks to everyone who posted instructions on Face Book about making rosettes. I also found the instructions on Paper Source and Dream Create Inspire helpful.

BANNER
Once you decide what shape you want your banner to be and you know that your rosettes will look good with them get to cuttin’. If you want your banner to look pretty from the front and back print out and cut two of each sheets.


MAKE MUSIC
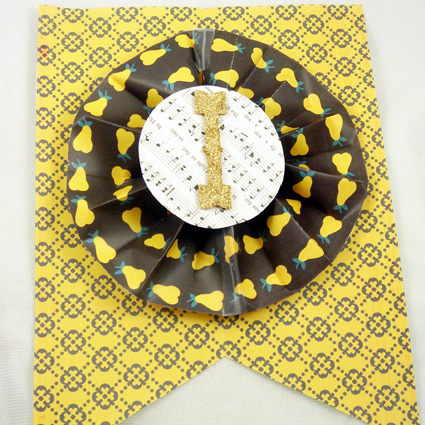
My letters would get lost in the shuffle attached directly to the center of my rosette so I opted for some old sheet music to help make them pop. I used a roll of packing tape as my guide and traced and cut out 6 circles.

HISSING CATS
Since I was making this banner to go with my black cat collection not only did I want the banner to say “Hiss” I wanted to have pictures of hissing cats to illustrate the whole thing. Lucky for me Martha Stewart had these handy dandy hissing cat silhouettes on her website. I printed them out on card stock and placed them on top of black paper and cut out with a craft knife. Each cat came out slightly different, but I like it that way. I used my Aleene’s glue stick to adhere the cats to sheet music discs.


GET YOUR HISS ON
The next thing I did was use my glue gun to attach my rosettes to the banner pieces. Next I used my glue gun to attach the sheet music circles to the center of the rosettes. Last but not least I used my Aleene’s Glue Gun to attach my twinkling letters H-I-S-S to the center 4 circles of sheet music.


STRING AND HANG
I used a black and white polka dotted grosgrain ribbon to hang my banner. I put a thin line of Liquid Fusion glue across the top of each panel and the banner and laid my ribbon on top making sure the pieces were spaced out evenly. I cut the ends in a decorative fashion and hung in my kitchen with push pins.


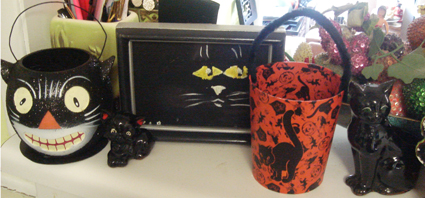
I am pleased as punch with the way the banner looks and how it helps draw attention to my collection of black cats. Plus it gives me something fun to look at as I stand at my sink and do the dishes.

I'd love to hear about how you celebrate and decorate for Halloween!

Tuesday, October 13

Terrorific Tuesday 2009 Week 2

terrorific tuesday week 2

This little light
Light up the night with this cute pumpkin votive holder from Kat the Fearless Crafter.

Sugar Skull Bracelet & Bats in the Belfry Choker
Candace is having way too much fun with shrink plastc! Check out these fun and charming crafts on the Spirit Clay blog.

Dollar Tree Decorated Lights Tutorial
Come and decorate some Dollar Tree Skulls with Crafterella, don't forget your sharpie markers!

The Impatient Crafter for iLoveToCreate
Whip up a Halloween Invitation that's a real 'hoot' with Madge in this project for iLoveToCreate!

Spooky Halloween Coasters
Cheryl Ball of Still Crafty After 50 shares some fun, funky, and spirited coasters!

Halloween Treat Bowl
Create a fun and festive treat dish with Inspired at Home!

Strands of Beads
Melissa creates a whimsical seasonal necklace based on the theme "pushing up daisies".

Basic Black Box Meets Pumpkin Patch
Whip up Halloween favor boxes in minutes with brand new Sizzix ScoreBoard dies.

Mummy Mannequin
Create a mummy that will be a memorable accent at your Halloween party with Pattiewack!

Munchkin Mama's Crispy Peanut Butter Balls
Munchkin Mama has a great recipe for no bake peanut butter balls that the whole family will want to make!

Witch Parking!!
Make a "Witch Parking" sign on the Mucky Finger's blog!

Vintage-Inspired Halloween Tree Topper
Shannon shows off her new Halloween tree topper, inspired by vintage crepe paper crafts!

The Impatient Crafter
Make a whimsical and elegant Halloween necklace with Madge!

Jack-O-Lantern Waterfalls
Studio Mama shows you how to make some fun and festive earrings for the Halloween season.

Glow in the Dark Jewelry
Use glow in the dark polymer clay and rubber stamps to produce eerie Halloween jewerly.

Crafty Chica's Paint Drip Pumpkin!
A loca idea on the fly turned out muy fantastico!

Free Printable Halloween Cup Sleeves
You’ll be a hit with these labels for hot beverages at your Halloween party.

Scarecow Sweatshirt
Sharron Westerfield shares a cute scarecrow sweatshirt she made from a fun downloadable pattern from Janome!

Halloween Ribbon Brooches and Fascinators
Alexa Westerfield a.k.a. Swelldesigner whips some quick and cute Halloween accessories!

R.I.P. Skeleton in Coffin
Guarantee a spooktacular Halloween Party with a skeleton in a coffin treat filled centerpiece!

Happy October Kewpies
Find inspiration in this colorful and cute candy corn Kewpie photo from Boopsie Daisy!

If you would like to join in the fun next week, e-mail Alexa at swelldesigner@yahoo.com and put in your subject line "Terrorific Tuesday". She'll get you added to the group!

Monday, October 12

R.I.P. Skeleton in Coffin


R.I.P. Skeleton in Coffin
designed by Suzie Shinseki

Guarantee a spooktacular Halloween Party with a skeleton in a coffin treat filled centerpiece!

Materials List

–Tulip® 3D Fashion Paint
65038 Black
65130 True Red
65407 Silver Metallics

–Aleene's® Original Tacky Glue®

– Tulip® Soft Fabric Paint™
BI15784 Glacier White
BI15799 Holiday Green
BI15800 Chocolate
BI15801 Ebony
BI15825 Royal Blue
BI15827 Golden Tan

Miscellaneous
– Spanish Moss
– Foam (to hold eyeballs in place)
– White chalk or chalk pencil
– D-Rings
– White tissue paper - CELEBRATE IT™
– Toothpicks
– Foam balls - 1½”
– Foil
– Paintbrush No. 6 Round, 1” Flat
– Black fabric
– Sandpaper
– Plastic container
– Felt, 3” x 3” piece
– Painter’s tape
– Chenille Stems - white, black
– Traders Trunk
– Sheet of stiff felt - 1 sheet black
– Foam Egg - oval - 3½” x 4-7/8”
– Foam Egg - oval - 2-13/16 x 3-7/8”
– Pencil with eraser or pen

Instructions

1. COFFIN: Lightly run sandpaper over and inside trunk to remove any loose wood shavings.

2. Pour a puddle of Ebony Soft Fabric Paint™ onto foil. Using 1” Flat paintbrush, paint inside lid and sides of trunk. Let dry.

3. Cut piece of stiff black felt to fit on bottom of trunk and glue with Aleene’s® Original Tacky Glue®.

4. Pour some glue into empty container. Add water and stir until mixture reaches a milky consistency.

5. Tear pieces of white tissue paper. Working in small sections at a time, brush glue onto areas of trunk, then place pieces of tissue paper onto adhesive on trunk. As you lay the papers down, manipulate with fingers to create wrinkles and interesting textures. Continue covering the trunk sides and top in the same manner. Let dry.

6. Pour puddles of Ebony and Glacier White onto foil. Using 1” Flat paintbrush, lightly brush over the wrinkled tissue paper on trunk with a mixture of grays to give an old, worn appearance. Let dry.

7. Cut a small piece of felt, fold over a D-ring on the flat end and glue to sides of trunk. Refer to photo. Tape down until dry.

8.
Trace or freehand “R.I.P.” in center of the D-rings and paint with Glacier White. Dry and outline with Dimensional Black. To trace, chalk back of pattern on reverse side, turn right side up, lay on surface and pencil over.

9.
EYEBALLS: Insert toothpicks into balls and into foam base to hold upright.

10.
Paint a pair of eyes with Royal Blue; mix a little Glacier White into the blue and paint the inner area. Make a dot in center with Ebony for pupil and a tiny white dot for highlight.

11.
For the brown eyes, paint iris with Chocolate. Mix a little Golden Tan to paint inside leaving the chocolate rim. Add the Black pupil and dot with highlight.

12.
For the green eyes, paint with Holiday Green, mix a little Golden Tan for center area and add black pupil and white highlight.

13. Make blood veins with the 3-D True Red.

14. SKELETON HEAD: Using the smaller oval shape, push two holes for eyes using the back of a pen or pencil eraser; a smaller arrow shape for the nose and lines going down for teeth.

15.
SKELETON BODY: Using the larger egg shape, push tip of pencil or pen across to simulate ribs. Paint all pushed in areas with some diluted Ebony to highlight.

16. Fold a chenille stem in half, trim an inch or so on ends. Punch hole in bottom of head and top of body and insert folded pipe cleaner. Add dab of glue to where they join to secure. Let dry.

17.
SKELETON ARMS AND LEGS: Use two chenille stems. Twist the two together at top; twist together a third of the way down and another third to leave ends to create fingers or toes. With remaining stems bend each a third way up and leave remainder (refer to pattern illustration). One end will wrap around to secure and the other will become the fifth toe or finger. Cut the looped ends. Insert the ends of the limbs into the body and dab glue to secure. Let dry.
18. RUNNER: Press fabric. Lightly freehand spider web with chalk (see picture). Go over lines with Tulip Dimensional Metallic Silver. Dry and wipe off chalk marks. The edges of runner can be frayed if desired.

Miscellaneous Notes

To paint eyeballs, insert toothpick in foam ball and the other end into a flat foam piece to hold in place while painting.

Tuesday, October 6

Terrorific Tuesday Week 1

terrorific-tuesday-2009-wee

Swelldesigner
is hosting Terrorific Tuesdays and asked us to join in! Terrorific Tuesdays is a fun roundup of Halloween inspiration celebrating all kinds of creativity and you know that WE LOVE TO CREATE! Check out the fun and inspiring links below and if you'd like to participate in this roundup, contact Alexa a.k.a. Swelldesigner at swelldesigner@yahoo.com (put in the subject line Terrorific Tuesdays) and she'll send you the details!

Studio Mama Blog
Creep out your friends with this Leatherface-esque collection of eyeballs strung on hardware!

The Impatient Crafter
Halloween is right around the corner and Madge kicks off the season with a stunningly spooky mixed media necklace and a bonus short story sure to send shivers up your spine!

Living Locurto
Kids will love dressing up this cute doggie in different costumes with this Halloween Doggie Dress-Up Free Printable!

Sharron Westerfield
Create an adorable jack-o-lantern baby bib for your favorite little one!

Crafterella
Join Crafterella in making you own spooky Mantipi specimen jar (with tutorial) using polymer clay.

The Fearless Crafter
Welcome your guests with this cute and creepy Spooky Spider Wreath wreath!

My Big Mouth
Craft a mini Halloween candy dish that looks like Frankenstein

Strands of Beads
Melissa creates a simple skully necklace to celebrate the season.

Kate Pullen, the Rubber Stamping Guide at About.com
Create a Halloween pyramid box perfect for use as a Halloween favor box or as an unusual decoration.

Allee Marderosian for iLoveToCreate
Take your look to the Darkside with these Twilight Romance tees, perfect for Halloween festivities or everyday adventures!

Candace Jedrowicz - Spirit Clay
These sparkly Candy Corn Riot earrings are made using real candy corn! No kidding!

Brenda Pinnick
Brenda uses her Sizzix Die to create a batty neck piece you'll want to sink your teeth into!

The Impatient Crafter for iLoveToCreate
Madge shows you how to make a super cute Halloween tote in this week's I Love to Create post!

Crafty Chica
The Chica, ILoveToCreate & Craft Zine have teamed up for a skullerific Dia de los Muertos Shrine Contest!

Alexa Westerfield a.k.a. Swelldesigner
Inspired by her love for True Blood, Swelldesigner takes a stab at bloody white pumpkins!
Clicky Web Analytics
Pin It button on image hover

Subscribe to our newsletter

* indicates required
I am interested in products and inspiration for...
Close