Showing posts with label retro crafts. Show all posts

Monday, July 2

iLoveToCreate Retrofabulous Embellished Straw Tote


iLoveToCreate Retrofabulous Embellished Straw Tote
Margot Potter
'These ARE your grandmother's crafts...ya gotta problem with that? 
I didn't think so."

I'm afraid I have always had a serious soft spot for retro beachy looks.  Straw hats, straw totes, sundresses and seersucker rompers all make my little heart go pitter pat.  When I saw this plain straw tote in the dollar section at Target, I could not resist.  I knew immediately how I would DIY it into a retrofabulous summer bag!  Some felt, rick rack trim, pom-pom fringe and a judicious smattering of sparkly crystal accents take a plain bag from drab to fab and with the help of Aleene's Tacky Glues literally in seconds flat!  Now THAT's retrofabulous!

Materials
Plain straw tote
Craft felt in four colors
Coordinating pom pom fringe
Coordinating rick rack trim
Tulip Glam-it-up Crystals in Metallics
Aleene's Quick Dry Tacky Glue
Aleene's Tacky Glue Dots Singles 3/16"

Tools
Scissors
Ruler
Marker
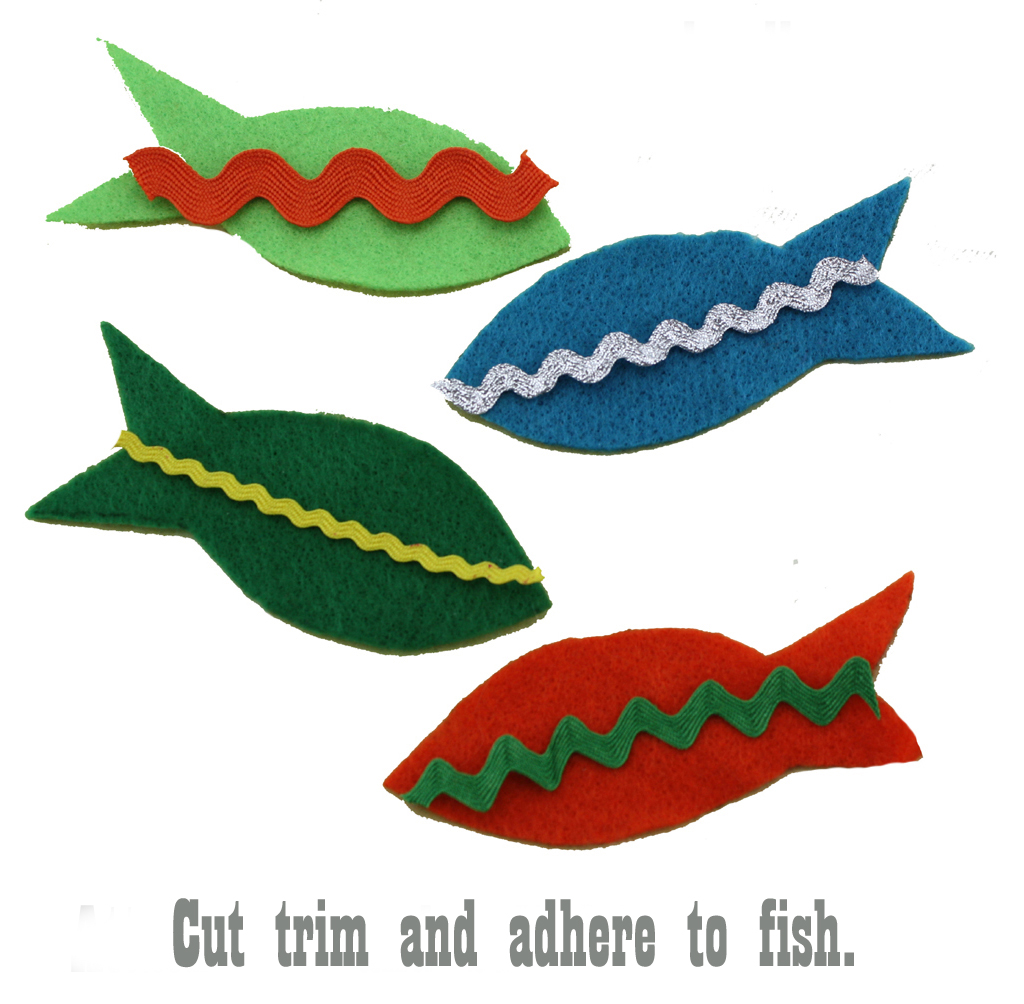
Hand draw a simple 4"lx1.5"w fish shape, cut out to use as a template.


Place template on felt, trace and cut out four fish.
Cut rick rack and adhere to fish.


Glue fish and pom pom trim to tote with Aleene's Quick Dry Tacky Glue.  Finish one fish with metallic crystal accents using Aleene's Tacky Glue Dots.  Allow it all to dry, toss on your favorite vintage or vintage inspired sundress and sunglasses and ta da...go get 'em, you retrofabulous creature, you!

Monday, April 2

iLoveToCreate Retrofabulous Crafts: Sparkletastic Easter Earrings


Sparkletastic Easter Earrings
iLoveToCreate Retrofabulous Crafts
Copyright Margot Potter
These ARE your grandmother’s crafts...ya gotta problem with that?”

From McCall's Needlework and Crafts 1968

I have been toying with making a pair of sparkly foam earbobs for a while now. There are endless variations on this idea in my stash of vintage craft magazines. They’re also made of cork and wood...I’ve even seen these made of crumpled aluminum foil. The idea is to suspend a round ball on a thin chain for a pair of swingy earrings. Remember that these are foam, so they weigh almost nothing, but if you like a more delicate silhouette, feel free to use smaller balls. I like my jewelry big and bold. These would be perfect for a teacher, young mom or if you’re feeling cheeky, to sport to the family Easter dinner. I’d make a matching necklace and wear this out and about just for fun, but I’m not afraid to be noticed.

Take this idea wherever you like, add sequins, seed beads, rhinestones. A splash of glitter gives it a little sparkle and the sparkly rick rack trim immediately evokes Easter eggs. I’m of the mind that life is short, so have a little fun now and then. What could be more fun than pink sparkly foam earbobs?!


Materials
2 1.5” foam balls
Sparkly silver rick rack trim
2 2” head pins
2 matching beads to secure headpins
2 ear wires
2 1” segments of thin chain
Aleene’s Foamtastic Glue
Crafty Chica Little Paints in red and white
Crafty Chica glitter in pink
Craft wire for painting and drying balls
Foam block for drying balls

Tools
Chain nose pliers
Round nose pliers
Flush cutters
Foam brush
Scissors


Insert a 5-6” segment of craft wire into each foam ball. Mix red and white paints to make hot pink. Use a foam brush to pounce pink paint on surface of ball. Sprinkle glitter on ball and shake off excess. You will probably have to go back in for a second coat to hit any spots that aren’t fully covered, if you repaint make sure to re-glitter. Allow to dry, inserting wire into foam block.  Keep ball on wire. Run a bead of Aleene’s Foamtastic glue along rick rack trim. Wrap trim around center of ball. Insert back into block and allow to dry.


When glue is dry, GENTLY thread a beaded headpin into the center bottom of your ball and thread to the center top. Make sure pin is straight and take your time.  Bend wire at a 90 degree angle using chain nose pliers. Cut to 1/4” with wire cutters. Grasp end of wire with round nose pliers and CAREFULLY turn into a loop. Open loop to add chains using chain nose pliers.


Cut chains and thread on open end of loop. Use chain nose pliers to secure closed.  Use chain nose pliers to attach earring wires to top of chain.


Optional: Add a beehive, tiara and a pair of cat eye glasses...hee.

Monday, February 13

iLoveToCreate Retrofabulous Crafts: Dazzling Dahlia Dimensional Canvas

Visit us on Facebook!
Craft on!
Dazzling Dahlia Dimensional Canvas Copyright Margot Potter 2012
Pop Art Pillows from Christmas Helps 1966 Family Circle

Christmas Helps 1966 Family Circle

iLoveToCreate Retrofabulous Crafts
Dimensional Dahlia Canvas
Margot Potter

"These are your grandmother's crafts.  Ya gotta problem with that?  I didn't think so."

The idea for this canvas came from a fabulous pillow project featured in this 1966 Christmas Helps magazine from Family Circle. I LOVED these pop art pillows and plan to make some of my own, but these Anna Griffin vintage patterned papers were so yummy, I thought why not make a canvas using the same idea? I am a huge fan of Lilly Pulitzer’s vintage fabrics and these papers have a very similar appeal. Think about making a series of two or three of these using the same color scheme but slightly different patterns (maybe a full flower, half flower and butterfly.) Use recycled paper or fabric remants if you like; this could be stunning using say Coca Cola can boxes or old book pages. This was super simple to create using Fiskars ShapeTemplate™ tools and the new Aleene’s Dry Adhesives! For a final touch of whimsy, I added some dimension using Tulip Beads in a Bottle. I am knee deep in the winter blahs, so this is a cheerful reminder that spring is on the way! (If you want more precision, mark and measure placement with a ruler before layering petals.)


Materials
10x10 mini canvas
Anna Griffin Carmen Collection scrapbook paper pack
Saturated pink and yellow cardstock
Aleene’s Tacky Dot runner
Tulip Beads in a Bottle sparkly pink and pale yellow

Tools
Fiskars ShapeTemplate™ Circles
Fiskars ShapeCutter™ and Mat

1. Cut out 22 patterned yellow and pink floral paper 2” circles and 11 yellow and 12 pink 2.5” paper circles using the Fiskars template, cutter and mat. You could also use circle punches or trace and cut by hand. I am impatient, so anything that makes it easier works for me!

2. Layer the patterned circles in the center of the solid color circles and adhere using Aleene’s Tacky Glue dots runner.

3. Begin on the outside, I found it helped to lay this out first and then reassemble just to get a sense of the layout before I committed to it permanently. The flowers overlap slightly and work around in a circle and repeat on the inner layer overlapping slightly.

4. Tape just the right side of your petal and start making a circle overlapping on the outside. Continue this process until you reach the final circle, which will get full tape runner coverage. Repeat for the inside layer. There are 14 petals on the outside and 8 on the inside. Finish with a large pink petal in the center.

5. Use Beads in a Bottle on the solid color edges of the petals in a color that coordinates. I used sparkly pink and pale yellow and found that the sparkly beads were a skootch less puffy than the solid color, I like the slight variation. You can take great care and put the exactly same amount of dots on each petal, but as I mentioned earlier I am impatient and simply thrilled I made it around every petal without a craftastrophe. It’s the little things.

6. Allow to dry overnight before touching or hanging!

Mandala Flower Copyright Margot Potter 2012

(PS: I love this flower so much, I am going to use it on some other projects as an image! Too fun!)

Monday, January 2

iLoveToCreate Retrofabulous Crafts: Pulp Fiction Thank You Cards

Visit us on Facebook!
Craft on!


iLoveToCreate Retrofabulous Crafts: Pulp Fiction Thank You Cards
Copyright Margot Potter
"These are your grandmother's crafts, ya gotta problem with that?"


The glitter has faded, the confetti swept away and it's time to start a new year filled with possibility. It's also time to take a moment and thank your friends and family for the lovely gifts they sent. What better way to say, "Thank you" than these Retrofabulous Pulp Fiction cards? The covers are scanned from my collection of ephemera, you can easily find similar books on eBay. I dragged them into Photoshop, color matched the fonts and added some new words to the mix, sized and printed and layered them with coordinating scrapbook papers and cardstock. Tulip Glam-it-up metallic crystals on the corners were the perfect touch of dimension. My first attempt to frame them with glitter was not so fab, so I started over. I've added coordinating sentiments inside. Aleene's AWESOME new glue dot tape runner made quick work of putting it all together.

Materials
Vintage patterned scrapbook papers (I used my fav Carolyn Gavin papers from K&Company)
Coordinating card stock
Tulip metallic Glam-it-up crystals
Aleene's Tacky Glue Dot tape runner
Aleene's Acid Free Tacky Glue

Tools
Paper cutter
Bone folder
Ruler
Scissors
Chain nose pliers or tweezers


1. Use photo editing software to add sentiments.

2. Use Word or similar software to create sentiments for inside of cards.

3. Print. I printed my images at 536x774dpi 150 resolution. It's easy to drag these into publishing software and put them side by side for printing.

4. Cut out images. You are stacking them on a solid cardstock and a patterned paper, each one gets slightly larger. I eyeballed using a paper cutter, you can measure them at 1/4" increasing margins, mark and cut.

5. Fold your card stock, crease with bone folder and cut off 1" from bottom.

6. Layer images starting with patterned paper which is straight, solid card stock on an angle and image straight. Use Aleene's Tacky Glue Dot Runner Tape to attach to card.

7. Cut out a sentiment, add a slightly larger coordinating cardstock paper frame, layer and attach to inside of card on an angle using tape runner.

8. Squeeze out a small amount of Tacky Glue. Use tweezers to careful pick up crystal, dip back in glue (don't over do it here) and attach to corners of image on card. Press gently with finger tips.


Monday, December 5

iLoveToCreate Retrofabulous Christmas Craftabration: Bedecked Holiday Stocking!


Madge and Her Retrofabulous Christmas Stocking!

Better Homes and Gardens 1966 Christmas Helps (Note the doodle someone did on the candle flames back in the day...hee.)

The stockings are hung...inspiration from BHG 1966 Christmas Helps

iLoveToCreate Retrofabulous Crafts
Vintage Inspired Christmas Stocking
Copyright Margot Potter

"These are your grandmother's crafts™...ya gotta problem with that?"

Ho, Ho, Happy Holidaze! It's time for another Retrofabulous Christmas Craft project inspired by the crafts of yore! Huzzah! This project was inspired by a simply lovely set of burlap stockings from a 1966 Better Homes and Gardens Christmas Helps magazine. I used a pre-made wool felt stocking and some vintage inspired trim and within moments (and without a sewing machine) had a simply fabulous stocking with a little help from Aleene's Fashion Fusion products! We have a brand new The Impatient Crafter video coming with both the stocking AND the gift tag project (featuring Aleene's AWESOME Dry Adhesives) included...so stay tuned!

Materials
Fabric Christmas Stocking with plain folded top
Ribbon trim thick enough to fit top of stocking (mine was 2.5" and from a big box craft chain)
Fuzzy trim (I used wired trim from a big box craft chain, but you can also use faux fur here)
Beaded tinsel trim (you could also use pearl swags or any similar trim, mine came from a big box craft chain)
4 red tinsel pom poms
Aleene's Fashion Fusion Glue Pen
Aleene's Fashion Fusion Peel and Stick Tape
Aleene's Fashion Fusion Peel and Stick Sheets (These can be used in place of tape)

Tools
Scissors (mine are Fiskars holiday themed scissors)
Ruler


1. Begin by measuring, cutting and applying your thick ribbon to the top of stocking. The ribbon will overlap in the back, be sure to leave enough to fold so you don't have the end exposed, this will prevent it from fraying. Use the tape or the sheets to attach. The handle of your scissors can help as you press the tape or sheets down to create a strong bond.

2. Measure and cut a length of fuzzy trim to fit around top of stocking. Use tape to adhere.

3. Measure and cut your swag, my stocking was 7" and the swag was 14". Remember to leave space between swags for pom poms.

4. Place swags under the cuff of your stocking, use glue or tape to adhere stocking cuff over swags and secure them in place.

5. Use glue or tape to adhere your pom poms. Depending on the porosity of your fabric and how much of the glue it sucks up, you may need to use Aleene's Fast Grab Tacky Glue!

Bonus project on video...coming soon!
6. Use a vintage card to make a matching gift tag...stay tuned for the video!

Monday, November 21

Retrofabulous Christmas Craftabration: Upcycled Holiday Cards

Visit us on Facebook!
Craft on!
Retrofabulous Upcycled Holiday Cards Copyright 2011 Margot Potter for iLoveToCreate

Christmas Helps 1966-Family Circle
From Christmas Helps 1966-Family Circle

From Christmas Helps 1966-Family Circle
iLoveToCreate Retrofabulous Crafts
Upcycled Holiday Cards
Copyright 2011 Margot Potter 

Today's Retrofabulous Christmas Craft is a simply delightful upcycled card project.  In the original project from Christmas Helps 1966-Family Circle they used tissue paper, but I love using recycled magazine images in my work.  Can you guess what the images are on the Christmas balls and candles?  The trees use some old scrapbook paper scraps and text from a magazine.  You could easily cut up last year's Christmas cards, wrapping paper, ad flyers...it's truly endless!  Aleene's new paper friendly glues make quick work of these cards.  Have you seen how expensive cards are?!  This saves money and gives a personalized touch to your holiday greetings. 


Materials
Cardstock in holiday colors
Recycled magazines
Aleene's Tacky Sticker Sheets
Aleene's Tacky Line Roll
Aleene's Tacky Dot Roll
Tulip Glam-it-up Crystals
Paillettes
Wired tinsel
Fine marker

Tools
Bone folder
Scissors
Paper cutter
Circle punches in graduated sizes

1. Select papers for card. Cut card to size on paper cutter. Fold paper in half and use bone folder to make a sharp edge on card.

2. Cut images into shapes (I used graduated circle punches to make the Christmas balls.)

3. Adhere large images to card using Aleene's sticker sheets.

4. Use Aleene's Tacky Line Roll for wired tinsel and Aleene's Tacky Dot Roll for small embellishments.  I used a fine tip marker to draw the thread on the Christmas balls.

Upcycled Holiday Card Detail

Upcycled Holiday Cards Detail

Monday, November 7

Retrofabulous Craftabration: Upcycled Holiday Gift Box

Visit us on Facebook!
Craft on!
Retrofabulous Upcycled Holiday Gift Box Copyright Margot Potter for iLoveToCreate 2011
Inspired By:

Images Copyright McCall's Magazine

(Anyone who knows me knows that I love all things retro. I have been thrifting since I was 19 and have a rather large collection of old paper. I have post cards and magazines dating back to the Victorian age and all the way up to the 1970s. I love old fonts, ads, images...it is all intriguing and wonderful to me. I did a series on my blog called Retrofabulous Craftabration a couple of years ago and now I’m teaming back up with the folks from iLovetoCreate to bring you a dose of retrofabulosity on the first and third Monday of every month.)

Retrofabulous Craftabration: Upcycled Holiday Gift Box
Margot Potter for iLovetoCreate

This project was inspired by a 1968 McCall’s Christmas magazine. They took old shoe boxes and upcycled them into festive holiday gift packages. How funny are these?! Also, whatever happened to that awesome thick yarn?!  It totally makes me want to make pom poms and hair bows!  Note to self: get awesome super thick yarn....stat.

To update this idea, I used some scrapbook paper, sparkly trim, a sentiment cut from a vintage greeting card, odds and ends from the studio and a favorite vintage pic from a 1964 calendar combined with the new Aleene’s paper craft friendly dry adhesive glues to create a kitschy upcycled package. This is a great way to reuse old boxes and to give a gift a fellow crafter can use for festive storage in their studio. You can use wrapping paper, fabric, scrapbook paper, newspaper, magazines, catalogs...add paints and dimensional embellishments... I’d love to see what you do with this idea, if you make a retrofabulous inspired upcycled package leave a link in the comments here!

Materials
Image (I scanned and sized mine)
Old sturdy box
Paper or fabric (I used scrapbook paper)
Trims
Embellishments (buttons, beads, old broken jewelry bits...)
Aleene’s Tacky Line Rolls
Aleene’s Tacky Dot Singles
Aleene’s Quick Dry Tacky Glue
Aleene’s Tacky Double Stick Sheets
Tulip Beads in a Bottle Glitter Paint (I used pink to coordinate with my papers)
Double sided craft tape

Tools
Scissors
Pencil
Decorative edge punch (optional)

1. Select a box-it should be sturdy enough to be used as a gift package and later as storage. Begin by covering the box with paper or fabric. I traced the box panels on paper, cut paper and attached the sheets to each panel using Aleene’s Double Stick Tacky Sheet. Just attach sheet to back of paper, cut to fit and then peel backing off and adhere paper to panel on box. I covered the entire box.


2. To hide the corner edges where papers meet, use decorative trimp. I ran double sided tape along each edge, and attached the trim folding it along both sides of the edge.

3. Add an extra layer of trim on each side of the edges. Measure trim to fit and cut. Place along the Aleene’s Tacky Line and cut glue to fit. Peel up trim and attach to box. You will need to put trim along all of the edges on all five exposed panels. I used two styles of trim, one for the side panels and another for the top panel.

4. If you want to add more paper embellishments to the top of the box, attach them using the Aleene’s Double Stick Tacky sheets. I added an image and also a decorative trim using coordinating paper and an edge punch. This also gave me a place to tuck a sentiment that can be removed later.

5. I had some wooden scrapbook embellishments that coordinated with the project and worked perfectly to conceal the four corners where the trim met on the top of the box. You can use buttons, old jewelry components, scrapbook embellishments, bows...whatever you like. Just one Aleene’s Tacky Dot Single does the trick.

6. I like sparkle, so I used a thin schmearing of Tulip Beads in a Bottle in pink on the background paper on the top of my box. You could also use Collage Pauge in Sparkly to get the same effect. While it is drying the paper will bubble up a little, do not freak out. It will flatten again, I promise!

Tuesday, April 20

ILoveToCreate Teen Crafts: Techno Garden Cell Phone Holder


ILoveToCreate Teen Crafts
Techno Garden Cell Phone Holder
Margot Potter
“Mom crafted, kid approved.”


Avalon is finally not the “only kid” in her school that doesn’t have a cell phone. Lest you think us barbarians, we simply couldn’t see the point of paying for another line for a twelve year old. I think kids are too plugged in as it is. Little did we realize, due to a miscommunication with our cell phone carrier, we’ve been paying for a third line that we don’t use for a year now. Argh. So we gave Avalon a second hand cell phone and instructed her to only use it for emergencies. We’ll see how long that lasts...

She immediately started rummaging through my crafty coffers for my collection of hand crafted cell phone holders. I’ve been making these for the past few years for books and magazines. I love the irony of a kitschy retro craft being converted into a techno friendly item. Thusly this project was born.

Add the awesome fabric YoYo maker I scored last month at the craft store that I’ve been itching to use in a project, an upcycled gingham shirt with buttons that didn’t fit properly and some vintage plastic beads and...I present the Techno Garden Cell Phone holder. In case you didn’t hear, gingham is all the rage for spring and summer fashions this year. You will have to create a pouch that fits your specific phone, therefore I’ve not included dimensions here. Just measure the felt around your phone, making sure there’s room for the phone to slide inside. Cut, glue and decorate.


Materials

Craft felt sheet in red
Black and white gingham fabric (if you have an old shirt you want to use, feel free)
Three coordinating buttons (mine came directly from the shirt)
Pine green rick rack trim (mine was vintage, but this stuff is easy to find)
Snap set
Aleene’s Liquid Fusion Glue
Aleene’s Super Thick Tacky Glue
9 10mm yellow Beadin' Path vintage plastic beads
10 8mm green AB Czech glass beads
2 EZ-Crimp ends
.018 49 strand beading wire
White or light color thread
Red thread

Tools
Clover YoYo Maker Large

Chasing hammer
Snap setter
Steel block
Mighty Crimp Tool
Chain nose pliers
Wire cutters
Scissors
Needle

1. Create beaded strand by attaching wire to EZ Crimp using Mighty Crimp Tool. Add your beads beginning and ending with a green glass bead and alternating between the two colors. Use chain nose pliers to pull wire through EZ Crimp end, keeping wire rounded to prevent from being too stiff, use Mighty Crimp Tool to attach wire and cut off excess with wire cutters.

2. Measure and cut your pouch leaving a 1” edge for your flap.

3. Glue the sides together up to the bottom of the edge using Aleene’s Super Thick Tacky Glue. Allow to dry overnight.


4. Create Yo-Yo following instructions on Clover YoYo Maker package. Begin by inserting fabric into receptive end of tool and then snapping the cover into place to secure the fabric.


5. Use fabric scissors to cut fabric edge to approximately ¼”.


6. Keep edge folded as you sew around the template from the bottom of the tool. See photo.

7. When you reach your final hole, sew through the first hole again. Carefully remove the snapping component from the receptive component and remove fabric.


8. Gently pull thread end tucking fabric edge into the center as you create your YoYo. When you have it formed, sew the open thread into the fabric edge, knot and cut off and tuck excess thread. Create two yoyos.

9. Mark and cut rick rack trim to create flower stems. Fold a bit of trim to form leaf. You can tack this with thread if you like.


10. Glue the components to the front of the pouch starting with the leaf, the stems and the flowers with Aleeene’s Fast Tack Tacky Glue. Allow to dry overnight.

11. Use Aleene’s Liquid Fusion to attach buttons to front of flowers. Allow to dry.


12. Attach snap following directions on snap packaging. You can also opt to use Velcro tape here, but tack it down for strength. My snaps use a small tool and a hammer to attach to the felt. After attaching snaps, glue a button on top of the exposed snap back on the front of your pouch using Liquid Fusion glue. Allow to dry.

13. Use red thread to sew the EZ Crimp ends on the strap to the back of the pouch. I positioned my strap ends just inside of the glue line on the edges of pouch. Tie off thread and hit with a tiny dab of glue. Repeat for second strap end.
Clicky Web Analytics
Pin It button on image hover

Subscribe to our newsletter

* indicates required
I am interested in products and inspiration for...
Close