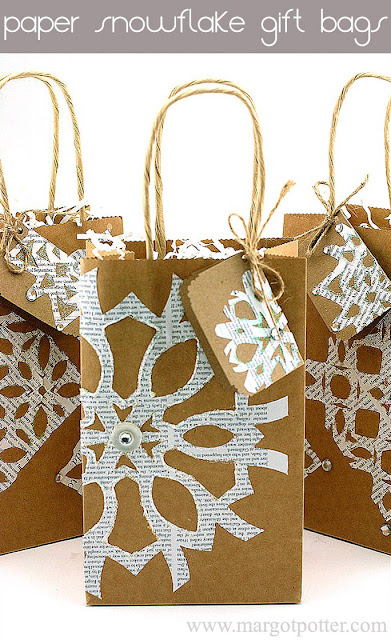
How to Make Paper Snowflake Embellished Gift Bags
Our favorite holiday movie here at Casa de Potter is Elf. (We watch it all year round!) In fact, we just watched it this past weekend. One of my favorite scenes is when Buddy decorates the department store and makes a flurry of fabulous paper snowflakes. It's been so long, I had to give myself a refresher course in how to make paper snowflakes. Once I had it down, I decided to make some using upcycled magazine pages, we have a lot of magazines piling up around here and I hate to throw them away.
Fair warning, this is very addictive. Why stop at hanging them from the tree, when you can layer them on plain kraft paper gift bags and tags? I am seriously smitten with these and plan to wrap all of our holiday gifts in snowflake embellished kraft paper wrappings this year.
(I guess I'm not the only one with snowflakes on my mind, Megan Nicholay made some seriously cute snowflake stencil t-shirts yesterday!)
Materials
Text printed magazine pages
Kraft gift bags
Kraft gift tags
Plastic rhinestones
White and Off White Buttons
Jute or hemp twine
Aleene’s Tacky Glue
Tools
Small paper friendly scissors
Hole punch
Paper plate
Tulip Sponge Pouncer
Cut standard size magazine pages into various sized snowflakes. Paper can be full size sheet or halves or quarters.
Fold right edge with bottom edge at center point on an angle that lines up with the top left corner.
Fold left side overlapping center as before with folded edge flush to edge of first fold, as in photo.
Fold this in half one final time. (The folds should be on the inside.)
Use a marker to trace a series of cuts or just roll freestyle, don’t cut too much off of folded edge, or your design may become too fragile. Simple, bold cuts work best.
Mark placement of snowflake on bag, cut off excess edge. Depending on size of snowflake, you can use the excess edge to make a second or third snowflake on bag. Cut them in different sizes for multiple snowflake bags!
Use spray adhesive or gently dab thinned Tacky glue from a paper plate using a sponge pouncer across back of snowflake, make sure to get entire snowflake covered with a thin coat of glue. Starting from the edge, press snowflake flush to bag using your fingers to remove any air bubbles. Take your time to prevent tearing paper. (You can also opt to use a brayer here.)
To embellish: Use Beads in a Bottle or a thin line of glue and loose glitter to add sparkling accents around the edges of all cut outs. Glue rhinestones and buttons to snowflakes with Tacky Glue. Allow bags to dry.
To create matching tags: Repeat process but use a smaller starting size of paper. Punch a hole in the top edge of tag and tie to handles of bags with jute twine.


11 comments:
I like reading an article that will make men and women think.
Also, thank you for allowing for me to comment!
Stop by my site where to download movies
What a great idea to use the printed magazine pages! I love them on the craft bags. I found a picture on Pinterest of cardboard ballerina poses with snowflakes as their tutus, and I like the idea of the words on them, maybe multiple layers. And I also saw a tutorial using coffee filters. Already round! Thanks for the great ideas Miss Margot! Enjoy the day. Erin
Hooray! Thank you, Erin! Yes, coffee filters work great too, they're very sturdy. You could paint or stamp them first and then cut them out, lots of possibilities.
Cheers,
Madge
The only thing that could make this more marvelous - is to be able to put it in a print format ... like recipes do - Otherwise - wonderful project for all ages.
Yes, my graphic skills are not up to par with my crafting skills. I am working on it, I do love the idea of printable craft tutorials!
Nice paper gift bags. I like it very much.
I just saw this in Pinterest. Just wondering... do you have a printable tutorial for this? I would love to have my kids try this.
Great idea! I love this bag. Thank you.
I am simply out of words after reading your article. I want to appreciate the way you handled such a complicated subject.
Magic Toy
So beautiful! Love it.
ElfiSanta.it
this is a beautiful information that you have shared with us , thanks ! :)
baby shark pillow case
baby yoda pillow case
burlap sofa pillow
Post a Comment