Showing posts with label Halloween projects. Show all posts

Monday, October 1

Look at what we have brewing up this month at iLoveToCreate.com!

Hop on over to our mother site iLoveToCreate.com and check out the amazing projects created by our craft designers. Each month, they make anywhere from 10-15 projects to showcase on our site. This month is one of our favorites...HALLOWEEN!  We had a lot of fun making both cute and spooky creations that we hope will inspire you to create for the season!  Follow the links below for each project to find full instructions.


And here's a hole other helping of amazing projects from iLoveToCreate.com to get your Halloween on. Find Halloween ideas here or click image below!

Saturday, October 30

31 Days of DIY Halloween - Boo Ghost Shirt

boo tee
Here's a super fun way for kids or kids at heart to get their creativity on this Halloween! You even get to have ooey gooey fun when you dip your hands in the paint to turn your handprints into spooky ghosts! This is a great project for those kids who think they might be a little too old to dress up, but still want to wear a cool Halloween shirt!

Materials:
Tulip® Fashion Form™
Tulip® Sponge Brushes™
Tulip® 3D Fashion Paint™
65131 Orange
65177 Green Glow
Tulip® Soft Fabric Paint™
BI15784 Glacier White
– Baby wipes
– Paper towels
– White chalk
– T-shirt – black – 100% cotton
– Foil

Instructions:
1. Insert Fashion Form into T-shirt to prevent paint seepage.
2. Squeeze a generous puddle of Glacier White Soft Fabric Paint onto a piece of foil. Use dry 1” foam brush to apply a thin even coat to palm and fingers on right hand, avoiding thumb. Position right hand so fingers point toward hem, and place in center about 2” below neckline. Having fingers slightly closed, press hand onto fabric firmly, making sure all paint has adhered. Carefully lift hand then repeat step with same hand to create next ghost, leaving about 1” space between handprints. Clean hands with a damp paper towel or baby wipe.
3. Use white chalk to lightly draw a “B” the same size as ghosts. Refer to photo.
4. Test flow of Orange Slick 3D Fashion Paint on paper towel. Squeezing with even pressure on bottle for a smooth line, follow chalk line of “B” letter.
5. Use Orange Slick to add oval shaped dots for eyes and mouth on each ghost.
6. Use Green Glow 3D Fashion Paint to outline letter and ghosts. Refer to photo. Add random dots around shirt where desired.
7. Let dry. Follow label instructions for care of garment.

Craft on! Click here for today's daily giveaway!

Thursday, October 14

31 Days of DIY Halloween - BOO-ti-ful Spirits Banner

boo banner

Would you believe this cute banner is made from a black t-shirt? Whether you’re making it for your front door, your office cubicle, or your Halloween party, it will be terrific when you turn out the lights, because the 3-D paint GLOWS in the DARK!

BOO-ti-ful Spirits Banner
Designed by Cheryl Ball

Materials:
Aleene's® Fabric Fusion® Permanent Dry Cleanable Fabric Adhesive
Tulip® Craft Mat™
Tulip® 3D Fashion Paint™ Value Packs and Sets
10 pack Glo
– Ribbons – assorted colors desired
– Paper towels
– White chalk – sharpened to a point
– Scissors
– Straight pins
– T-shirt – Black – XL
– Patterns (click here)

Instructions:
1. Cut out banner pattern then pin to double layer of black T-shirt. Cut out then repeat step creating a total of four pennants.

2. Flip over design pattern. Using white chalk, lightly draw over pattern lines holding up to window if needed to see lines.

3. Position first pattern, chalk side down, on first fabric pennant and hold in place. Press fingers along pattern lines to transfer design to fabric. Repeat with all designs and pennant pieces.

4. Place fabric pennant on Craft Mat – it will prevent paint from seeping through to work surface and is easy to clean. Test flow of paint on paper towel using an even pressure on bottle for a smooth line. Starting with first pennant, outline each section then fill in with color shown, applying an even coating. Use a straight pin to pop any bubble that may form. Carefully slide off Craft Mat and let dry. Repeat for remaining three pennants.

5. Measure and cut a 6-ft. length of ribbon for hanger. Center pennants along ribbon spacing approximately 4” between and leaving longer tails at each end. Apply a thin bead of Fabric Fusion on ribbon, position banner section in place and press to secure.

6. Using ruler on Craft Mat, measure and cut 8” sections from ribbons, cutting enough for about four ribbons between each pennant and at ends. Tie around long hanger ribbon as shown.

Craft on! Click here for today's daily giveaway!

Wednesday, October 13

31 Days of DIY Halloween – Freaky Fun "Boo" Pillows

boo pillow

Cheryl Ball 
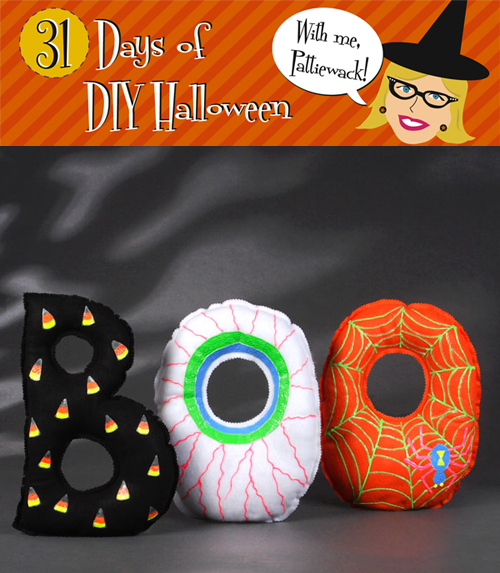
made these fun felt pillows and then painted them with Tulip® 3D Fashion Paint that really and truly glows in the dark! I want to sneak them to my house and put them on my black tweed couch for a quick Halloween makover. Do you think she’ll miss them?

Materials List:
Tulip® 3D Fashion Paint™ Value Packs and Sets
Neon Glow
Tulip® 3D Fashion Paint™
65177 Green Glow
– Felt yardage – ½ yard each – black, white, orange
– Paper towels
– Polyfill
– Sewing machine with matching thread
– Pinking shears
– Sewing needle
– Scissors
– White chalk sharpened to a sharp point
– Sewing pins
– Patterns (click here)

Instructions:
1. Enlarge pattern to about 16” tall – or desired size – then cut out.

2. Pin patterns onto double layers of felt. Sew right next to pattern. Remove pattern then use pinking shears to trim seams to about ½”.

3. Shake bottles of 3D Fashion Paint. Start flow of paint on paper towel using an even pressure on bottle for a smooth line.

4. Letter “B”: Use white chalk to draw about 1½” tall candy corn triangles onto front. Use Natural Glow to outline each triangle and fill in top third. Fill in second third with Neon Orange and remainder with Neon Yellow. Let dry then add a Natural Glow line between Yellow and Orange. Let dry.

5. Eyeball O: Squeeze a line of Neon Blue about 1” wide around center as shown then fill in. Add a ring of Neon Green around Blue. Use Neon Pink to create veins as shown, starting at center and working toward edge. Let dry then use Natural Glow to outline each ring and next to each vein. Let dry.

6. Spider Web O: Use white chalk to draw lines for web starting at center and moving toward edge. Draw on spider body, head and legs as shown. Fill in body and head with Neon Blue, legs with Neon Pink, and eyes and marking on back with Neon Yellow.

7. Use Green Glow for web, adding long lines first then filling in with curved lines between. Let dry. Use Natural Glow to outline entire spider and details then along each line of web. Let dry.

8. Carefully cut an opening on back of pillow. Fill each pillow with Polyfill, pin opening closed then use needle and thread to sew.

Craft on! Click here for today's daily giveaway!
Clicky Web Analytics
Pin It button on image hover

Subscribe to our newsletter

* indicates required
I am interested in products and inspiration for...
Close