Showing posts with label DIY crafts. Show all posts

Monday, May 26

Spray Dyed Scarf DIY


Happy Memorial Day! Today’s the official unofficial start of summer, so to get in the spirit and get the summer started I created a fun Spray Dyed Scarf that can also double as a beach wrap or light cover up. Using Tulip’s Spray Dye Kit it’s easy to get great color, add some stencils and you can create cool patterns.

Monday, April 28

Painted No Sew Market Tote


Create a cute and colorful “no sew” beach or market tote using dyes as paint on basic white t-shirt. 
Just because the package says tie dye doesn’t mean that’s how you have to use it. For those who don’t want to mess with the rubber bands Tulip Tie Dye is perfect for painting with too! 


Monday, April 14

Hex Nut Cuff DIY


Create a cool honeycomb design on a cuff using hex nuts with this hardware store inspired Hex Nut Cuff DIY tutorial. Turn up the chic factor even more by adding Tulip glam-it-up crystals to the centers of some of the hex nuts. 

Monday, March 24

Watercolor Dress DIY


Watercolor flowers just seem to be a great illustration of spring, they give a rainy day effect and have lots of color. This Watercolor Dress DIY is simple to make, you can add as many flowers as you want or just a few here and there. Tulip Fabric Markers are really fabulous for creating designs on clothing and by adding water you’ll have even more options.

Monday, March 10

T-Shirt into a Skirt with Hearts and Stripes


Almost anywhere you live it’s hard not to have spring fever right now and this DIY tutorial will show you how to turn a T-Shirt into a Skirt with Hearts and Stripes for girls, creating cute spring stripes and patterns using Tulip Fabric Spray Paints and Tulip Neon Heat Transfers. To put an extra spring in your step, I’ll also show you how to easily turn the sleeves into pockets!

Monday, February 24

Snow and Ice Dyeing


With all the snow and ice that’s piled up in the Northeast and other parts of the country right now, we thought it was about time we put it to good use! Create unique and amazing colors and patterns with Snow and Ice Dyeing it’s a super easy and fun way to dye fabric. This would be a great project to do with kids. I really love this technique for dyeing. It creates some amazing color mixes and designs and it does all the work for you!  In the summer you can do this with ice cubes! I think this is my new favorite way to dye fabric!  

Monday, December 23

DIY Printed Holiday Wrapping Paper


With just one day left until Christmas it’s time to make some Printed Wrapping Paper and get those gifts under the tree! Using the cute letter stencils, paints and glitter from Tulip you can add fun holiday messages and personalize any gift. Add some ribbons and bows and you’re all set!

TOOLS & MATERIALS:
Kraft paper 
Scissors

step 1
Layout your kraft paper on a flat surface and measure the package that you want to wrap, make sure that  you leave some extra room just in case.

Mark off the space that you will be painting.

step 2
Lay your stencils on your kraft paper.

Using your pouncer, paint inside your stencil.

step 3
Before your paint is dry, sprinkle your glitter on top of the letters you want to add glitter to.

Let dry and shake off any extra glitter.

Now, it’s time to wrap your packages! 

Have fun and customize your packages with your letters. Add fun and festive messages. 

Happy wrapping and Merry Christmas!

There's still time to make some quick gifts, to see some fun fashion DIY’s check out my blog at Trinkets in Bloom.

xoxo
Cathy

Monday, December 9

Festive DIY Holiday Boxers


HO, HO, HO craftionistas! If you haven’t already, it’s time to get festive! Create some fun and fabulous Holiday Boxer Shorts using the Tulip Holiday Fashion Art Kit. With everything you need to tie dye, add sparkle and embellish some whimsical boxer shorts to give as gifts or to wear yourself as festive sleep shorts. 

Monday, October 28

DIY Brooch using Beads in a Bottle


A fun mix of materials and a cool new way to make your own beads, this DIY Brooch using Tulip’s Beads in a Bottle adds sparkle and glamour to your outfit. Check out the tutorial to see how easy it is to make your own “beads” on most any surface.

Monday, September 23

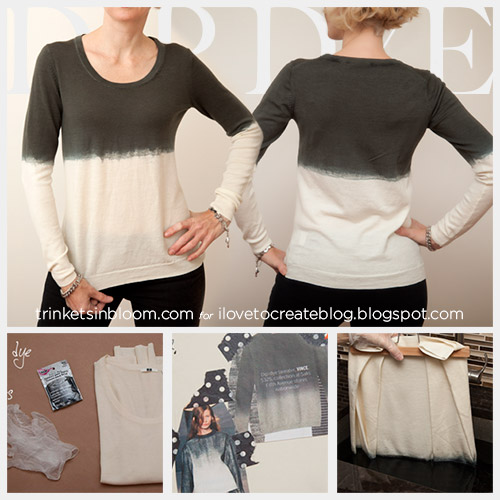
Dip Dye a Wool Sweater


Fall is officially here, so it's time to Dip Dye a Wool Sweater! As the weather gets cooler we all want to wear more cozy sweaters and just because you’re wearing wool doesn’t mean you can’t dye it or do any of the fun things you’d do to cotton. Wool can be a tricky fiber, but it can absolutely be dyed or dip dyed to keep you warm, cozy and on trend for fall.

Monday, September 9

Messenger Bag DIY


Add a personal touch to a plain canvas bag, using stencils, fabric markers and fabric spray paints to create a cool personalized Messenger Bag DIY. I used the Tulip Body Art Stencils to create tattoo inspired designs on this bag, by filling them in with fabric markers. This is a really cool and simple way to create designs and patterns quickly and easily. 

Tuesday, August 6

DIY Zipper Bracelet With Chains


Gold chains and a punk rock revival are huge trends for fall. So why not add a little edge to your accessories with this DIY Zipper Bracelet with Chains. Using two zippers with the chains in between makes this a wide statement bracelet. Have fun and show your edgy side, stack it with more gold chains or wear it alone, either way you’re sure to make an impact.

Tuesday, July 16

DIY Jeans with Printed Cuffs


Sometimes a simple solution can be the best, I love the subtle color and pattern on these DIY Jeans with Printed Cuffs. For those who don’t want to wear an allover printed pair of jeans this is a perfect solution. A subtle pop of color at the ankles adds an unexpected touch and just the right amount of color. Combine them with this seasons brightly colored jeans, you'll have a fun and on trend pair of DIY Jeans with Printed Cuffs.

Tuesday, July 9

DIY Dip Dye Skirt


Create a cute and breezy Dip Dye Skirt for summer with inexpensive fabric and Tulip’s Liquid Dye. I love using unexpected materials for projects (this fabric is actually for home furnishings), but the print was so cute all I could think of was making something to wear out of it. This is the first time I’ve tried Tulip’s Liquid Dye and I think I’m a convert! This stuff is amazing! The best part is how quickly you get a great strong color and there’s very little to rinse out! It’s so easy to use, you’re going to love it too!

Tuesday, July 2

Altered Tie-Dye T-shirt Challenge featuring Cathy of Trinkets in Bloom


Summer and tie dye just seem to go perfectly together and this DIY Tie Dye Beach Cover Up, made using Tulip’s Tie Dye Kit, is just the thing you need to keep cool and chic on the beach this summer! And with a fun contrast trim, you can easily wear this dress for lunch or drinks after a day of sunning! Stay cool!


TOOLS & MATERIALS:

1 T-shirt (Large/long enough to fit you like a short dress.)
1 Tulip Tie Dye Kit (I used Moody Blues)
Scissors
Sewing machine
Pins
Ruler or tape measure
Ric rac or other trim (optional)


step 1
Prepare your dye and the space where you will be dyeing your shirt.

I used my bathtub, but if you have a space where you can do it outside, that would work too.

First I laid down a large trash bag, then two layers of paper towels to catch the drips. Then I used a baking rack on top. The baking rack it really great to keep your fabric from sitting in the dye which can be bad especially if you’re using more than one color.

Fill the bottle with the dye powder up to the fill line with water and shake.

step 2
Time to tie your shirt.

I used an accordion pleat to make this design.

Lay your shirt out flat and make vertical pleats about 1.5 inches wide.

When your shirt is all pleated, wrap rubber bands about every 3 inches.
Make sure your rubber bands are very tight.

step 3
Lay your shirt on the baking rack you’ve prepared for dying.

Squeeze the dye onto your shirt in the center of each section.

Let your dye set for 6-8 hours. The longer you let your dye sit the stronger
and darker your color will be.

step 4
When your dye is ready cut off your rubber bands and rinse your shirt.

Keep rinsing your shirt until the water runs clear. (This can take awhile.)

Then wash and dry your shirt according to the instructions that came with your dye.

step 5
Lay your shirt out flat and measure where you will cut. 

You can also put your shirt on and pin along the neck where you want to cut.

Use a ruler or tape measure to make sure you cut a straight line from your neck to your arm hole.

TIP: Make the back side a little wider than the front.

step 6
Cut around the neck band on the sides and down in a straight line to the arm hole.
Do this for both sides.

step 7
Turn your shirt inside out and try it on.

Pin the sides of your shirt to fit snugly under your your arms, this will keep the armholes from gaping.

Take your shirt off and lay it out flat.

Use your tape measure to make a straight line from where you pinned your arm hole to the bottom hem of your shirt.

step 8
Using your sewing machine, sew a straight seam down each side of your shirt where you pinned it.

Before you turn it right side out or cut anything try it on again to make sure it fits the way you want.

Then cut off the extra fabric on your seams.

step 9
After all my sewing and cutting I couldn’t help but want to add something else. RIC RAC!!!

(Fortunately I had this great hot pink large ric rac just waiting to be used!)

Pin your ric rac to the bottom of your shirt and around your armholes. 

Use your sewing machine very carefully sew your ric rac on right down the center of it and right along the edge of your shirt.
For more fashion DIY's from Trinkets in Bloom click here.

Add some sunnies, cute flip flops, sunshine and you’re ready for a day at the beach!

Clicky Web Analytics
Pin It button on image hover

Subscribe to our newsletter

* indicates required
I am interested in products and inspiration for...
Close