Showing posts with label tulip fabric dye. Show all posts

Monday, January 19

DIY Dip-Dye Lampshade

There is something to be said for the plain white lampshade; it's classic, inexpensive, and goes with just about everything. But wouldn't it be nice to jazz up that shade with a special touch? A quick dip in Tulip fabric dye takes this lamp to the next level!
Best part of this project? It's crazy easy. You are four steps swap from something seriously snazzy.

Tuesday, May 20

The $10 Lamp!

I've been desperate to change up my living space. What once made me happy now makes me sigh. And so I've decided to do something about it and anything I can DIY and work out on the cheap is a project that has me smiling! Today I'm sharing with you my $10 lamp. That's right... All of my materials cost a cool $10. Pretty spiffy!

Monday, September 23

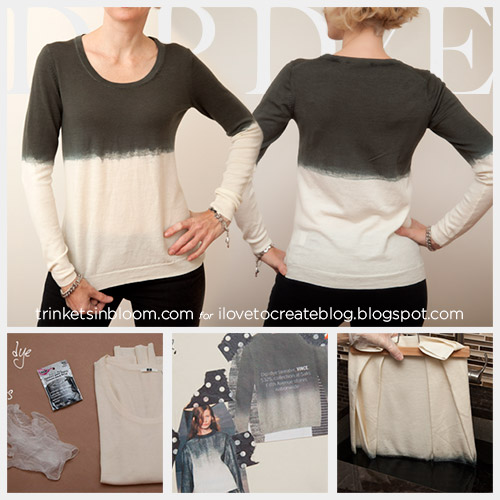
Dip Dye a Wool Sweater


Fall is officially here, so it's time to Dip Dye a Wool Sweater! As the weather gets cooler we all want to wear more cozy sweaters and just because you’re wearing wool doesn’t mean you can’t dye it or do any of the fun things you’d do to cotton. Wool can be a tricky fiber, but it can absolutely be dyed or dip dyed to keep you warm, cozy and on trend for fall.

Sunday, May 26

How to make Bohemian Flags


Bohemian Flags 
Jaderbomb for iLoveToCreate


There is nothing like a set of whimsical flags flowing in your back yard catching the attention of everyone in your neighborhood or your friends and family. These flags super duper easy to make. It is also a project that relieves stress. You know, a little Art Therapy for ya! Let's get started.
You will need:
*Tulip 5 Color Tie-Dye Kit :  (Red, Orange, Lime, Teal, Violet)
*Plain White Napkins (I got these from Target)
*Glue Gun & Hot Glue 
*Tulip Fabric Markers
*Twine or Bias Tape
*Tulip Fabric Spray Paint (Glitter)
*Scribbles 3-D Paint
*Lot's of LOVE


I wanted to show you what comes with the Tie-Dye kit.
*Rubber Bands
*Powdered Dye
*Clear Gloves
*Instructions
*Squirt Bottles
(p.s. keep these you can reuse them)
I think this is my favorite part of the project. Using all of these materials make me giddy as a "giddy little girl". What is crafting if you can't use great products like these!
Fill a bowl up with water. On the side get an old tray with an old cookie drying rack in it. If you don't have this it's ok, just use whatever you have. I like the drying rack because it allows the dye to drip below it. 
Soak one white fabric napkin in the bowl of water. 
Make sure to cut a "little" hole on your dye packet. We are not using a lot of this and we want to store it without getting it all over. 
This is how much I actually put in my bottle. Not too much. We want a light color on our napkins. 
 
What! No Tie-Dye? Well I figured I would do something a little different today. After you squeeze water out of your napkin place it in your tray. Pick the color you want and start applying it all over the wet napkin. We are creating solid shades of color with our Tie-Dye. 
Repeat the steps until you are done with all of your napkins. I hung my napkins on a clothesline to dry. Make sure you don't hang in the middle of the day. If the sun hits the napkins more on one side it could dry that side faster and cause the color to change.
If you don't have a clothesline you can lay them flat on the ground to dry.
Well looky here! Someone just had to say HI! Mr. Tacky always pops up at my house. 
Your napkins should be done drying outside in 5 hours, maybe 4. Wash them all together, with nothing else.  Then pop them in the dryer. I ironed them when they came out. Trust me, they will be wrinkled. Look how spiffy these babies look. 

The next thing you want to do is:
 1. Lay your napkin flat and cut the edges off.
2. Fold your napkin into fourths and cut the sides. We are just creating small squares. If you want to do this differently you can. Also, remember you can make your squares smaller than what I did in the picture.
3.  After you cut your sides, pull the fabric around all four sides. This will make the edges look frayed.
4.  Tadahh! You will be left with a stack of frayed fabric.
 
P.S. The one thing I love about the Tulip Fabric Markers is...they have two sides! One side is a brush tip and the other side is a fine tip. This is so smart! You can really put those little details in your work now.

I started by drawing my flowers on the fabric squares with the black fabric marker. I figured that would be the easiest thing to do. When you are done it will kinda feel like a coloring book sheet. Have fun with your colors.
I tested the colors on the scrap sheets of fabric to make sure the colors went well together. Set aside for 15 minutes to dry.
 
After the fabric markers are dry I outlined the flowers with Scribbles 3-D Paint. This was the final touch that was needed. Big SIGH. I am in love with them. This takes about 3 hours to dry completely.
 
Last step is to coat the fabric with some Tulip fabric spray paint.
 
It adds a subtle coat of fine glitter on them. You know me, I love glitter.
 
This is the fun part, putting it all together. You can use bias tape or twine for this step. I like bias tape because it makes them look more elegant and finished. and it comes in ton's of colors.
*If you want twine just put a line of hot glue on the back on a square then place the twine on top.
*If you use the bias tape open it up and put a line of hot glue inside then place fabric on top. I put a little more glue on top of fabric then fold the top flap of bias tape on top of it.
 
I can't begin to tell you how much fun your kids would have making these.
 

The only rule for this project is to have FUN. You could do this project for special occasions and get a group of friends to each make a square. I think that is so special. Make your kids birthday flags, holiday flags or whatever you can think of. I love all of you "Tye-Dyers" big big! 
Huge hugs from my craft room to yours!
See you in the next post.
P.S. I promise when you start playing with Tie-Dye you won't be able to stop, hehe! 
*Find more of my DIY decor at JADERBOMB.COM*

Wednesday, November 9

iLoveToCreate Teen Crafts: Onesie, Twosie


Avalon Potter
"Teen crafted, mom approved."

I was asked to decorate a onesie for an upcoming Baby Shower.  I knew right away I wanted to use a Tulip Iron On transfer and the phrase: "Little Love Muffin."  I know lots of teens have babies in their families and it's really easy and fun to make onesies using products from iLoveToCreate.  My mom was so impressed with my design, she made one too!


Materials
Washed cotton baby onesie
Tulip Fabric Markers
Tulip Iron on Transfers
Tulip Letter Stencils
Small cardboard form to slide inside shirt while decorating

Tools
Tulip Mini Fashion Iron

1. Wash the onesie to remove the sizing. Slide a piece of thick cardboard into the onesie to protect the back from the inks. You can also use a book for this because onesies are so small!

2. Use an iron to attach applique to shirt. Allow to cool.

3. Use the fabric markers and the stencil to write your words.

4. Mom used the Tulip Beads in a Bottle paint to add dimension to her wings, halo and hand written words.

Wednesday, July 6

MAYA IN THE MOMENT TEEN CRAFT: DIY Charcoal Gypsy Skirt

 I had a plain white gypsy skirt that I wanted to dye. I didn't want a crazy rainbow look, but something more subdued and romantic. All it took was one pack of Tulip Fabric Dye to get the charcoal look I wanted!

 This is what you need. For a deeper color of black, you can boil water on the stove and dye your skirt that way. I didn't want dark black, so I used the hot/warm feature on the washing machine.

 Scrunch up the skirt and add rubberbands all the way down. I doubled them.

 Put the washer on HOT water. Again, if you want a darker shade of black, boil water on the stove. There are directions on the back of the package.

 Pour in the dye.

 Add 1/4 cup of salt.

 Put it on the light wash cycle, let it set in the dye for about an hour. When it is done with the rinse cycle, take out the skirt and hang to dry. I used a 100% cotton skirt and if I would have put it in the dryer it would have shrunk, so I hung it to dry.
I love how it turned out, most of all I love that I did this all by myself!


Visit us on Facebook!
Craft on! Click here for today's daily giveaway!

Tuesday, July 5

The Popsicle Dress

Today I'm going to show you how I took an old dress and spiced it up with some dye.  I now call it my popsicle dress.  (It reminds me of those big bomber popsicles I'd buy from the drug store as a kid.  Yum!  We'd save our money and then ride our bikes there.) 

The dress was one I had purchased a while back.  It fit well, but it was cream-colored and kind of blah on me.  I never found a shirt that matched it well either.  So, I decided it was time to play with my Tulip Dye kit.  I have never dyed fabric before.  The kit made it really easy.  It has bright pink, lime green, and bright blue in it.  It also includes some fun tools and a booklet showing you some different dyeing techniques.


  I went to the garage and hung up my dress (covering the ground underneath it).  I mixed up all three colors and used the spray bottle attachment.  (Here's the dress before.)


I sprayed lime green on top.  It was a lighter lime green, so I ended up spraying blue over the green to make it darker.  Then I sprayed just blue in the middle and then bright pink at the bottom.  The colors blend well if you do it quickly while it's all still wet.


It still fits well and it's still comfortable, but now it screams of summer fun.  Woo-hoo!  Bring on the popsicles and the fun, baby!


Now I'm looking through my closet to see what else I could dye.  It's pretty fun.


Thursday, February 11

Wood You be Mine


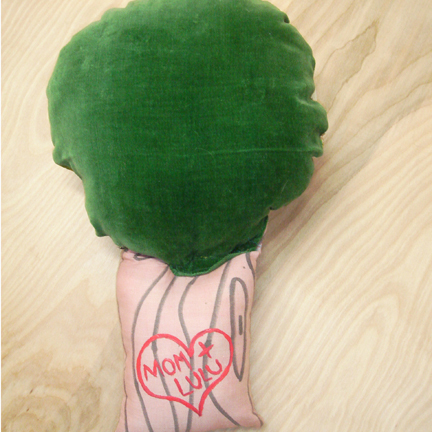
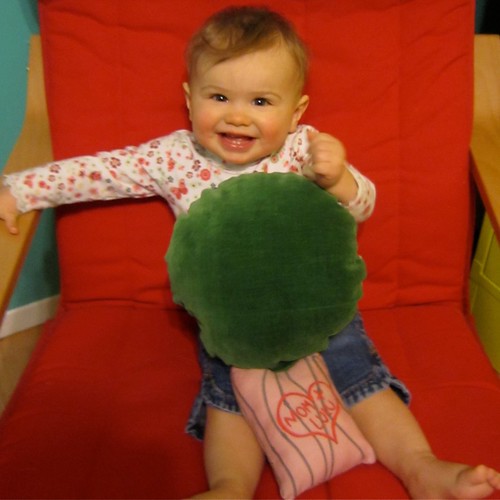
As I mentioned on my blog yesterday I'm a little obsessed with the whole initials carved into the tree thing. So much so that I had to try my hand at it. Since it is Tallulah's first Valentines Day I decided I would make her a carved tree softie. Who says initials in trees are only for couples, what about moms and babies? So cozy in for a sewing, dying, painting, pillow kinda I Love to Create.


SUPPLIES
Tulip Fabric Markers
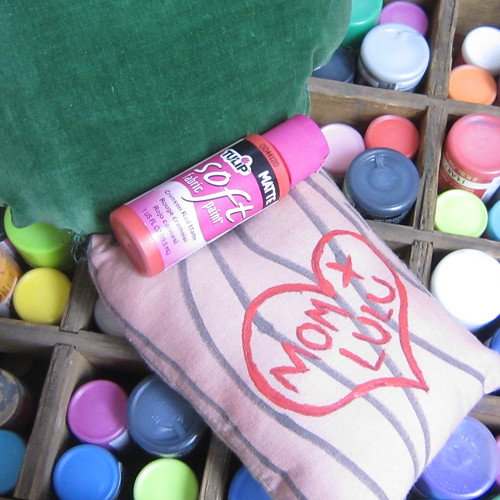
Tulip Soft Fabric Paint
Tulip Fabric Dye
Paint Brush
White Fabric
Green Fabric
Sewing Machine & Stuff
Stuffing
Scissors


WOODGRAIN
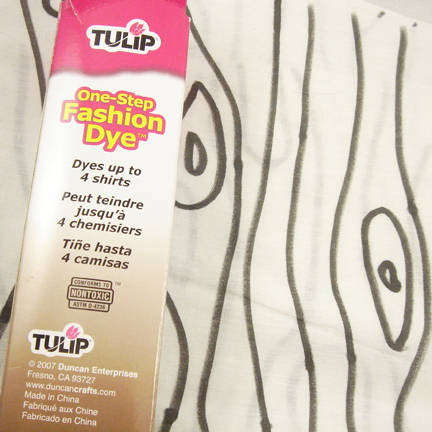
Like most of my craft projects this plushie started in one direction and ended up completely different. My friend Noelle was sweet enough to give me some fabric that looked like woodgrain. However, in the end I decided to make my own. Using a black Tulip Fabric Marker I drew a woodgrain pattern onto white cotton fabric. You can make the pattern as detailed as you would like.


DYE JOB
Once I had the wood pattern drawn onto my white fabric it was time to make my tree trunk brown. Follow the instructions on the package.


TREE TOPS
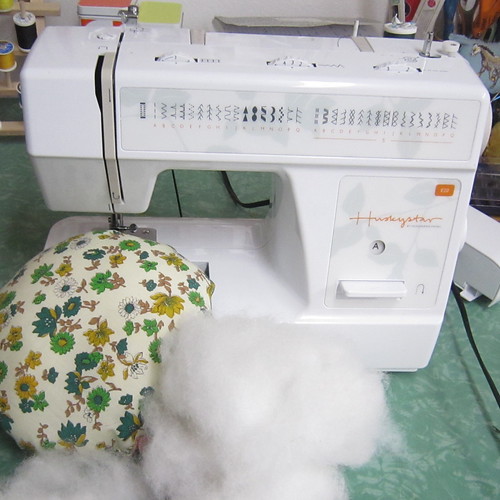
Using green fabric (if you had more white fabric you could always dye it green) draw a circle or more random pattern for your tree top. Cut out the fabric and pin right sides together, stitch leaving a small slit, turn right side out stuff and hand sew the slit closed.

Do the same thing with your tree trunk and then sew them together.


PAINT YOUR INITIALS IN THE TREE
Once the pillow was completely stuffed and sewn I painted a heart with the words: "Mom + Lulu". Now Tallulah and I have our own sweetheart tree!

Clicky Web Analytics
Pin It button on image hover

Subscribe to our newsletter

* indicates required
I am interested in products and inspiration for...
Close