Showing posts with label Halloween costume. Show all posts

Monday, October 6

21 Costumes To DIY With Tulip And Aleene's!


I like that I'm not exactly like everyone else. And when it came to Halloween, I didn't want to dress like everyone else. In high school I went dressed in a purple suit with a drawn on goatee and lots of jewelry with my friend dressed similarly. Ever since then, I've thought that DIY costumes were the BEST! Here are 21 costumes that ROCK that you can make yourself with the help of iLoveToCreate products! 

Friday, September 27

How to Make a Spider Web Necklace


If you are in need of a super fun and striking accent to your upcoming Halloween costume, I think this spider web necklace might be right up your alley (hopefully it's not a creepy nighttime alley). All it takes is three things to make this spider web necklace...what's easier than that?  Watch the video below and I show you step by step how to make it!

Wednesday, October 17

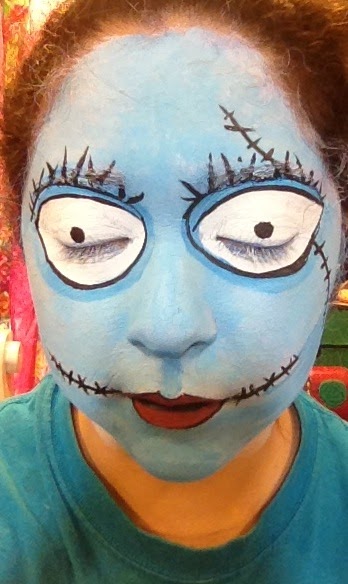
MAYA IN THE MOMENT: Sally (Nightmare Before Christmas) Facepainting Tutorial!


Hello! Since Halloween is just around the corner, and everyone is doing face painting tutorials....I thought I should do one! This is Sally from Nightmare Before Christmas! I love Tim Burton, and when I was little I asked my parents to paint me as the Corpse Bride. But Nightmare Before Christmas is the original TB classic, so much respect to my girl, Sally!


LINK


SUPPLIES:


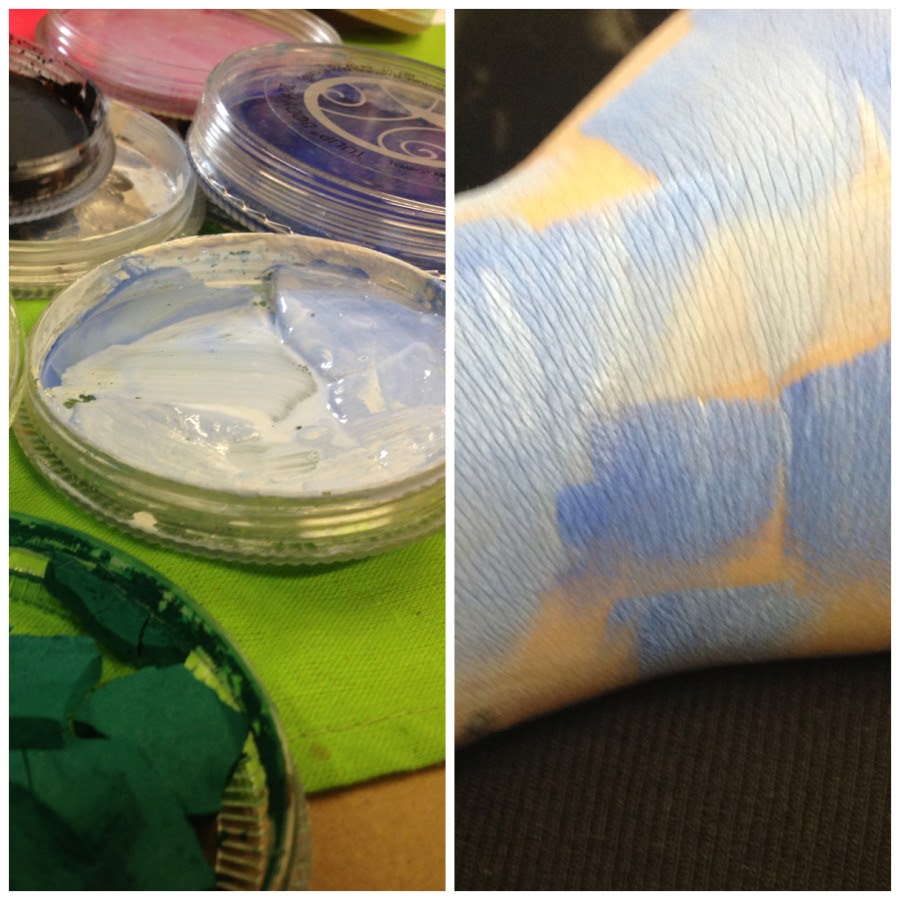
First I mixed the white and the blue and tested it on my hand. I love that these paints are super creamy and you can blend colors really easily.

You want to pull up a picture to use as a guide! I used this one:

As far as the base coat - I added a dash of green to get a teal undertone. Next I covered my whole face using a make-up wedge (you can also use a soft paintbrush), and started with the painting the eyes and lips. For the eyes, create two large white ovals that go around your eyebrows and under your eyes as well. you can paint on top of the blue, or do the white separate from the blue.

Next use the deep red to create curvy lips, outline them in black, like Sally. For face painting, you always want to exaggerate the details to look more dramatic!

 Next, I had my dad help me with the eyes and eyelashes. Since I couldnt see....haha :) Paint on the stitches on each end of your mouth and up the side of the face. Don't forget the eyelashes and eyelid contouring, use a darker shade for that!

I could  have left it like this, but I wanted to do something cool with my closed eyelids, so we painted dots, again like Sally! Once you're done, paint your neck a little bit darker blue and add the stitches there too. 

You can make a maroon wig out of yarn or buy one at the costume shop. As far as the rag dress, look at the thrift store for a patchwork style. Or you could take a solid dress and use Fabric Fusion and glue fabric swatches all over it. 

Lastly add the last painted on stitches and you're done!

Here is my other Halloween facepainting tutorial!

Thanks for checking out my project! 
Come visit me on Facebook - http://facebook.com/mayainthemoment

Tuesday, October 26

Glow-in-the-Dark Ghoulish Tee


Here's a last-minute Halloween costume that easily transitions from day to night! Wear the T-shirt casually by day in all the sunny places, then skulk in the shadows at night and you'll take on an eerie glow. (A dark-colored tee ensures that the glow will be all the more dramatic.)

Materials:

-A plain T-shirt

-Scrap paper

-Sponge brush

-Tulip Neon Glow-in-the-Dark Paint in "Natural Glow"

-Black permanent marker (optional, for the stencil)

-Freezer or parchment paper (optional, for the stencil)

-Scissors (optional, for the stencil)


Make it:

1. Draw the outline of a skull (teeth, nasal cavities, eye sockets) on the stencil paper, then cut out the pieces. Insert a piece of scrap paper (like a paper grocery bag) between the layers of the T-shirt and lay it flat. Lay the stencil over the front of the shirt. (Note: If you're feeling brave, skip the stencil and freehand the design on the shirt.)


2. Squeeze out some glow-in-the-dark paint and generously sponge it onto the front of the T-shirt.


3. Cover the whole design evenly!


4. Peel off the stencil and let the paint dry completely.


5. Then slide out the scrap paper from between the layers and wriggle yourself in there instead. In other words, try on you shirt and find the light! (And pack a flashlight in order to recharge as needed throughout the witching hours.) I tried to take a cool picture of the glowing shirt in the dark, but alas, it proved too challenging for my weakling camera. But it looks SO ghoulishly good.


Craft on! Click here for today's daily giveaway!

Friday, October 8

Costume-ology 101: Tulip Glow Fabric Paint


One of our designers, Cheryl Ball, shows us how to add Tulip Glow Fabric Paint to Halloween costumes! Not only is it fun, and adds a dimensional texture, but it is great for safety reasons too!

Craft on!Click here for today's daily giveaway!

How to Make Glittered Dorothy Shoes


My little niece, Sarah, is going as Dorothy from the Wizard of Oz for Halloween. Everyone knows the most important part - aside from Toto, is the pair of ruby slippers. Unfortunately, Sarah's mom couldn't find anything comparable at the stores, so she asked me to transform the above vinyl pair the best I could with glitter.

First thing I did was Google the shoes for a picture.


I wanted to be purist so I bought sequins and tried a Crafty Chica version, which came out like this...


Eh...they didn't quite come out like the original...Sarah and I had a mini-conference at my craft table and made an executive decision to go with old school micro glitter (plus, I ran out of sequins!). This is the end result:


(Bows still to come!)

They came out super sparkly and Sarah-approved. I would have added red crystals all over, but Sarah wanted them as is. She is ready to rock the grade school Halloween party!

To make these shoes, first paint them red with Tulip® Soft Fabric Paint™ , if they are not so already.

If the shoes are vinyl, you'll need to sand them down to give them "grip".

Next, coat with Aleene's Fabric Fusion one section at a time and pour on the glitter (I used my Crafty Chica Rockabilly Ruby).

I wanted these shoes to last a long time, so I finished them off with two coats of high gloss Aleene's® Spray Acrylic Sealer™.

Craft on! Click here for today's daily giveaway!

Wednesday, October 6

ILoveToCreate Teen Crafts: Hallowe'en Masquerade Ball Mask

Craft on!Click here for today's daily giveaway!


I was really impressed when Avalon showed me the mask she created and the outfit she styled to go with it! Tres chic, n'est pas? I must admit, seeing my little girl look so sophisticated and grown up was a little tough to take, but I'm so very proud of her creativity. Here's this week's fabulous teen craft created by the lovely and talented Avalon Potter!

Hallowe'en Masquerade Ball Mask
Copyright Avalon Potter
ILovetoCreate Teen Crafts
"Teen crafted, mom approved."

Since I created an invitation to a Halloween masquerade ball last week, I decided that this week I would make a mask for the ball. Every girl needs a sparkly mask to complete her fabulous ensemble. This is a great project because you really make it your own, for example you can switch up the pattern or size of the crystals or you could even change the color pallet of the mask. I had a lot of fun making this and I hope you will too.


Materials
• A plain mask of any color (preferably fabric)
• A fabric flower of any color
• Tulip Glam-it-up™ crystals
• Tulip Glam-it-up™ cordless heat setting tool
• Aleene’s Liquid Fusion glue


Instructions
Step 1. Once you have gathered all of your materials get your mask, hot fix crystals, and applicator. Plan out where you want your crystals to go so you know where to apply them ahead of time.

Step 2. Apply crystals using your applicator. Designer Note: If your mask is plastic or made of plastic do not use the applicator it will melt the mask. Use Liquid Fusion glue to apply the crystals instead.

Step 3. Once you have finished applying your crystals, decide where you will want your fabric flower to go. I put mine in the upper corner of the mask.

Step 4. Use Liquid Fusion to glue the flower to the mask.

Step 5. Allow glue to dry. Once you finish you’ll have a beautiful mask to complete your costume.
Clicky Web Analytics
Pin It button on image hover

Subscribe to our newsletter

* indicates required
I am interested in products and inspiration for...
Close