Showing posts with label iron ons. Show all posts

Tuesday, July 26

Superhero Arm Warmers from an Old T-shirt!

This T-shirt transformation project is my favorite of the accessories in my first book. They're super easy to stitch up in an afternoon, and even easier to embellish with iron-on glitter sheets--which seriously increase the superhero factor.


These arm warmers are especially good for:
1) Completing late night deadlines (reports, papers, presentations, tax filing, etc.).
2) Healing goose-bumped flesh in the over-air-conditioned spaces of warm-weather climates.
3) Protecting long-armed folks from that pesky draft caused by the gap between the glove and sleeve in cold weather climates.
4) Shielding the knuckles of bicyclists from biting winds when they ride really fast.
5) Executing superhero power stances.

Materials:
-1 or more old T-shirts (with the bottom hem intact)
-Fabric marking tool
-Ruler
-All-purpose scissors
-Fabric scissors
-Needle and thread (or sewing machine)
-Tulip Fashion Glitter Shimmer Transfer Sheets
-Pressing cloth
-Iron


1. Measure the distance around the middle of your forearm (x). Mark a rectangle x" wide and between 11" and 14" tall that lines up along one of the side folds of the T-shirt and extends up from the bottom hem.


2. Use the fabric scissors to cut out the rectangle through both layers.


3. Cut open the side, along the fold of the shirt.


4. Fold each rectangle, right sides in, and make two marks along each of the open edges that measure 1 1/2" and 3 1/2" from the hem.


5. Stitch along the open edge, about 1/4" from edge, leaving an opening (for the thumbs!) between the two marks.


6. Turn the arm warmers right side out and orient the thumb holes about one-third from the edge.


7. Use all-purpose scissors to cut out fun shapes from the iron-on glitter sheets (in pairs, if you want your arm warmers to match).


8. Keeping the arm warmers oriented as they were in Step 6, flip them over and arrange the glitter shapes near the hem. Peel away the shiny surface layer from the shapes, lay a pressing cloth over the arm warmers (being careful not to disturb the placement of the shapes), and press firmly with the iron for about 40 seconds. Repeat if necessary to set the glitter transfer.


9. Turn off and unplug the iron. Try on your new pair of superhero arm warmers!


10. Use all the shapes you cut out in Step 7 to make more!


Optional: Use remaining T-shirt scraps to make a matching superhero mask or headband!


Visit us on Facebook!
Craft on!Click here for today's daily giveaway!

Thursday, September 17

Iron On Hair Clips and Jewelry


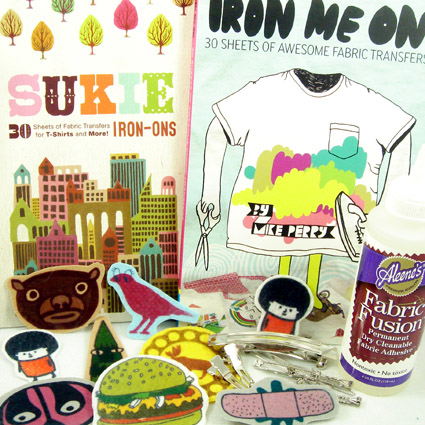
My inspiration for today’s I Love to Create column comes from two places. First there were the iron-on’s by Chronicle Books. Adorable illustrations by Mike Perry and Sukie of kittens on mopeds and football helmets with skulls. The books sat mockingly on my shelf never getting used except at the occasional onesie making baby shower. Recently while looking for the perfect hair clip I came across a barrette I bought at Maker Faire last year. I’m embarrassed to say I don’t know who made the cute little owl on felt, but I adore him nonetheless. The owl is a stamp on felt which got me to thinking: if you can stamp on felt, why couldn’t you iron on it? I plugged in my iron for the first time in God knows how long, drug out stacks of stiffened craft felt and got busy. The iron-on transfers actually were more vibrant on the felt than they ever were on clothing. I was on to something good.


SUPPLIES
Iron On Transfers
Fabric Fusion Glue
Craft Felt
Blank Hair Clips and Pins
Liquid Fusion Glue
Eyelets
Scissors
Pinking Shears
Chain
Pliers
Jump Rings
Crop-o-Dile


The first thing I did was to choose a few of my favorite motifs from the books. Luckily lots of the illustrations are small and some even come in pairs, just right for a set of hair clips.

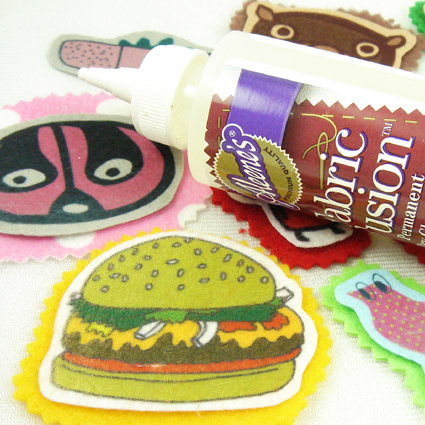
Following the instructions for the fabric transfers I ironed the images onto different color pieces of craft felt. I tried to use the pre-stiffened kind when I could.


I love layering color so I added a second piece of felt which I cut out with pinking shears for a decorative edge.

Using my Fabric Fusion glue I stuck the two coordinating pieces together and waited anxiously for them to dry.


Once the two pieces of felt were stuck together I had to decide which pieces were going to be barrettes, pins or necklaces. Rings and Things has an amazing selection of hairclips, pins and jewelry parts. For the pieces being made into pins and hair clips I attached the felt to a blank using Liquid Fusion Glue.


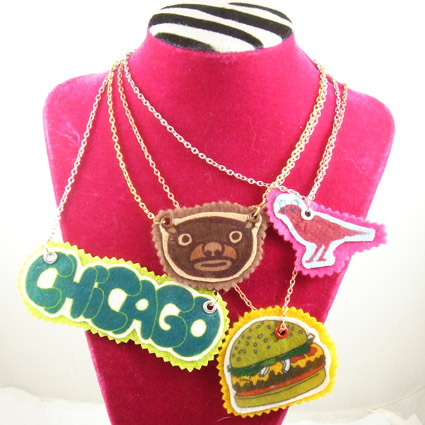
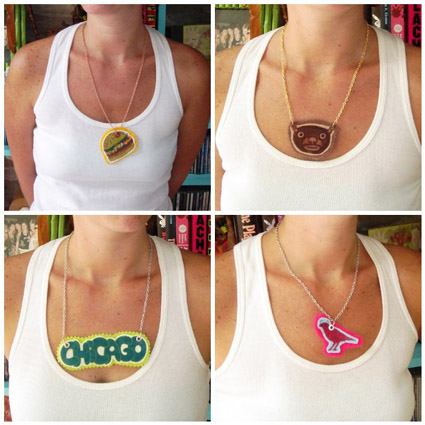
Once I got started, I found it hard to stop ironing. For the larger designs I ironed and layered just as I had with the hair clips. I used my Crop-o-Dile and some eyelets to make holes in the felt. I attached a chain using jump rings and my necklace was born. Since the craft felt was stiff the necklaces keep their shape.


If it will sit still long enough I will find a way to make it into jewelry!

Monday, May 4

Oh, Baby Onesie Decorating Contest


We LOVE our baby onesies . . . so cute, so tiny, so perfect for sweet Tulip® Baby Couture™ Iron-On Transfer™ designs. What mama wouldn't love a basket filled with decorated onesies for every day of the week?!

We're launching our Oh, Baby Onesie Decorating Contest from now until June 15th. Choose your favorite Tulip® Baby Couture™ and Tulip® Fashion Art products to transform plain and practical onesies to Baby Couture! The winner will receive $30 worth of Tulip® Fashion Art products. And check these SUPER SPECIALS to get you started!

OK, so just to clarify, you are encouraged to use the Baby Couture iron-on designs; but you don't have to. All we ask is that you use a Tulip product(s) of your choosing and totally glam up that onesie. You can stitch, slash, spray it, just be sure to use a Tulip product of some kind! Here's some suggestions:

– Dye your onesie with Tulip® One-Step Fashion Dyes™.

– Add amazing details and brushwork detail with Tulip® Soft Fabric Paint™.

– Add dimension with Tulip® 3D Fashion Paint.

– Stencil on your look with one of our many Tulip® stencils!

– Check out our Tulip® product page for more great projects to get inspired by!

To enter, join our www.ilovetocreate.com community and add your pic to the online gallery or add it to the facebook fan gallery instead. The best determined winning entrant will be chosen from all the entries.

Oh and for additional inspiration, check out Jennifer Perkin's blog on How to Throw a Onesie Making Party! Lots of great ideas!!
Clicky Web Analytics
Pin It button on image hover

Subscribe to our newsletter

* indicates required
I am interested in products and inspiration for...
Close