
You know, sometime simple is good, and these are SO simple and fun to make. Put the supplies for this cute craft in a box and save it for an after school project for the kids when it’s too wet or cold outside. And if you make a ton of them, they would be terrific to scatter down the middle of a party table, or to take to the office to sneak onto your co-workers’ desks for a nice surprise!
Paper Pumpkins
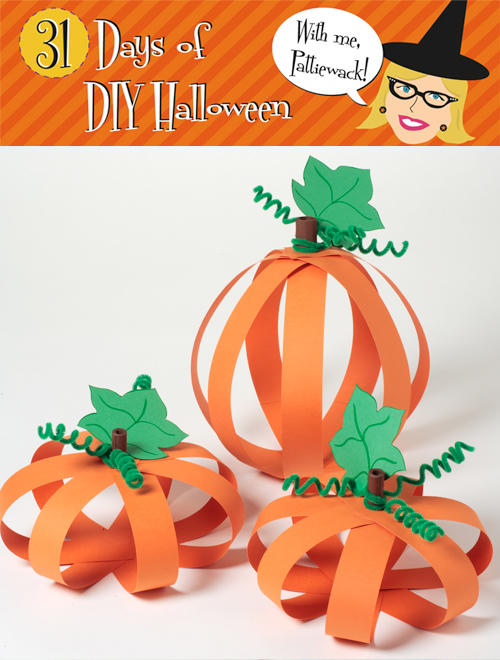
Materials List:
– Aleene’s® Crystal Clear Tacky Spray™
– Scissors
– 12” square paper, 4 orange
– Permanent marker, green
– Personal paper cutter
– 12” square paper, green
– Pencil
– Hole punch, large
– 12” square paper, brown
– Pipe cleaners, 9 green
– Patterns (click here for pattern)
Instructions:
1. Cut orange paper into 1-1/2” wide strips, using paper cutter.
2. Arrange seven strips in an asterisk shape with ends slightly overlapping in center, making sure they are even width apart. 3. Apply Tacky Spray on one end at time and press together. Let dry.
3. Pull up other ends to middle. Apply Tacky Spray on ends and place together. Let dry.
4. Trace leaf pattern on green paper. Cut out with scissors.
5. Use green marker to draw veins.
6. Punch a hole at center bottom of leaf. Place a pipe cleaner through hole and twist end around pipe cleaner.
7. Curl end of pipe cleaner around pencil. Remove pencil, leaving a curly-q. Repeat with other pipe cleaners, using three per pumpkin.
8. Cut a 1” wide strip of brown paper and roll on pencil. Apply Tacky Spray on end of roll to adhere.
9. Spray one end with glue and press on top of pumpkin. Refer to photo.
10. Wrap pipe cleaners and leaf around stem. Repeat all steps to make other pumpkins.
Craft on! Click here for today's daily giveaway!
No comments:
Post a Comment