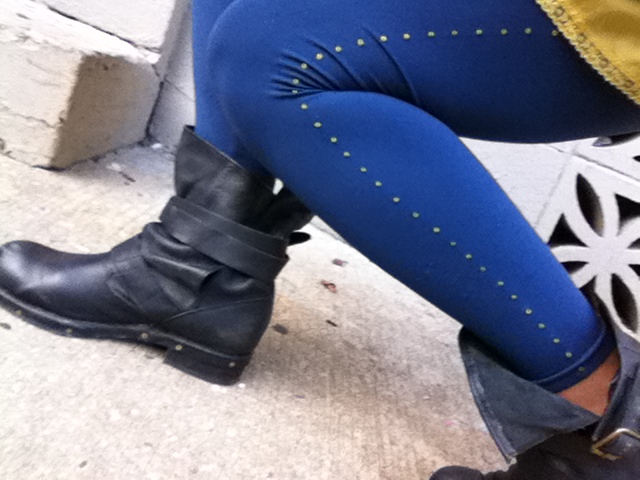
I once spotted a pair of studded leggings in a magazine, and though they were just for styling, not for sale (I would have snatched them in an instant!), perhaps it was actually a lovely DIY blessing so that that years later, when I unpacked my tubes of Beads in a Bottle for the first time, I'd know just what to do. I pulled the slightly wrinkled page from my "future inspirations" notebook and set to work!
Materials:
-leggings or footless tights
-Tulip Beads in a Bottle paint in desired colors
-chalk marker
-ruler or straightedge
-iron (optional)
1. Prewash the leggings and let them dry completely. Fold the leggings so the sides are facing out. Find the center line down each leg, from hip to ankle and use the ruler and chalk marker to mark dots 3/4" to 1" apart along that line. Optional: Set the iron to a low setting and press the leggings flat to make a crease along the outside of each leg before measuring the dots.
2. Select a Beads in a Bottle color to match or contrast the leggings (though you can't tell from the late-night craft lighting in the photos, I was working with blue leggings, so I chose a light yellow for nice contrast). Make sure the leggings are on a flat surface, with your marked dots facing up. Hold the tip of the tube about 1/16" above the first dot and gently squeeze out the paint to form a bead. Note that the beads shrink slightly when they dry, so be a little generous without going overboard.
3. Continue adding dots along the length of the legging until you reach the hip, making sure to lift the tip of the tube straight up after you've applied the bead to prevent smearing. Note: If plan to wear your leggings with that hot leotard you have hiding in the back of the closet, you may consider extending the line of dots waistband-high, but otherwise, you only need to squeeze beads up to the hemline of your skirt, shorts, or dress.
4. If you can lay the second leg flat without disturbing the wet beads on the first leg, do so, and repeat steps 2 and 3 to complete the look. Otherwise, let one side dry completely (about 4 hours) before dotting the other side.
5. Let both sides of the leggings dry and get ready to rock them! The beads dry three-dimensionally, so you do get a slightly studded effect that can be seen when silhouetted from the front. Cool, very cool.
Variations: Experiment with different patterns -- zigzag your beads down your legs, cluster them around the ankles so they "explode" up the leg, or apply them in a nice line up the back of each leg--reminiscent of old-school seamed pantyhose.

Visit us on Facebook!
Craft on!Click here for today's daily giveaway!


3 comments:
I am happy to discover this post. I think my girlfriend will love this idea. This is so creative!
Daftar Situs Bandar Togel Online Juga Agen Judi Togel Pilihan Terbaik, Aman, Terpercaya, Terbesar Dan Terbaru seperti situs Prediksi Jitu dan juga situs result togel china.
thank you for the information that has been provided. I really like this content, keep up the good work! Data keluaran togel and Paito Togel
Post a Comment