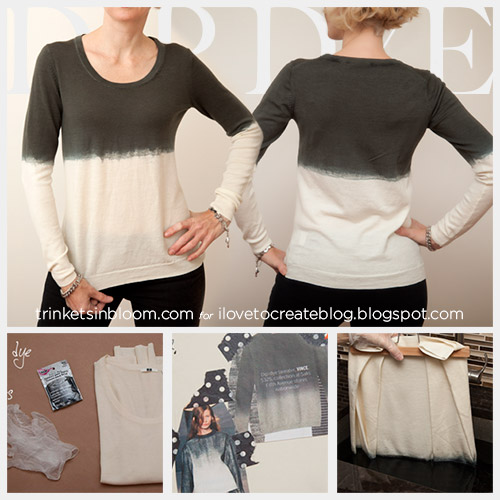
Fall is officially here, so it's time to Dip Dye a Wool Sweater! As the weather gets cooler we all want to wear more cozy sweaters and just because you’re wearing wool doesn’t mean you can’t dye it or do any of the fun things you’d do to cotton. Wool can be a tricky fiber, but it can absolutely be dyed or dip dyed to keep you warm, cozy and on trend for fall.
I was inspired to make this Dip Dyed Wool Sweater after seeing so many cute and cozy dip dyed sweaters for fall. It’s so simple and fun to take a basic sweater up a notch with just a packet of dye and an afternoon!
TOOLS & MATERIALS:
1 Wool sweater (mine is 100% merino wool)
Gloves
Vinegar - 1 cup
Tulip fabric marker (optional)
Pants hanger
step 1
Fill a stainless steel sink or a pail with hot water.
I didn’t boil my water, I just used the hottest water I could get from the tap.
Fill your sink to about 5 or 6 inches, enough to dip your sweater in easily.
step 2
Prepare your sweater.
I wanted to dip dye the top of my sweater, so I put the bottom hem and the cuffs of my sleeves into a pants hanger to hold them straight and smooth.
step 3
Before you add your dye get your sweater wet just where you want to dip dye it, by dipping it into your hot water.
TIP: Do not move your sweater around a lot or scrunch it up with your hands in the hot water. Doing this to wool in hot water will make it shrink and or felt. Just dip it in and gently press it with your fingers to make sure its completely wet where you want to dye it.
Set it aside.
step 4
Pour your entire packet of dye into the hot water in your sink and mix.
I recommend using a stainless steel spoon, it won’t become stained by the dye.
step 5
After your dye is mixed add 1 cup of vinegar, this will help you get a darker color on an animal fiber like wool.
Mix your vinegar in your dye bath.
step 6
Now you’re ready to dip your sweater into your dye bath.
Hold your hanger over your sink and slowly dip your sweater in.
Use your hands or a spoon to move your sweater gently and to make sure it’s all in the dye bath.
Continue to hold your sweater in your dye bath without moving it around.
You can pull it out to check the color, but don’t move it around a lot, just let it soak.
Keep the part of your sweater you want dyed in the dye bath for at least 45 minutes.
When you think your sweater is ready pull it out of the dye bath and gently squeeze some of the dye out of your sweater to “dry” it a bit. This will give you a more accurate color since it will dry lighter.
step 7
When you have the color you want, rinse your sweater in warm to cool water until the water runs clear and any extra dye has been rinsed out.
step 8
Gently hand wash your sweater based on the washing instructions for your sweater.
Do not agitate it while you are washing or rub it together, this will cause the fibers to shrink and felt.
Gently squeeze out any extra water, you can roll it up in a towel to help get some of the water out.
Lay it out flat and reshape it, sometimes sweaters can grow, shrink or change shape a bit when you get them wet. It’s always a good idea to lay it out flat and make sure it looks the way you want before you let it dry.
step 9
If your sweater is like mine and the stitching they used was not the same fiber as your sweater and it didn’t take the dye, don’t worry!
Grab your Tulip fabric marker and carefully color over the stitching.
I recommend you do this with small dots to keep it looking clean and neat.
For more fun fashion DIY tutorials check out my blog Trinkets in Bloom!
xoxo
Cathy


4 comments:
wondering can you do this with other fabric types like cotton?
That looks great! I always wanted to try to dip dye my old clothes, but I can't seem to find the time for it. Anyway, I bet this would also look good for bed sheet covers and throw pillows. I do think I need a bigger tub for dip dyeing bed sheets and an trusted Industrial Dye.
This is my personal favorite wooden hanger
Wow! I have to pair this way
Post a Comment