


For this project you will need:
Pre-made pillow covers -mine were $5.99 apiece and half off of that at Hobby Lobby
Pillow inserts
Tape (I used narrow Duck Tape)
Soft bristled paint brush

I wanted to find a linen look pillow cover but had no luck. This one seen here worked really well, though.
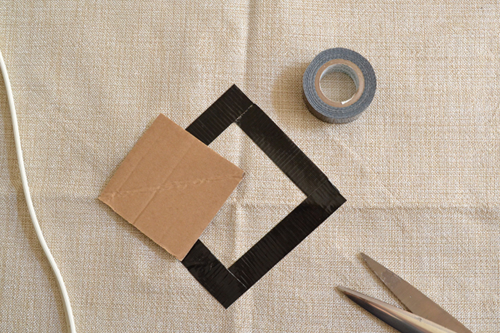
To start this pattern you want a square smack dab in the center. To make a nicely shaped square, simply take a firmer paper and fold the corner in on itself to make a triangle that is half the size of the square you want. Trim around that triangle and unfold for a perfect little template!
Tape around your first square...

And follow around that square to make the lines extended out. Within those lines use your template to make the next one and so and and so on. You can make the entire cover shapes or leave the outer edges as stripes leading up to the diamonds like I did. Do whatever floats your boat!

To get that fun, streaky and distressed look, I took my paint and very thickly applied it in stripes and allowing the chunky areas to remain. This is crazy fast work and lots of fun, too!

And here you have this one! Up close the texture appears much chunkier than it does from a distance, but with Tulip fabric paint the texture is still soft to the touch and not stiff and uncomfortable.

For a simpler pillow I took my tape and ran vertical lines two inches apart on the next cover. For this spotty, distressed look I applied a lot of paint to the brush, really loading it up, and then brushed around like crazy within that area until the paint was all gone. And then I moved on to the next stripe!

And my striped pillow is much more understated and the paint is much thinner on the cover. It's fun and simple and seriously took about 10 minutes from start to finish!

I found the weave of my covers tight enough and my application of the paint quick enough that I didn't need to place anything inside of the cases to prevent bleed to the back. Test an area or just go ahead and put some cardboard inside to be safe if you prefer.
In the end I'm crazy about these pillows and so is my Momma. Because shortly after making these beige and gold cuties, I decided to make my entire living space tones of gray. Isn't that the way things always go :)
Thanks so much for reading and if you enjoyed, why don't you pop on over and give me a visit at my blog Dream a Little Bigger?
_______________________________________________________________________
7 comments:
very nice pillow, do you just let the paint dry after brushing it.. ??? in the picture it looks thick and lumpy, but the finished product does not...
The thrifty recycler in me would use remaindered fabric and do a quick sew. But I LOVE this!
Hey, Martha - you do just let it dry. The paint settles a bit so that there is definite texture there, but it's not as crazy as it looks like it might be when the paint is wet!
suzani pillows Very nice and helpful information has been given in this article. I like the way you explain the things. Keep posting. Thanks..
Find Easily home appliances online on free home appliances classifieds.
Canon PIXMA MX534
Hello, an amazing Information dude. Thanks for sharing this nice information with us. Multicolor throw
Post a Comment