True Craft Confession: I bought these plastic gems at Michaels a few weeks back with plans to use them for a mosaic inspired fashion DIY. I've had these espadrilles for a while, but I never wear them because they're kind of boring. It wasn't until I took the pics of the finished sandals that I realized they look just like Candy Crush Saga! Too fun! The colors here are vibrant, not quite neon, but very punched up. You could use clear foil backed stones for a totally different effect. I tried a variety of adhesives, but the best by far was Aleene's 7800. It sets quickly and it's thick, so the stones don't slip around on the straps while they dry. Take your time and work methodically. I tried picking the stones up and dipping them in the glue, but I found that spreading the glue on with a crayon and placing them by hand worked best. When you finish, just shave off the end and your crayon will be back in business!
Showing posts with label candy crush crafts. Show all posts
Showing posts with label candy crush crafts. Show all posts
Monday, July 15
Friday, July 5
Candy Crush T-shirt Tote Bag
I love a little bit of bling during the summer, so when I saw a giant bag of rhinestones at the craft store the other day, I knew I had to make something fabulous with them. Inspired by all the crazy Candy Crush talk in my family and at the office, I made this colorful and sparkly bag! It's the perfect tote to match my Candy Crush Color Bomb ring I made last week. Here's how you get the fun look for yourself!


What you need:
– Plain large t-shirt in grey
– Plain large t-shirt in grey
– Large rhinestones (you can buy value packs at the craft store)
– Sewing machine
– Various ribbons
– Painter's tape
– Scissors
– Wax Paper
Cut out your tote back from a plain shirt! This a great way to revamp that old tshirt in your closet. As you can see, the bag is already taking form with just a few cuts.
Sew the bottom of the bag shut with your sewing machine. You can also hand sew if you don't have a machine.
Rip off a sheet of wax paper and insert inside of the bag. It's there to protect the other side of the bag when you glue.
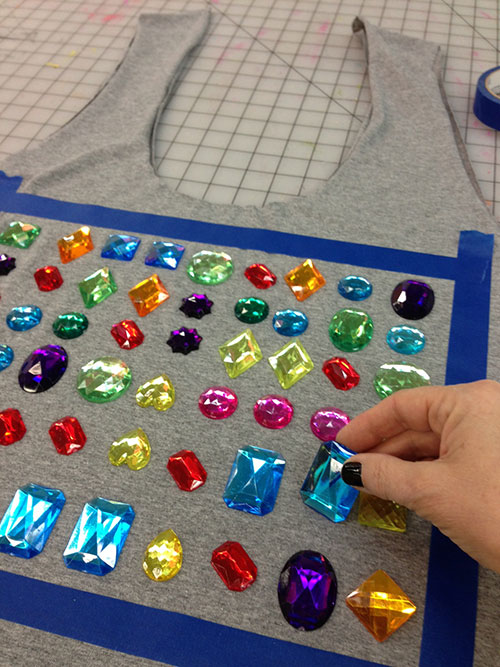
Rip off a few pieces of the masking tape and make a giant rectangle with the tape on the front of the bag. Arrange your gems in Candy Crush fashion. Make sure to have some in groups of three or four just like the game!
Now apply a small amount of Fabric Fusion to the back of each rhinestone gem and press in place.
Remove the tape guideline around your piece and let dry.
Cut several pieces of ribbon in 2 feet sections for each. Gather together and tie around the handle for a fun and whimsical touch to your bag. I also added my little Color Bomb ring I made last week as a cool accent to my bag.
Here's a couple details of my bag!
It's going to be my new summer market tote/ So sparkly and fun!
Friday, June 28
Color Bomb Candy Crush Saga Ring DIY
Have you been playing Candy Crush like crazy on your phone and Facebook? All the gals here at iLTC have and so has my daughter Stacy. They are sooooooo addicted and it's all I hear them talking about lately. So I decided to whip up a fun little ring for my friend Kristin here at work who's the biggest Candy Crush addict I know! It's so easy and you can make it for a fun afternoon project. Here's how you do it!
What you need:
– Aleene's Jewelry & Metal Glue (Tabs or Adhesive...I used the tab kind)
– Aleene's Jewelry & Metal Glue (Tabs or Adhesive...I used the tab kind)
– Wooden bead (I picked mine up at Michaels)
– Ring blank (also from Michaels)
– Tulip Soft Paint in brown
– Ring blank (also from Michaels)
– Tulip Soft Paint in brown
Unpeel the Jewelry and Metal adhesive tab from it's plastic sheet and onto your ring blank base. Next, peel off your red dot. You may be thinking, "Surely, an adhesive dot isn't all that strong." Let me guarantee you, it is! In fact, a while back I shared a cute spiked iPhone case I made and I'm still using it daily and not one of my spikes has fallen off! This stuff is tough!
Pour a little brown on your plate and paint your wooden bead. Cover entirely.

Now here comes the fun part. Make small little dots with your Scribbles paints! I pulled up a picture for inspiration from the internet so I knew exactly what colors to use! Dot each color randomly...
until the entire surface is covered. Make your dots in smaller and larger sizes just like the candy bomb in the game!
Here's a fun tip! Since I wanted the paint to dry and not have to hold the ring for hours, I taped the bottom of the ring blank to a plate so it would stay upright while drying. It only took 2-3 hours for it to dry!
And here's what it looks like when worn! So fun!
Happy SUGAR CRUSHING everyone!
Subscribe to:
Posts (Atom)


