
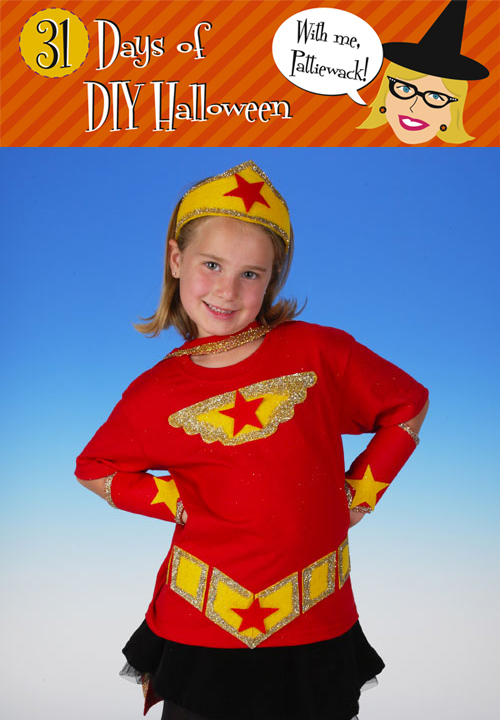
We love it here at iLoveToCreate, when we get to see our co-worker’s kids, and this cutie-pie belongs to Holly Brant, one of our marketing department peeps. She was really feeling the Girl Power when she put this sparkly costume on! You can’t see in the photo, but the cape is a second t-shirt the I cut out the front and left the neckline of the t-shirt. Then I glued and glittered the edges to make a SUPER cape!
Materials List:
– Aleene's® Fabric Fusion® Permanent Dry Cleanable Fabric Adhesive
– Tulip® Fashion Glitter™ Pack in Metals
– Tulip® Fashion Form™
– Tulip® Fashion Glitter Bond™
– Straight pins
– Paper
– Scissors
– Felt squares – (4) yellow, (2) red
– T-shirts (2) – child’s size – red
– Headband
– pattern
Instructions:
1. Prewash and dry T-shirts to remove sizing. Do not use fabric softener.
2. Insert T-shirt Form between layers of fabric.
3. Cut out pattern pieces and attach with straight pins to corresponding colored felt
pieces.
4. Cut out emblem, power belt, two cuffs, two stars and two headbands from yellow felt.
5. Cut out two cuffs and three stars from red felt.
6. Headband – Use Fabric Fusion™ to adhere felt to bottom and top of headband. Hold in place with pins until set. Use Fabric Fusion™ to adhere red felt star in center of headband. Place a piece of paper behind headband. Apply Glitter Bond™ around edges of headband with sponge applicator. Pour glitter onto Glitter Bond. Paper will over catch excess glitter for reuse. Let dry.
7. Emblem – Use Fabric Fusion™ to adhere emblem to center of chest on T-shirt. Glue red star in center of emblem. Hold in place with pins until set. Apply Glitter Bond™ around edges of emblem with sponge applicator. Pour glitter onto Glitter Bond™ over a piece of paper to catch excess glitter for reuse. Let dry.
8. Power Belt – Glue belt pieces to bottom of T-shirt with Fabric Fusion™ in the design shown. Glue red star in center of belt. Refer to photo. Hold in place with pins until set. Apply Glitter Bond™ around edges of belt with sponge applicator. Pour glitter onto Glitter Bond over a piece of paper to catch excess glitter for reuse. Let dry.
9. Power Cuffs – Use Fabric Fusion™ to adhere yellow cuffs to red cuffs. Hold in place with pins until set. Glue yellow stars on the red side of each cuff, at the top of the point. Hold in place with pins until set. Apply Glitter Bond around edges of cuffs with sponge applicator. Pour glitter onto Glitter Bond™ over a piece of paper to catch excess glitter for reuse. Let dry.
10. Cape – Using second T-shirt, trim around the front of the neckline, cutting off front and sleeves of T-shirt. Cut down both sides of T-shirt back to form a cape. Be sure to leave neck of shirt intact. Apply Glitter Bond™ around edges of cape with sponge applicator. Pour glitter onto Glitter Bond™ over a piece of paper to catch excess glitter for reuse. Let dry.
Craft on! Click here for today's daily giveaway!
2 comments:
You can add glow-in-the-dark paint around the glitter and make this costume safe for trick-or-treat night!
Pattiewack
Great Article. You might also like EN9 Round Bar Manufacturer in India
Post a Comment