Hoodie HOO! Summer is still here but with school right around the corner I am going a little nuts! Those long summer days will get shorter and shorter and we might notice we will have less time to work on crafts. Today I will be showing you a craft that you can accomplish in a small amount of time! I loved making this cuff because it can be split up into parts allowing your kids to help out along the way. I let my son do the dots which made him feel involved and that is always good! I hope you enjoy it and remember the possibilities of designs are endless when decorating your personal cuff. The best part of today's tutorial is this amazing new product from Tulip!
Let's get started making our Glittered Cuff!
You will need:
*Tulip Dimensional Fabric Paint (White)
*Scissors
*Sharpie Marker
*Leather
*Ruler
*Snap Fasteners
*Sharpie Marker
*Leather
*Ruler
*Snap Fasteners
*
I am in love with these "Glitter Dimensional" fabric paints. I love that they dry clear and the only thing noticeable is the abundance of glitter!
Step ONE: Lay your piece of leather down on a flat surface. Everyone's wrist is a different size so you might want to wrap a piece around your own wrist to see the length it needs to be. You want to leave a few inches hanging off each end to attach the fasteners.
I am making my length 8" long and the width is 3". I personally thing three inches is a good width for a cuff. You can make it smaller or larger if you choose.
This is what it should look like when you have the entire thing outlined. Don't worry the sharpie lines will not show since we are doing the markings on the back side.
Step TWO: Cut out the entire outline.
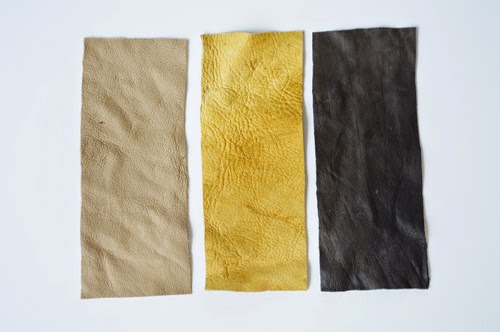
I made a few in different colors so I could show you how the glitter paint looks on them.
Step THREE: Time to make the slits in the cuff. We are still working on the back side. You will make 6" slits that are going to be about 1 centimeter apart from each other.
Your slits should look like this in the end.
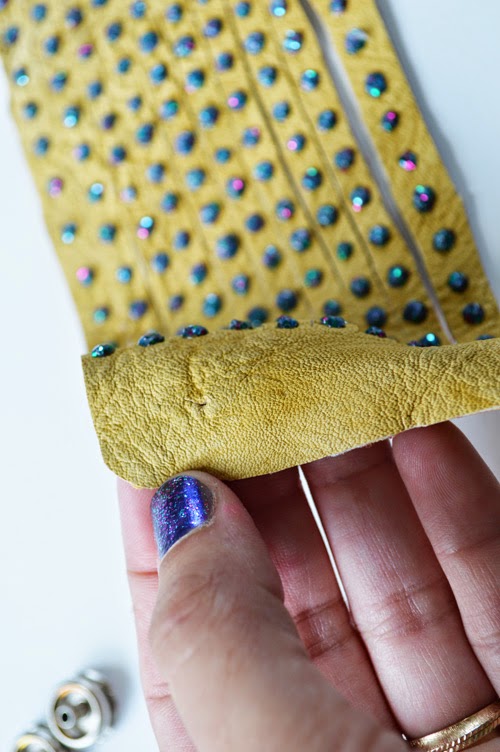
Step FIVE: Grab your glitter paint and apply dots onto each strip.
How gorgeous is this glitter paint! It reminds me of those candy dot strips I used to eat when I was a kid!
We are going to use these snap fasteners to attach each end. They are pretty easy to use and the instructions that come in the pack are very helpful.
Just so you can visually see I will show you which parts go with each other.
SNAP SET #1: You will end up putting two pairs of these on the same side.
SNAP SET #2:You will also put two pairs of these on the opposite side of the cuff.
This is what your glitter will look like when it is dry!
Tip: I keep a piece of leather with my snaps on it so I will never forget what pieces go with each other.
To start making the bracelet you will make a little slit on the end of the cuff.
Put your snaps in the leather.
Place it on top of the metal plate that comes with the snaps.
Then place the driver inside of the snap then hammer away. I suggest when you do this part to do it on cement.
When doing the opposite end you will line both ends up and this will help you line the snaps up. You can mark a dot with a pen or just use a pair of scissors to make a little hole.
Time to move onto the other end of the cuff. You will be putting different parts of the snap in these holes.
I am very pleased with the way they turned out! Aren't you!
I hope you enjoyed this tutorial and if you have ANY questions feel free to leave them in the comment section below! Big hugs! Hey! Wanna learn how to finger knit, come see!
Huge glittery hugs, JADERBOMB


2 comments:
LOVE IT!!!!
I am happy with your article, Fajartoto think your website is pretty good. Many articles are very useful for everyone. I am sure your website will grow in the future. Fajartoto will always support your website, hopefully more advanced. keep the spirit... thanks
agen togel terpercaya
togel online
bandar togel terpercaya
situs togel online
bandar togel terbaik
fajartoto
judi roulette online
situs togel terbesar
prediksi togel jitu
live draw hk
Post a Comment