Pumpkins are my my all time favorite thing to craft! I have almost 40 or so pumpkin projects on my blog (you can see some of them here). I love that they are the perfect little palette to make prettiness happen for fall. Here's a simple sparkle pumpkin that you can make with just three supplies. If you are looking for a quick fall craft to instantly sparkle up your space, this is it! Let me show you how easy it is to make.
Showing posts with label Halloween pumpkin. Show all posts
Sunday, September 22
Thursday, September 29
Creepy Creature Canisters


Excuse last week's neon bachlorette interruption, it is back to all Halloween all the time around here. This week for I Love to Create I present you with some creepy creature canisters.

SUPPLIES
Set of Canisters
Sheep (ish) yarn
Felt
Scissors
Aleene's Tacky Glue
I love recovering old canisters and making them into something new. Remember my 
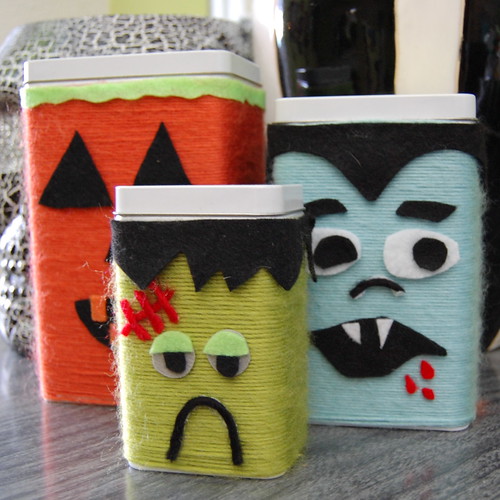
wallpaper covered canisters from last year? This time I went the yarn route. I had a set of 3 canisters from Ikea just waiting to celebrate Halloween properly.
This project is so super duper easy. All you need are some canisters which I see regularly at the thrift store. Round or square will work. Next you will need some Tacky Glue, my preference is some sort of fast grab. I am in love with the colors in my friend Vickie Howell's new yarn line Sheep(ish) so I grabbed a ball of blue, green, orange and got to wrapping.

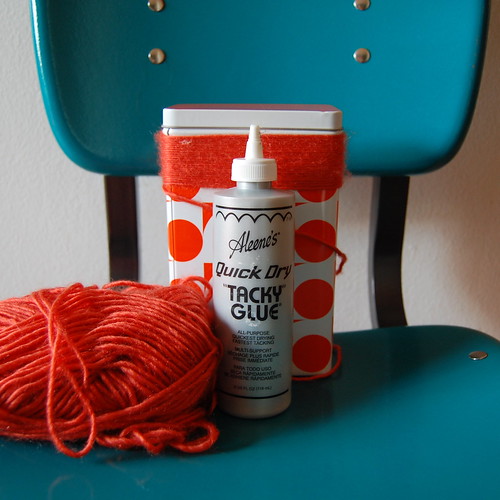
Starting at the top or the bottom wrap your entire canister in yarn. You will need a dab of glue when you finish to keep your yarn from unravelling. I wrapped the starting piece of yarn to hold it in place.

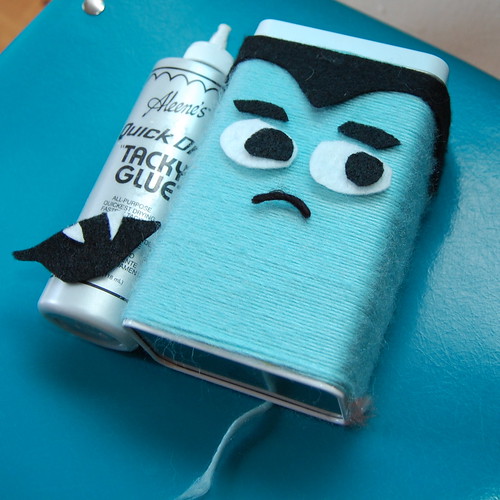
Once your canister is totally wrapped it is time to adorn with felt and more yarn. You could use white yarn for ghosts or mummies, brown yarn for werewolves, green yarn for witches - the options are endless. Now what kind of sweet treats shall I put in my canisters?

Check out more Halloween fun here and more I Love to Create posts here.
Visit us on Facebook!
Craft on! Click here for today's daily giveaway!
Friday, October 1
31 Days of DIY Halloween - Wild Child Pumpkin

I love how Cheryl Ball turned a simple decorative pumpkin into wildly fun décor with vibrant fabric and Collage Pauge™ Instant Decoupage™! Add extra attitude with Tulip® 3D Fashion Paint™ and Tulip® Glam-It-Up!™ PDA: Personal Dazzle Assistance™.
Wild Child Pumpkin
Materials List:
– Tulip® Fashion Glitter™ in 23560 Black Fine Jewel
– Tulip® 3D Fashion Paint™ in 65038 Black
– Tulip® Glam-It Up!™ PDA: Personal Dazzle Assistance™ in 26637 Clear Red Black
– Collage Pauge® Instant Decoupage
– Aleene's® Fast Grab™ Tacky Glue
– Paper towels
– Pinking shears
– 1” foam brush
– Pumpkin
– Foil
– Scissors
– Tulle – 4” x 18” wide strip
– Scratch paper
– Small paintbrush
– Fabric – ¼ yard – bright pink – or desired color
Instructions:
1. Use scissors to cut fabric into about 1” squares.
2. Squeeze a puddle of Collage Pauge onto foil. Working in small sections at a time, use dry foam brush to apply an even coat to surface of pumpkin. Tap foam brush onto a piece of fabric then place into adhesive, then brush on another coat. Add another piece of fabric slightly overlapping the first then apply more over top. Repeat step until entire pumpkin is covered. Let dry.
3. Start flow of Black 3D Fashion Paint on paper towel using an even pressure on bottle for a smooth line. Place scratch paper on work surface. Working in sections at a time, paint on zebra stripes as shown. Immediately pour black glitter over wet paint then pour off excess onto scratch paper. Repeat step, letting paint dry if needed before moving to new section. When thoroughly dry, use small paintbrush to brush off excess glitter.
4. Squeeze a small puddle of Black 3D Fashion Paint onto foil then use small brush to paint stem of pumpkin. Let dry.
5. Peel skeleton design from plastic backing sheet then press onto a piece of pink fabric. Use pinking shears to trim into square as shown.
6. Peel off single clear crystal from backing sheet then press into place throughout design. Add black crystals to stem.
7. Use Fast Grab to glue fabric square to front of pumpkin as shown.
8. Tie a bow of tulle around stem
Subscribe to:
Posts (Atom)

