Wednesday, February 15

MAYA IN THE MOMENT CRAFT: Naughty & Nice Dog Collars

ChaCha models her new sparkly, hot pink glittery collar!
 Lady and the Tramp came out last week on DVD and it's one of my all-time favorite films! I love how the ultra pampered Lady hangs out with the streetwise Tramp and learns how to toughen up. A little bit naughty and alittle bit nice. 

It got me thinking about my two girl dogs - ChaCha and Bianca. 

I found two dog collars that would make you think they go with rowdy dogs and I glammed them up for ChaCha and Bianca. One of the has spikes and the other says "Bad to the Bone."
That way it reflects the spirit of both Lady... and Tramp too!
 Here is what you need: 
1 dog collar
 Squeeze out some of the glitter adhesive and use the brush to apply it on the collar. If the surface is not porous, then rub it gently with sandpaper so the glue and glitter will grip. While the glue is still wet, pour the glitter all over.

 Let it dry and then add dots of glue and place crystals on top of the glitter. let dry.

 OK, for the second collar, I used Tulip 3D Glitter Dimensional Paint and added dots all over and then set crystals on top of the them. Let it dry. The paint acts as a glue and gives a glittery background!


Visit us on Facebook!
Craft on!

Tulip One-Step Dye featured on Teen Mom 2!


One of my guilty pleasures is MTV's Teen Mom 2. Heart wrenching - when I'm not gasping at the crazy hairdos or bad decision making..but we won't go there. Well, guess what? Our Tulip One-Step Dyes were featured in a recent episode!


Recently, Chelsea did something wonderful and joined the March of Dimes to help raise funds for premature babies. She enlisted a team of friends to join her in the walkathon and the night before...well, watch the video to see!


We like her thinking. Tie-dyeing shirts is a great way to show unified spirit when it comes to fundraising events and group activities. Choose your favorite colors and have at it. Check out your local Walmart and craft stores for kits that come with everything you need.


Visit us on Facebook!
Craft on!

Tuesday, February 14

Herringbone Boy Tee

I really like all the herringbone pattern I've seen popping up everywhere and the beauty of it is that it's crazy easy to do.  Chevron can be hard, but herringbone is cake.  I decided to try my hand at a herringbone tee for one of my little guys.


So, I got out a blank tee and some tape along with my Tulip fabric paint and a paintbrush.  I used paint tape, but you could definitely use masking tape as well.


I began by taping vertical lines onto the shirt. 


Then I added the diagonal lines.  You could measure it all out, but I just eyed it.


Then I painted the shirt.  (I laid some paper inside the shirt so the paint wouldn't bleed through.)  I painted it all blue, but a little orange for more vision interest.


I peeled off the tape and heat set the paint after it dried.  (To heat set the paint just place a sheet over it and iron it for 20 seconds or so.)


And?  He likes it.


In fact, we think the herring bone pattern might just accentuate his very muscular physique :)


And there you have it.


Monday, February 13

iLoveToCreate Retrofabulous Crafts: Dazzling Dahlia Dimensional Canvas

Visit us on Facebook!
Craft on!
Dazzling Dahlia Dimensional Canvas Copyright Margot Potter 2012
Pop Art Pillows from Christmas Helps 1966 Family Circle

Christmas Helps 1966 Family Circle

iLoveToCreate Retrofabulous Crafts
Dimensional Dahlia Canvas
Margot Potter

"These are your grandmother's crafts.  Ya gotta problem with that?  I didn't think so."

The idea for this canvas came from a fabulous pillow project featured in this 1966 Christmas Helps magazine from Family Circle. I LOVED these pop art pillows and plan to make some of my own, but these Anna Griffin vintage patterned papers were so yummy, I thought why not make a canvas using the same idea? I am a huge fan of Lilly Pulitzer’s vintage fabrics and these papers have a very similar appeal. Think about making a series of two or three of these using the same color scheme but slightly different patterns (maybe a full flower, half flower and butterfly.) Use recycled paper or fabric remants if you like; this could be stunning using say Coca Cola can boxes or old book pages. This was super simple to create using Fiskars ShapeTemplate™ tools and the new Aleene’s Dry Adhesives! For a final touch of whimsy, I added some dimension using Tulip Beads in a Bottle. I am knee deep in the winter blahs, so this is a cheerful reminder that spring is on the way! (If you want more precision, mark and measure placement with a ruler before layering petals.)


Materials
10x10 mini canvas
Anna Griffin Carmen Collection scrapbook paper pack
Saturated pink and yellow cardstock
Aleene’s Tacky Dot runner
Tulip Beads in a Bottle sparkly pink and pale yellow

Tools
Fiskars ShapeTemplate™ Circles
Fiskars ShapeCutter™ and Mat

1. Cut out 22 patterned yellow and pink floral paper 2” circles and 11 yellow and 12 pink 2.5” paper circles using the Fiskars template, cutter and mat. You could also use circle punches or trace and cut by hand. I am impatient, so anything that makes it easier works for me!

2. Layer the patterned circles in the center of the solid color circles and adhere using Aleene’s Tacky Glue dots runner.

3. Begin on the outside, I found it helped to lay this out first and then reassemble just to get a sense of the layout before I committed to it permanently. The flowers overlap slightly and work around in a circle and repeat on the inner layer overlapping slightly.

4. Tape just the right side of your petal and start making a circle overlapping on the outside. Continue this process until you reach the final circle, which will get full tape runner coverage. Repeat for the inside layer. There are 14 petals on the outside and 8 on the inside. Finish with a large pink petal in the center.

5. Use Beads in a Bottle on the solid color edges of the petals in a color that coordinates. I used sparkly pink and pale yellow and found that the sparkly beads were a skootch less puffy than the solid color, I like the slight variation. You can take great care and put the exactly same amount of dots on each petal, but as I mentioned earlier I am impatient and simply thrilled I made it around every petal without a craftastrophe. It’s the little things.

6. Allow to dry overnight before touching or hanging!

Mandala Flower Copyright Margot Potter 2012

(PS: I love this flower so much, I am going to use it on some other projects as an image! Too fun!)

Friday, February 10

CRAFTY CINEMA: Chick Flick Tissue Box


I'm a sucker for tearjerker love stories and yes, I'll admit it out loud - I'm counting down the hours to see The Vow tonight - so much that I even made a glitzy tissue box to take with me so I can cry with class.

I know you want to make one too!


Visit us on Facebook!
Craft on!

Learn new crafting techniques! Cool2Craft TV Monday February 13, 2012

It's super cool! Cool2Craft TV February 13, 2012: EcoFlowers - You may be knee deep in snow but we’re thinking spring! EcoHeidi heads into the garden this week with some fun eco-flower ideas. This week’s episode of EcoHeidi TV is filled with floral pretties. Heidi is creating Soda Can Flowers with Aleene's Tacky Dot Singles, Coffee Cup Roses with Aleene's Tacky Glue and Ribbon Spool Flower Art. Special guest Candace Jedrowicz crafts up a pretty eco-flower bouquet. It's a terrifically tacky and creatively cool show! 

It’s easy to watch the Cool2Craft TV Channel right from your computer. Airing Monday February 13, 2012 9am Pacific/10am Mountain/ 11 am Central/ Noon Eastern. Go to http://cool2craft.com and find the Livestream player and chat box. See you Monday! Visit us on Facebook! Craft on!

Thursday, February 9

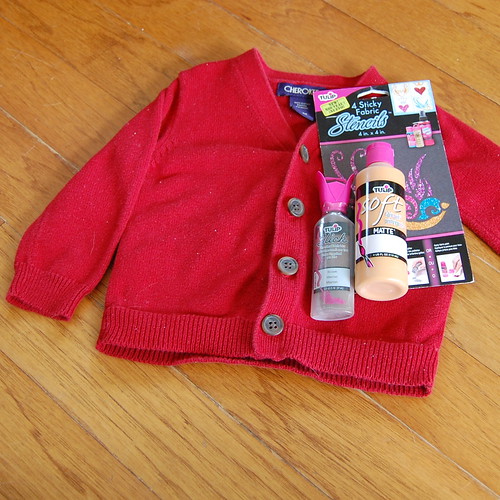
Heart Shaped Elbow Patch Cardigan


Since Tallulah got a new pair of shoes for Valentines Day I thought it was only fair that I make Baxter a themed outfit. I had seen the idea of heart shaped elbow patches on the Country Living website and loved it. They took the time to hand stitch their hearts, today for I Love to Create I took the time to hand paint mine.


SUPPLIES
Tulip Soft Fabric Paint in tan
Cardigan
Tulip Slicks Fabric Paint in brown
Tulip Sticky Fabric Stencils
Tulip Stencil Brush


The first thing you need to do is determine where your child's elbows will hit on your cardigan. Once you mark the spot place your sticky back heart shaped stencil right on top. Using tan paint and a stencil brush apply a coat of paint. Notice I did not get paint in the crown portion of this stencil. Also you might want to put something between the sleeves so that the paint does not bleed through to the other side of the sleeve. Allow to dry completely.


I love the look of hand stitching, but am not a huge fan of actually doing any stitching. I love to take the quick and easy route and fake the look with some Tulip Slicks fabric paint. Just apply small dashes all around the edges of the hearts to give a sewn effect.


Next pop your kiddlet in their new sweater and beam with pride. We have been referring to Bax as Professor Baxter in his new elbow patches cardigan. Super cute, snuggly and perfect for Valentines Day!

Visit us on Facebook!
Craft on!
Clicky Web Analytics
Pin It button on image hover

Subscribe to our newsletter

* indicates required
I am interested in products and inspiration for...
Close