Showing posts with label aleene's dry adhesives. Show all posts

Wednesday, July 17

DIY Bracelets

A girl can never have too many bracelets! 
Last week I led a bracelet-decorating craft for some kids and the whole time, all I could think about was getting home so I could make my own! Here are three ideas I came up with. I think this is a really fun idea to do with your girlfriends or cousins. Just put out a bunch of bracelets and all kinds of Aleene's glues and lots of beads, ribbons, markers, gems and stuff like that. Have everyone design their own bracelet!

Wednesday, April 10

DIY Lilly Pulitzer Inspired Greeting Card


I am a HUGE fan of Lilly Pulitzer's designs and also of Lilly Pulitzer the woman.  I was so sad to hear she passed away on Sunday.  I wanted to pay homage to her and this quote pretty much sums it up.  The full quote is: "Anything is possible with sunshine and a little pink."  Lilly Pulitzer
Lilly's dressmaking career was a happy accident.  She opened a small juice stand in Palm Beach and her dresses were getting stained from the juice.  She had a flash of inspiration, had a dressmaker whip up a shift in a patterned fabric to hide the stains and the dresses proved more popular than the juice!  Aleene's Dry Adhesives, Tulip markers and some pretty Lilly-esque patterned papers come together to make a pretty, inspiring card perfect for any time.  Maybe even for Mother's Day!
What you need:
Coordinating patterned scrapbook paper
Pink cardstock
Kraft card blank
Printed quote in yellow, pink and green ink
Tulip Fabric Markers (darker yellow)
Fiskars Advant-edge Punch System
Floral Die (comes with system)
Fiskars 1" Paper Circle Punch
Scissors
Gather your materials, you'll need floral, striped, yellow dotted and patterned papers in coordinating colors and a sheet of solid pink cardstock.  1.  Use your Fiskars punch to cut the floral lace.  You can alternately use a die cutter or a different punch or a craft knife to add some paper cut outs.  2.  Use a round 1" paper punch and dotted yellow paper to punch out lemon.  3.  Use yellow markers to draw lemon on front of paper.  Cut a slit using scissors.  4.  Cut all of your elements out and layer them on card.  Attach larger pieces with sticker sheet and smaller pieces with glue runner.  
 

It's fun to make projects inspired by your favorite artists and designers.  With just a little imagination, some basic craft supplies and Aleene's adhesives, one of a kind uniquely fabulous greeting cards are a breeze to create.  Who is your favorite designer?  What kind of card could you make inspired by their work?

(Find more fashion and style inspiration on my site DIY Doyenne!)


Monday, March 4

St. Paddy's Day Mason Jar Vase


iLoveToCreate Teen Crafts
St. Paddy's Day Mason Jar Vase
Avalon Potter

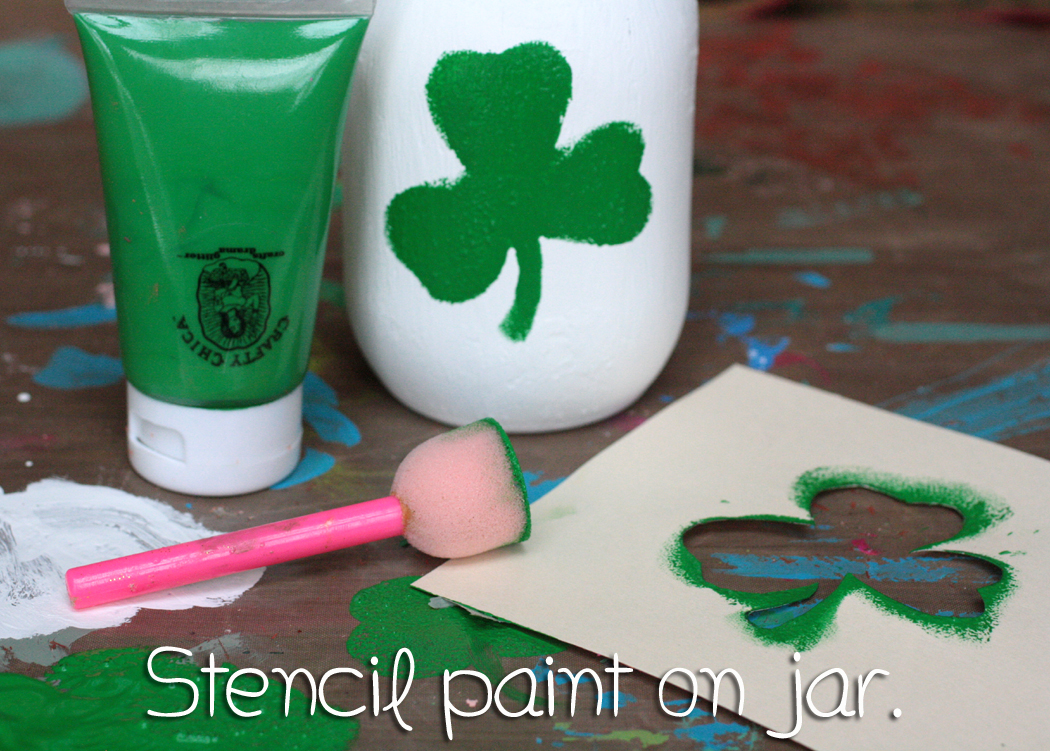
We love St. Patrick's Day around these parts, being of Irish descent.  Erin go bragh! Avalon wanted to make an Irish themed craft for St. Patrick's Day using a mason jar.  This mason jar vase is so simple to create and you can customize it however you like by cutting a different stencil, using different paint colors or adding a different message.  All you need is a mason jar, Crafty Chica Little Paints, a manilla folder, a tag, twine, Aleene's Tacky Dot Runner, a computer printer and a few coats of Aleene's Spray Acrylic Sealer.  In under an hour, you'll have a pretty vase for your favorite faux flowers.


Paint the outside of your jar white.  Two to three coats will be needed.  Let it dry completely before the next step.

Free hand draw a shamrock or find a permission free image online.  Ours is about 2" long and wide.

Use a craft knife and a cutting mat to cut your stencil out.

Use a Tulip pouncer to stencil green paint on front of jar.  Allow to dry.  (We liked the fuzzy edges, but you can, if you so choose, go back in with a small brush to clean the image.) Once paint is dry, spray 1-2 coats of Aleene's Spray Acrylic Sealer in matte finish.  Allow to dry.

Print text in green, using the KG Skinny Latte font at 28pts.  Cut text, use Aleene's Tacky Dot Runner to adhere to small kraft paper tag.

Use green and white baker's twine to attach tag to top of jar.


Tuesday, January 8

A Love Jar

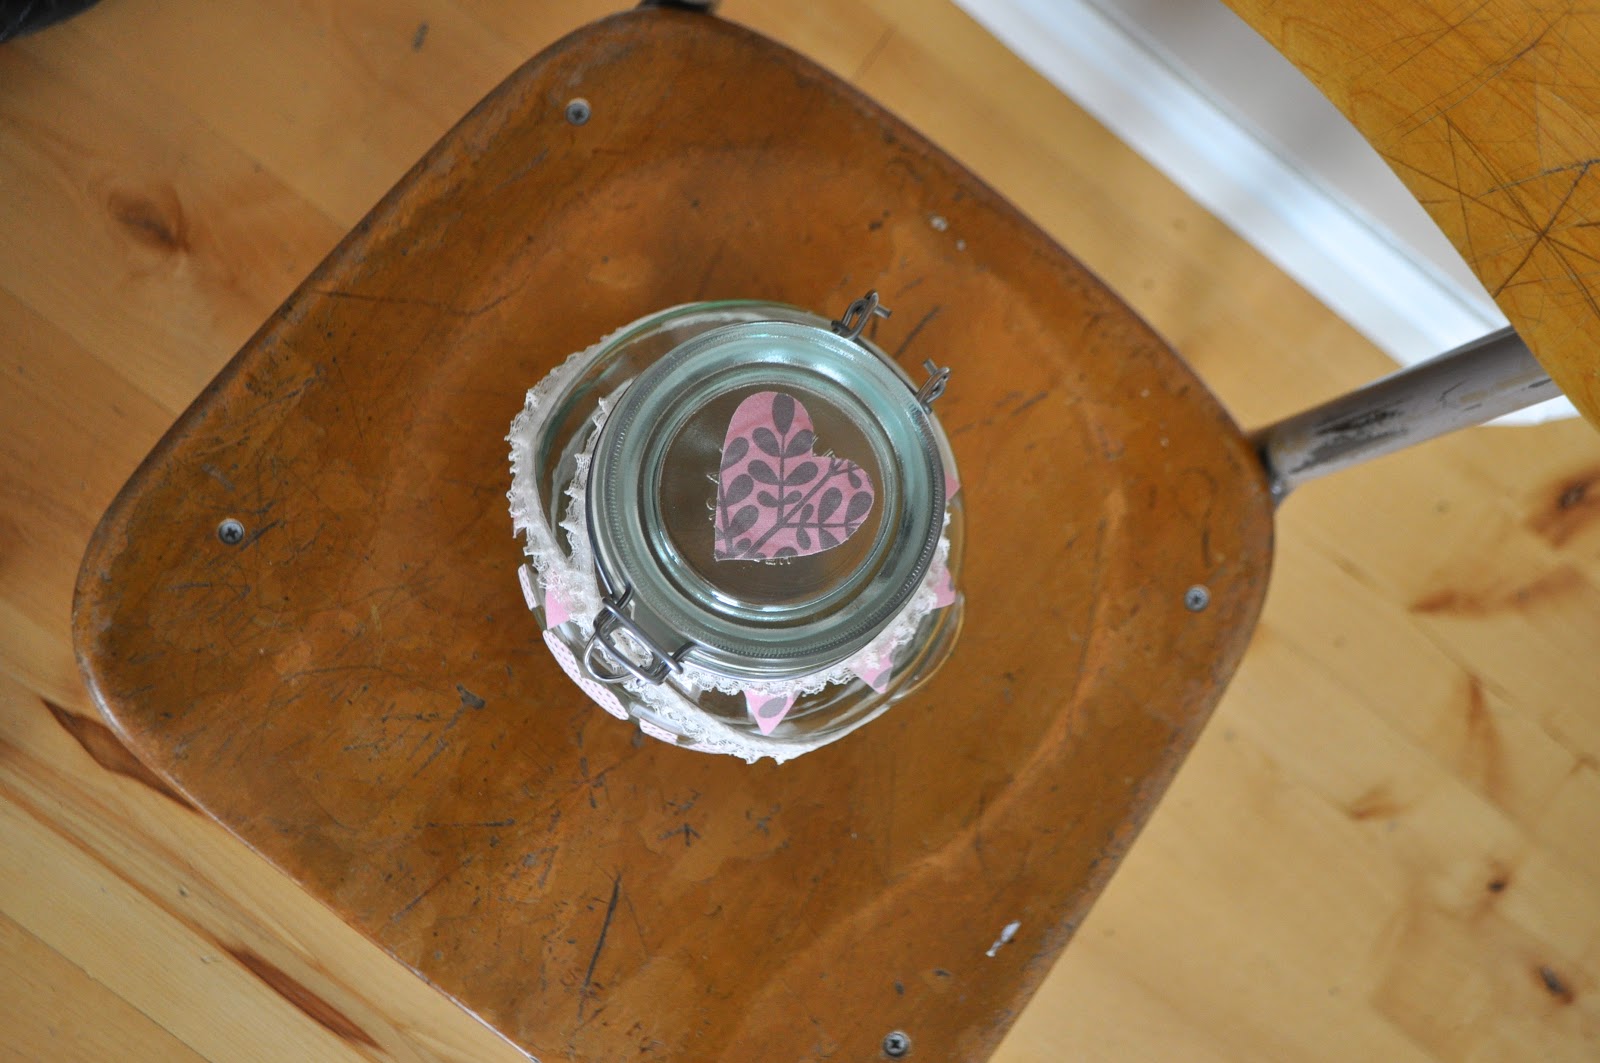
In our house we do a lot for Christmas, but I don't really get into the other holidays so much.  I thought it might be fun to do something for Valentine's day this year, so I made this little Love Jar.  First I'll show you how I made it and then I'll explain some different ways to use it.


I love Aleene's dry adhesives because there's no messiness.  Plus, they worked great to get my fabric to stick to the glass.  I pulled out some scrap fabric to use for the project.


I used the double stick sheets to make my letters into stickers.  I peeled off one side, added the fabric, and then drew the letters backwards on the back to help me cut them out. 


After cutting them the letters were basically stickers.  I peeled off the back and stuck them on the jar.


I used the tacky line roll for the lace that I ran around the jar.  Then I cut little triangles from the extra fabric and placed them on the lace like a pennant banner.


So, what do you do with a love jar?


I figure you could use it as a valentine mailbox, placing notes to each other in it.  Or you could fill it with candy and gift it.


But I think I'll fill it with little treats and let my boys take one when they've showed love by doing something good.  That way Valentine's is more about sharing love than crushes (which my boys are disgusted by at this age).


Now off to buy some candy :)

Monday, November 5

Giving Thanks DIY Thanksgiving Table Decor


iLoveToCreate
Giving Thanks DIY Thanksgiving Table Decor
Margot Potter

My new crafty gal pal Cheryl Burchett and I are co-hosting DIY segments for Gannett News here in Knoxville on WBIR Channel 10 called DIY on the FLY. We just filmed some fun Thanksgiving themed segments and the first one aired this week. I've embedded the video below AND here are the step by step instructions for some inexpensive and simple projects you can make to take your holiday table from drab to fab in seconds flat! You can make these projects as complex or as simple as you like, but whatever you do, Aleene's Tacky Glue dry adhesives make putting it all together a breeze!  

I think it's important remember the spirit behind this holiday.  When we 'give thanks', we rediscover the many things for which we can be grateful in our lives.  By writing them down and reading them out loud between dinner and dessert, we share our gratitude with our family and friends.  That's some very powerful and positive stuff right there! I think this would make a most lovely annual tradition, so we've decided to implement it here at Casa de Potter!

Materials
Card stock in fall colors
Coordinating patterned scrapbook paper
Printed sentiments in coordinating colors (thankful, give thanks, guest names)
Cut felt seasonal shapes (Genevieve Gail for Michaels)
Aleene's Tacky Double Stick Sheets
Aleene's Tacky Dot Runner
Tulip Dimensional Fabric Paint Glitter in gold
Tulip Dimensional Fabric Paint in pearl espresso
Mini glittered foam pumpkins or real mini pumpkins  
Large orange hollow foam pumpkin
Faux flowers


Tools
Computer with printer
Scissors
Decorative edge scissors
Paper trimmer
Ruler
Knife
Foam brush


Mini-Pumpkin Placecards
Print names.  Cut out with paper trimmer or scissors.  Cut a patterned scrapbook paper background using decorative edge scissors as in picture.  Cut solid colored card stock background.  Attach layers with Tacky Dot Runner.  Use knife to cut small slit in top of foam pumpkin.  Insert card!


'Give Thanks' Table Card
Print Give Thanks.  Cut out with paper trimmer or scissors into a fat rectangle as in picture.  Layer on a patterned solid color cardstock, cut to fit leaving a 1/4" edge.  Layer on patterned paper, cut to fit leaving a 1/2" edge.  Cut large solid color card stock to 7.5"x8.5" to make card.  Fold in half, using a bone folder or your scissor handles to score and fold card.  Attach layered papers to front of card with tape runner.  Attach shapes with sticker sheets to top left corner and lower right corner of papers.  I place one of these on either side of my centerpiece arrangement of gourds, mini-pumpkins, garland and glittered pumpkin vase.

'Give Thanks' Pouches
Print 'thankful' in several fall colors.  Cut word out with paper trimmer or scissors as in picture.  Layer on a solid colored card stock and cut to fit leaving a thin border at top and bottom as in picture. Layer on patterned paper and cut to fit leaving a thin edge at top and bottom.  Cut three 3"wx.5" wide pieces of light colored card stock (these will be used by guests to write three things for which they are thankful.)  Use a decorative miniature clothespin to secure to top of organza bag.


Glittered (Faux) Pumpkin Vase Centerpiece
Cut top out of pumpkin, this will be your vase.  You can use a foam pumpkin or if you prefer a real pumpkin (if using a real pumpkin, you will need to pat it completely dry with a paper towel before applying paint and glitter.)  Use foam brush to spread a thin layer of pearl espresso paint on surface of pumpkin, allow to dry until tacky, this should be thicker in some sections than others for a striated effect.  Squirt a generous amount of glitter medium on pumpkin and spread with fingers.  Work around entire pumpkin.  Allow to dry.  If using real flowers, a glass vase should be inserted into opening, if faux flowers cut to fit inside of pumpkin.  You can optionally add glitter to either fresh or faux flowers using the same glitter medium! (If you want to apply a solid layer of glitter to pumpkin, work in sections using Aleene's Tacky Glue and loose glitter.)


(Blogger was compensated for project and given some free product to feature in project. Opinions are 100% my own. If I don't like it, I don't blog it!)

Wednesday, August 22

iLoveToCreate: Retrofabulous All Occasion Greeting Card


iLoveToCreate Retrofabulous All Occasion Greeting Card
Margot Potter
"These are your grandmother's crafts, ya gotta problem with that?"

Avalon has been taking advance placement and honors classes and her homework straw pile is epic!  It's my birthday today, so I decided to whip up my own birthday card.  I'm a Leo, we're kooky like that.  You can make one too using layers of coordinating paper, trim and faux rhinestones and a vintage image sized with text added in photo editing software.  I share my birthday with the ever so lovely and talented Miss Cathie Filian, so I used her fabulous Podgeables to add some dimension to the card!  Aleene's Dry Adhesives make putting it all together as easy as 1-2-3!

Materials
Podgeables tag shape
Yellow and orange cardstock
Patterned scrapbook paper (I used Retro Collage from Michaels)
Patterned tissue paper
Genevieve Gail Felt Floral Ribbon Trim
3 large faux rhinestones
3 medium faux rhinestones
Aleene's Tacky Sticker Sheet
Aleene's Tacky Dot Roll

Tools
Paper cutter (largest cardstock layer is 5.5"x11"-folded to make card.)
Scissors
Bone folder

My image came from a vintage Vogue pattern from the early 1950s, Dover books is a great source for permission free images.  I scanned, edited, sized, added the text Retrofabulous and printed it out.  Decide how you wish to frame the image, trace and cut out.

Use a paper trimmer to cut yellow cardstock and patterned scrapbook paper in decreasing size. Cut ribbon to fit card. Use Aleene's Tacky Sticker Sheets to adhere image to front of acrylic frame and tissue paper to back of frame. Layer and stack remaining papers and trim using Tacky Sticker Sheets. Add faux rhinestones with Aleene's Tacky Dots!

Wednesday, July 25

iLoveToCreate: Tres Chic Cupcake Toppers


Avalon and I decided to throw an intimate soiree for #TeamPotter on last night's Craft Wars episode.  Friends and family all live far away, so we just made our own little party with Avalon's best friend and the three of us.  Av had a project due today for iLoveToCreate and I've been playing with my logo and we decided that cupcakes and decorations were in order.  So we made these super cute, super simple cupcake toppers.  You can make your own using permission free fashion images or photos or anything you like!  Aleene's dry adhesives made it easy and fun and we love how these turned out.  I think I may have to make some jewelry out of these!  Tune in next Monday and I'll share how I made the cupcake stand topper with the ruffled lace technique and talk about quick and easy ways to personalize your parties.

Materials
Toile/Damask scrapbook papers in coordinating prints
Black and white fashion image printed to fit in a 2" punch
Large wooden or plastic party picks
Flat back plastic rhinestones
Aleene's Tacky Tape Runner
Aleene's Tacky Dot Roll 1/2"

Tools
Fiskars shape cutter and circle templates (2/5" circle)
Fiskars 2" circle punch


Monday, June 4

iLoveToCreate: Retrofabulous Mini-Frame Pendants


iLoveToCreate Retrofabulous Mini-Frame Pendant 
Margot Potter 
"These are your grandmother's crafts, ya gotta problem with that?"

Making these miniature wearable paper artworks is easy peasy and a ton of fun.  Old book pages make great collage backgrounds and you can find images in Dover Books titles or do this with upcycled new magazine pages for a more modern look.  No matter how you do it, Aleene's Dry Adhesives and Jewelry Glue make this a breeze!


Materials
Miniature Frame (HHH Enterprises)
Tiny metal Tim Holtz idea-ology flower
4mm crystal AB SWAROVSKI ELEMENTS round
Old book page
Red construction paper
Artistic Wire mesh black
Aleene's Tacky Tape Runner
Aleene's Tacky Sticker Sheets
Aleene's Jewelry and Metal Glue
Chain
Clasp
Jump rings

Tools
Chain nose pliers
Small scissors
Pencil
Trace background paper to fit frame and cut with small paper scissors. 

Cut out and adhere tiny collage elements using Aleene's dry adhesives.

Use Aleene's Jewelry and Metal glue to attach flower and crystal.  (Be sparing, a little goes a long way!)

Cut a small section of mesh and tie a bow, pull mesh tubing on both sides to create bow shape.


Visit us on Facebook!
Craft on!
Clicky Web Analytics
Pin It button on image hover

Subscribe to our newsletter

* indicates required
I am interested in products and inspiration for...
Close