Tuesday, August 31

Lego Purse

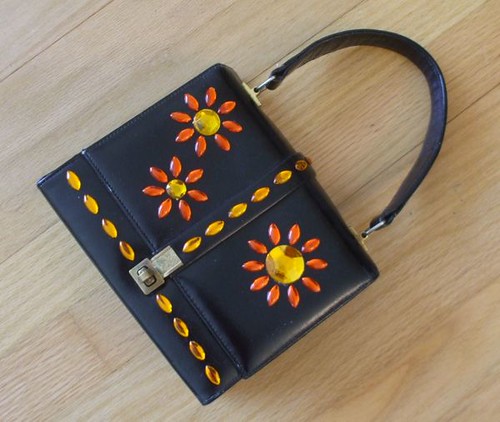
Legos don't have to be for kids only. Learn how to turn those colorful game pieces into a novelty purse!

Lego Purse


Craft on!
Click here for today's daily giveaway!

Monday, August 30

'Free the Beat' Jeans


'Free the Beat' Jeans

Designed by Allee Marderosian

Walk to the beat of your own fashion-forward drum with a pair of jeans that rock! Give an old pair edgy new personality with Tulip® Fashion Graffiti™ products and a hint of sparkle from Tulip® Glam-It-Up!™ Iron-On Crystals™.

CLICK HERE FOR THE REST OF THE POST AND FOR PROJECT DIRECTIONS

Sunday, August 29

Fanciful Tea Party!

Fanciful Tea Party

Designed by Suzie Shinseki

Whether you’re serving tea for many or tea for one, you won’t want the party to end when you use the Duncan® Oh Four™ Tea Party Collection decorated with Cover-Coat® Opaque Underglazes.

CLICK HERE FOR REST OF POST AND FOR PROJECT DIRECTIONS!

Saturday, August 28

Dimensional glazed cards by Papercutting Kind of Day

Paper artist, Linda, from the blog Papercutting Kind of Day used our Aleene's® Paper Glaze to create a raised, glossy look over marker-drawn images on her greeting card.

Aleene's® Paper Glaze adds a clear dimensional layer to card and paper designs, including simple line work and larger design areas. It dries to a hard, nontacky glass-like finish to accentuate design details for dimensional designs and laminating effects on paper.

Paper Glaze can be used alone or tinted with acrylic paints, and it won't run colors. It can also be accented with a variety of embellishments, like microbeads, glitter and trims.

Brush it on to cover broader areas. Use the convenient needle-nose tip for precise application and to squeeze out dots. And cut the tip up a bit more to create thicker lines for design.

You can also use Paper Glaze with rubber stamps to create watermarks.

Friday, August 27

Dimensional Canvas Flowers

Making canvas flowers are my latest obsession! They are very easy, inexpensive and you can use them on so many things! Here is my latest batch and what I did with them!


1. Using raw canvas, draw your flowers with a pencil and then outline with a black Tulip® Fine Tip Fabric Marker™.

2. Color with the other markers from the set, and then highlight them by outlining with Tulip® 3D Fashion Paint™ (black slick). Let dry.

3. Set out your t-shirt and insert wax paper or foil between the layers so the glue will not seep through. Before you glue down the flowers, arrange them in different patterns until you find the one you like.

4. Use Crafty Chica® Extreme Embellishment Glue™ or Aleene's® Fabric Fusion® Permanent Dry Cleanable Fabric Adhesive and paint on a generous layer on the back of each flower - one at a time! (Glue, apply to shirt; glue, apply to shirt, etc...) Let dry!

5. After the glue is dry, add accents around the edges of the flower with more Tulip® 3D Fashion Paint™. This will seal the edges and really make your flowers pop off the background fabric!

Craft on!
Click here for today's daily giveaway!

VIDEO: How to prevent stencil overspray

Have you ever used a stencil with fabric spray and then cursed when the paint goes beyond the edge? Here's an easy way to prevent that!


CLICK HERE IF YOU CANNOT SEE VIDEO ABOVE

Thursday, August 26

Channeling Your Inner Enid Collins


I heart Enid Collins purses. I'll shout it from the roof tops. What's not to love - kitschy designs, sparkly gem stones and they were made in Texas. I got my first Enid Collins purse 15 years ago. I spotted the sparkly bug covered bag from across the room at a thrift store and it was love at first sight. Back then Enid Collins purses were cheap and easy to find, my how times have changed. These days a quick stroll through Ebay and you can find Enid Collins purses running almost $300.00. That's a little rich for my blood. Luckily, much like Enid herself, I am a crafty lady.


Today for I Love to Create I thought we could talk about a few different ways you could grab a plain purse, a bottle of Tacky Glue and some Tulip Fabric Paint and try to channel your inner purse designer and make Enid proud.


SUPPLIES
Felt
Scissors
Fabric Fusion Glue
Vintage Purse
Tulip 3D Fashion Paint
Gem Stones
Paint
Tacky Glue


The first thing I did was settle on an sea theme. I cut out my felt in the shapes of seahorses and made one into a boy and the other into a girl. I used a combination of Tacky Glue and Fabric Fusion Glue.


After I perfected Mr. and Mrs. Seahorse all that was left to do was strategically place them on my purse. I of course had to bedazzle any empty space and most importantly 'title' the purse. All Enid Collins Purses have cute little names written on them in script and mine is called Under the Sea.


I'm not the first or the last crafter to come up with the brilliant idea of making my own Enid Collins inspired purse. Here are a few other gems I discovered.


Over at Sweetheartville we see that you can make your own Enid Collins bag on any style purse, even an 80's black leather number.


Not a purse, but still equally fantabulous is this brooch by Cathy Callahan of Cathy of California. The Alrighty Sparkle Cocktail Brooch from the book Bead Simple: Essential Techniques for Making Jewelry Just the Way You Want It by Susan Beal.


Speaking of Susan Beal she made this adorable little sparkly handbag and she used Tacky Glue too!


Ok one last post about Susan and then I swear I'm stopping. Did you see her Enid inspired Treasure Box in Craft No. 5?


I found this cute little Enid inspired owl over at Cheeky Magpie.


Love Taryn made one of the cutest Enid inspired bags I came across.


Dolls want their own Enid Collins purses, thank heavens Liz Retros made it all possible.

Amy over at The Angry Chicken made one heck of a cute Enid inspired purse.

For more Enid Collins goodness feast your eyes on all the amazing bags in the Flickr Pool. I just discovered a website dedicated to Enid's bags run by her grand daughter.

Fashion Icon Jewelry


Fashion Icon Jewelry

Designed by Pattie Donham-Wilkinson

I absolutely LOVE Audrey Hepburn, and the Aleene's Paper Glaze glides onto paper to create a crystal clear dimensional effect that reminds me of cloisonne' enamel jewelry when it dries.

CLICK HERE TO SEE THE REST OF THIS POST AND PROJECT DIRECTIONS

Wednesday, August 25

ILoveToCreate Teen Crafts: Flower Child Headband

ILoveToCreate Teen Crafts
Flower Child Headband
Copyright Margot Potter
"Mom crafted, teen approved."

I bought this exquisite Alexander Henry fabric to fashion curtains for my kitchen two years ago. My first attempt was a painful reminder of the old adage "Measure Twice, Cut Once." I adore vintage inspired fabrics and the colors in this are fantastic. I had some scraps left over and a sewn hem from the curtains. This idea popped into my head while I pondered some stretchy headbands I purchased a while back. I've shown how to create these fabric flowers before, in fact at the end of this post are several fabric flower projects I've created for ILoveToCreate.

This is so easy and fun and this headband can either be worn in a Flower Child style or as a traditional headband. Either way, this is the kind if accessory a stylish teen will adore.

Materials
Aleene's Fabric Fusion Glue
Large Floral Print Fabric
Coordinating craft felt
Stretchy headband
Thread

Tools
Sewing needle
Paintbrush

1. Select a flower to feature as the focal of the design. Cut it out, leaving fabric around it in a circle or oval shape.


2. Place fabric on felt and cut the felt just a little bit wider than the fabric.


3. Use a paintbrush and apply a thin layer of Aleene's Fabric Fusion glue on the back of the fabric. Press fabric on felt smoothing gently with your hands. Allow to dry.

4. I had a doubled up and sewn fabric section, but you can just double some fabric over, iron and create your fabric flower. I have a tutorial for this here and here.

5. Once felt has dried, cut felt edge off of flower to get a smooth edge.

6. Sew the fabric flower to the headband.

6. Sew the center of the felt backed flower and a black bead into the center of the fabric flower, the thread should go through to the headband so it's nice and securely attached.


Paper Quilling with Cynchronicity

Cynchronicity has a step-by-step tutorial on the art of paper quilling using Aleene's® Original Tacky Glue® ! Not only are there directions, but there are also other ideas of what to use these mini-masterpieces for, such as jewelry and greeting cards.

Check out the directions HERE.

HOW TO VIDEO: Ombre dye technique

(Photo from Milan runway show, via http://www.askalannah.com)

Ombre fashion is still in full bloom, and because of that, we're sharing one of our most popular videos that demonstrates how to create the effect for your own wardrobe using our award-winning Tulip® One-Step Fashion Dye™ .

You can use it on a t-shirt or a gown, or fabric that you plan to sew with. Have at it!


CLICK HERE IF YOU CANNOT SEE VIDEO ABOVE

Tuesday, August 24

Slashed Peekaboo T-shirt


Hi T-shirt fans! This is a project I've been meaning to make all summer. I saw something like it in a tween-ish retail store once (I know, I know, now that I'm a thirty-something perhaps I should start shopping in more adult places)--and thought, as I so often do, I could so make that... And so I did. And now you can make this 80s punk-meets-hip-hop tank top, too.

Materials:
– 2 T-shirts (1 fitted, dark color; 1 in larger size, light color)
– scissors
Tulip Big Phat fabric markers
Tulip Fashion Graffiti Spray Paint Kit (including fabric paint and spray paint cannon)
Tulip Fashion Graffiti stencils
– paper grocery bag (or other scrap paper or sheet to use as a drop cloth)
– ruler
– chalk marker
Aleene's Fabric Fusion (or needle and thread)

Make it:
1. Cut off the sleeves of the darker T-shirt, just outside the seams, to make a tank top.


2. Cut off the neckband of the lighter T-shirt and lay the tank top over it, lining them up at the neck holes. Trace the tank top onto the T-shirt and cut out the outline through only one layer to make the peekaboo panel.


3. Set aside the dark tank top. Lay the panel flat on the grocery bag paper. Use the fabric markers and stencils to lay a background pattern. (I used chain link fence!)


4. Fill up the paint cannon and spray freehand across the panel in combination with stencils to create another pattern layer. Change colors as much as desired! Then set the panel aside and let it dry.


5. Turn the tank top inside out and measure and mark 9"-long horizontal lines, about 1" apart, down the front. Stop about 4" from the bottom hem.


6. Cut along the chalk lines through just one layer of fabric.


7. Gently place the (now dry) panel right side down against the front of the (still inside out) tank top, lining them up again at the neckline. Peel back one side of the panel and squeeze an even amount of fabric glue along the edge. Then gently press the edge against the tank top. Continue gluing around the straight edges only (minus the bottom hem) to attach the panel to the slashed surface of the tank top. Let it dry!


8. Carefully turn the tank top right side out and try it on! The bright graffiti panel will peek through the slashes you made in the front of the darker layer.


Variations:

-If you want to keep the sleeves attached and your shoulders covered, do it! Simply tuck the sleeves inside the shirt while you're tracing it in step 2.

-If you want to be able to change things up at on a moment's notice, just spray an entire tank top (rather than a panel) in steps 3 and 4 and wear it layered underneath the slashed tee. Then you have the option of having the graffiti tank peeking between the slashes or any other tank top you have in your wardrobe!

-Try slashing different shapes! Familiarize yourself with the Brokenhearted tee (project #3 in Generation T: 108 Ways to Transform a T-shirt) for a sweet spin on this project.

Now go off and fight. For your right. To par-tee!

Dotted dye technique

This is a fabulous technique that shows dye in a whole new way. It's easier than it looks and you can mix up what ever color combination you want. We used our new Tulip® Shape Dotters™ to complete this look!


Clicky Web Analytics
Pin It button on image hover

Subscribe to our newsletter

* indicates required
I am interested in products and inspiration for...
Close