Showing posts with label custom tie dye shirts. Show all posts

Wednesday, February 9

S.W.A.K. Bedshirt

Sleep With A Kiss! This red-hot nightshirt gives goodnight kiss a whole new meaning. Tulip® One-Step Dye™ and Tulip® Soft® Fabric Paint ignites your creativity for which dreams are made.

Materials List

  • Tulip® One-Step Dye™

    Fuchsia
    Purple
  • Tulip® Fabric Paintbrushes™

  • Tulip® Paint Tray Pack™

  • Tulip® Surface Cover™

  • Tulip® Soft® Fabric Paint

    BI15784 Glacier White
    BI15786 Sunshine Yellow
    BI15787 Mandarin Orange
    BI15788 Petal Pink
    BI15790 Crimson Red
    BI15801 Ebony
  • Miscellaneous

    •   100% cotton long-sleeve white tee
    •   Chalk, sharpened to a point
  • Patterns

    Instructions

    1. Prewash fabric to remove sizing.
    2. Lay down Tulip® Surface Cover on a flat surface.
    3. Lay damp tee flat on surface.
    4. Wearing rubber gloves, add water to dye bottles, filling to line. Replace caps tightly. Shake until dye is dissolved.
    5. Squeeze Violet dye down one arm of the tee.
    6. Next, apply Fuchsia dye on half of the tee. (Refer to photo.)
    7. Cover dyed fabric with plastic surface cover to keep damp. Let set 6-8 hours. Wash and dry separately.
    8. On a clean surface, lay tee out flat. Insert Tulip® Fashion Form.
    9. Squeeze out Tulip® Soft Paint colors into Tulip® Paint Tray.
    10. Use chalk and trace the lip pattern randomly onto to shirt. (See photo)
    11. Fill in traced lips with Crimson Red, Mandarin Orange, Sunshine Yellow and Petal Pink, gradating darkest to lightest from top to bottom.
    12. Use Ebony and Glacier White to add detail to lips.
    13. Remove Tulip® Fashion Form and let dry.
 
Visit us on Facebook!
Craft on! Click here for today's daily giveaway!

Thursday, January 13

Angel Baby

Designed by Cheryl Ball
Make your little angel an outfit that’s heavenly with Tulip® One-Step Dye™ and Tulip® Soft Fabric Paint™!

Materials List

  • Aleene's® Fabric Fusion® Permanent Dry Cleanable Fabric Adhesive

  • Tulip® 3D Fashion Paint™

    65000 White
    65407 Silver Metallics
  • Tulip® Surface Cover™

  • Tulip® Soft Fabric Paint™

    BI15806 Platinum
  • Miscellaneous

    •   Scissors
    •   White canvas tote
    •   Paper towels
    •   Onesie
    •   Gray chalk pencil
    •   Needle and thread
    •   Small paintbrush
    •   Purple ribbon – 1½” 40010024507, 5/8”
    •   Foil
    •   Pink wired ribbon – pink ombre
  • Patterns

    Instructions

    1. Cover work surface with Surface Cover. Wash tote and onesie in washer with small amount of laundry soap and no softener. Place damp pieces on work surface and smooth flat.
    2. Starting at bottom of bag, accordion pleat fabric up to top of bag, creating about 2” wide pleats then press flat. Starting at side on onesie and about 4” from end, pinch fabric across to other side then tightly wrap a rubber band. Wrap another about 3” from first then equal sections on remainder.
    3. Wearing gloves from dye box, fill dye bottle with water to indicated line then shake until thoroughly mixed. Squeeze dye within sections on onesie, turning and inserting bottle tip within folds. Squeeze dye across pleats on tote, creating about a 2” swath along length, leaving a white space between. Carefully lift single pleats and add dye as needed.
    4. Cover dyed fabric with Surface Cover to keep damp. Let set 6 to 8 hours or longer for most intense color. Rinse dyed fabric under warm running water until water runs clear and excess dye is removed. Fill washer to large load setting with hottest water suitable for fabric and a small amount of laundry soap. Dry in dryer then iron both smooth.
    5. Squeeze a small puddle of Platinum Soft Fabric Paint on foil. Use small round brush to add a few drops of water then thoroughly mix, adding more water as needed until paint is the consistency of heavy cream. To create spatter effect, fill brush with thinned paint then flick across fabric. Fill brush again then flick in a different direction. Repeat on onesie and tote to desired effect. Let dry – a blow dryer will speed this step.
    6. Fold onesie in half lengthwise then press along fold for a crease down center. Unfold onesie, making sure you can see crease line. Flip over pattern then use gray chalk pencil to trace along pattern lines. Line edge of pattern along crease down center. Hold in place with hand then run finger over lines to transfer pattern in chalk onto fabric. Remove pattern.
    7. Start flow of 3D Fashion Paint on paper towel using an even pressure on bottle for a smooth line. Practicing on a paper towel, squeeze a few lines of thick paint on one side, fold over paper towel then press lightly over paint. Open paper towel to reveal design. Practice a few times to determine width of paint for desired effect.
    8. Squeeze 3D Paint over chalk lines, Silver for heart and White for wings. Carefully fold over other half of onesie then lightly press. Open to reveal design. Let dry. Repeat step with tote, using slightly larger pattern.
    9. To create small flower, cut an 18” length of ribbon. Carefully pull wire from both sides. Fold ribbon in half lengthwise then use needle and thread to sew a gather stitch along open edge. Gather ribbon along thread then sew a few stitches to secure. Swirl ribbon then sew gathered edges together to secure. Repeat steps for larger flower but do not fold ribbon in half.
    10. To create leaves, cut two 3” sections of narrow lavender ribbon, fold in half then use Fabric Fusion to glue ends together, holding with tape if needed until dry. Repeat step for large leaves using a 4” long strip.
    11. Use Fabric Fusion to glue flowers in place then add glue to ends of leaves and tuck under flower as shown. Let dry
    12. Tie wider ribbon into a bow around handle of tote.
 
Visit us on Facebook!
Craft on! Click here for today's daily giveaway!

Wednesday, September 8

Sacred Heart Tie Dye Shirts

Lacy from Catholic Icing celebrates her faith with a wonderful tutorial on making your own Sacred Heart tie-dye shirts using our Tulip® One-Step Tie-Dye Kit™. She has a series of photos showing how to fold, dye, and even paint on the accents.


Craft on! Click here for today's daily giveaway!

Tuesday, August 24

Dotted dye technique

This is a fabulous technique that shows dye in a whole new way. It's easier than it looks and you can mix up what ever color combination you want. We used our new Tulip® Shape Dotters™ to complete this look!


Friday, August 6

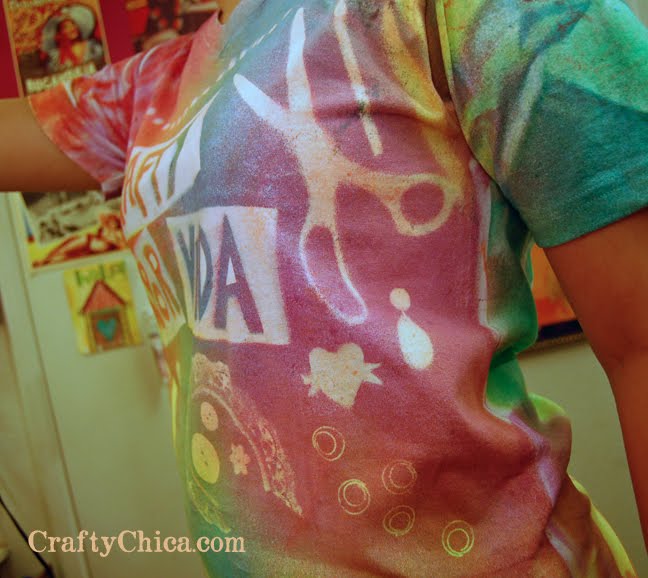
"Crafty por vida" Stenciled Tee


Last week at the craft convention, I got to play around with the new Tulip Tie Dye Fashion Kits - they are new kits that come with all kinds of stencils and textures to use on fabric. The entire time I was demoing, I kept thinking about coming home to play with the concept even more!

I eventually made two fun shirts, here is one, and I'll show you the other one in a few days. I wanted a hard, chunky, almost punky kind of look. So I went with hand cut stencils.

"Crafty por vida" means "crafty for life."
I used watercolor paper and drew out block letters and cut them out with a craft knife. Then I placed all kinds of items from my studio on the shirt.
NOTE: Only use items that you don't mind getting paint on!

Then I used different colors of Tulip® Fabric Spray Paint™ all over. For the areas outside of the stencil, I scrunched it up and used multiple colors. The cool thing is that the watercolor paper stencils are easy to cut through, yet very sturdy so you can use them multiple times. AND - you can also save the letters you cut out and use those on a different project!

This is the back of the shirt. It's fun and silly, and
I'm happy that Maya asked to keep it, that is a good sign!
Wait until you see the next one, it was inspired by a movie!

Washing instructions: Let the shirt sit for 4 hours, and then wash alone in cold water.
You are good to go after that!


Peace, love, and glitter!

Friday, July 10

Our employees love tie dye!

Check out Frank Peters (our R&D manager) and Lauren Binci (our new product development manager), hamming it up wearing their custom Tulip® One-Step Fashion Dye™ t-shirts in the office for casual Friday! Frank said Debbie (you may remember her from our post on Adam Lambert) made him the shirt. Debbie's always trying out new techniques and having fun with tie dye! Lauren is also very creative and whipped up a tie dye shirt, and then sewed her custom shirt using one of her corsets as a guide.

We absolutely love seeing our employees wearing our products here at I Love To Create!

Have you used our dyes or other products in a project recently and want to shout it from the rooftops? Leave a link to it in our comments section or shoot us over an e-mail at ilovetocreateblog@yahoo.com . We'd love to see what you love to create!
Clicky Web Analytics
Pin It button on image hover

Subscribe to our newsletter

* indicates required
I am interested in products and inspiration for...
Close