Use the bright colors of Tulip’s One Step Tie Dye Kit to make a cheerful DIY Tie Dyed Infinity Loop Scarf. With the weather transitioning into fall, it’s the perfect time for a pretty scarf to wear with any outfit.
Let's get started!
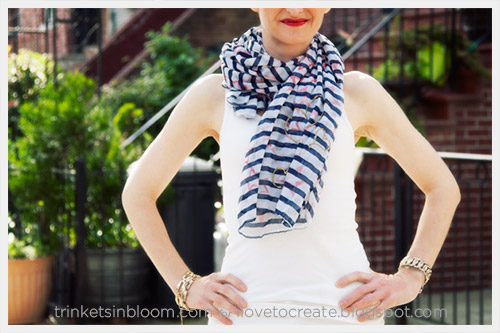
This
slightly nautical DIY Stars and Stripes Scarf is a fun way to
revitalize an old scarf and also get you ready for Memorial Weekend.
There’s something so clean and fresh about a nautical look for
clothes and accessories as we head into summer. I love the crisp white
and blue stripes on this scarf, but I wanted to add a subtle touch of
red with stamped stars to add more dimension and interest.
I recommend putting some paper underneath your scarf just in case your ink or fabric paint bleeds through.
Press
your stamp firmly into your fabric ink pad, make sure you have ink on
the entire design of your stamp then press your stamp firmly onto your scarf.
You will need to reload your stamp with ink each time you want to stamp it onto your fabric.
As you go check the edges of your stamp for extra ink and clean it with a wet paper towel to keep it from ruining your design.
TIP: To
get really strong color with your Scribbles stamps you will need to
make sure you have a lot of ink on your stamp and press firmly onto your
fabric.
The
great thing about the Scribbles fabric ink and stamps is that it really
stays on your fabric and doesn’t fade after washing. Also the inks have
a very nice hand feel on your fabric. You hardly know they’re there,
they’re never stiff or sticky. That’s why they’re perfect for a soft
sheer scarf!
step 2
When
you have finished stamping your design, you can add an extra touch with
your fabric paint. I painted 3 hearts onto a corner of my scarf.
This can be a great finishing touch to your scarf, make it your signature!
Be
sure to let your scarf dry for a few hours or overnight to make sure
all inks and paints are completely dry before washing or wearing.
For those who attend - we're going to have a special gift if you
purchase Crafty Chica products, plus
freebies: commemorative Crafty Chica temporary tattoos, buttons and
more! I'll also have a display of finished craft projects showing what
you can do with the products. Oh, and I'll have books too! There is
limited supplies of the goodies, so get there early!
Now wait, what if you don't live near one of the stores that sells the products? You can buy the items online at iLoveToCreate.com (should be posted soon). Now, I'm going to have fun on this road trip. I'm making special pieces
of art and will be leaving them along the way throughout the tour in
random places. I'll be posting the locations on my Instagram and my Facebook page
- so if you live in Phoenix or California, stay tuned, you might score
one of them! If you do, share a photo on my Facebook page!
Lastly, I have to give special thanks toLa Quinta Inn & Suitesfor sponsoring this tour. They are providing us rooms each night, we couldn't have done it without them! And also, gracias to iLovetoCreate and Michaels for making it all happen!
APPEARANCE DATES AND
LOCATIONS
Phoenix
Kick-off party! Thursday, September 13th, 6-8 pm 1925
E Camelback Rd, Phoenix, AZ
It doesn't matter that it's still 100 degrees in my hometown...it's September! Which equals...FALL! This is my "Hurry up and cool down Arizona, It's September, duh." scarf.
Place a trash bag to cover your table/workplace. Pinch scarf as shown to start applying zip ties.
Attach zip tie in 1" increments along the scarf. (It looks like a centipede! eeww :p )
Wet scarf so that the tie dye can absorb it then apply on to scarf.
I wanted a faded look, so I let it dry outside for two hours (instead of wrapping in plastic for six hours like the directions say) since the fabric was thin.
Cut off zip ties (this could take some time....) and wash separate in cold water! Hang dry.
Fashion blogger Carly J. Cais of Chic Steals will be featured in the next few weeks as a guest blogger here on the iLoveToCreate blog! She has created some trendy and fashionable looks and she shows you step by step how to make them! Take it away Carly...
Nothing could be easier than re-purposing the bottom of an old t-shirt as an accessory! Wear as a simple scarf for a pop of pattern at the neck, a lightweight hood, or sew the bottom closed and add a drawstring to use as a pouch for makeup. By using two colors in the leopard print and varying the size of the spots, you get a much more finished, high-end look than by just using the stencil alone.
and... – garbage bags – paper towels – cotton swab – small bowl for paint – fabric scissors
How To: 1. Begin by creating the leopard pattern on the t-shirt. Wash the shirt in the washer (do not use fabric softener) and dry in the dryer to remove sizing.
2. Place onto a garbage bag, laid onto a flat surface. Place another garbage bag in-between the fabric layers so the dye does not seep through. 3. Place the leopard stencil from the Tie-Dye Fashion Kit onto the shirt, and cover around the stencil with paper towels to prevent overspray.
4. Put on the gloves in the kit. Mix the Tulip Aqua Tie-Dye according to the kit directions, and spritz onto the fabric using the spray bottle. Be careful to not spray too much; just enough so the stencil shapes are visible (too much and it will seep under the stencil and the pattern won't be crisp).
5. Remove the stencil; wipe down with a paper towel.
6. Repeat Steps 3) - 6) to cover all the area below the underarms of the t-shirt on the front. Turn the shirt onto the back and repeat.
7. Allow to dry about an hour.
8. Mix the Tulip Cobalt Tye-Dye according to directions, and squirt some dye into a small bowl (not used for food). Dip a cotton swab into the dye and dab it onto the t-shirt, on top of the aqua spots you made with the stencil. (Reference a photo of what a leopard's spots really look like to help with placement.)
9. Cover with plastic and allow to dry 4-6 hours. Once dry, wash in the washer with a small amount of detergent and water at the hottest suitable for the fabric. Dry in the dryer.
10. Once dry, cut off the top part of the shirt, from side to side right under the sleeves.
And you're done! Wear the fabric loop as an infinity scarf for a punchy pattern at the neck, or customize further with a little craftery on your sewing machine.
Happy DIY'ing! xoxox Carly J. Cais
Thanks Carly for this awesome DIY and bringing us such a fab revamp project. We look forward to seeing the other projects you've whipped up! In the meantime, fans, hop over to Carly's Chic Steals blog to get more inspiration and cool DIY projects and techniques


 step 1
  TIP: To
get really strong color with your Scribbles stamps you will need to
make sure you have a lot of ink on your stamp and press firmly onto your
fabric.
TIP: To
get really strong color with your Scribbles stamps you will need to
make sure you have a lot of ink on your stamp and press firmly onto your
fabric.



.JPG)


