Last week I led a bracelet-decorating craft for some kids and the whole time, all I could think about was getting home so I could make my own! Here are three ideas I came up with. I think this is a really fun idea to do with your girlfriends or cousins. Just put out a bunch of bracelets and all kinds of Aleene's glues and lots of beads, ribbons, markers, gems and stuff like that. Have everyone design their own bracelet!
Hey everyone! It's SUMMERTIME! YAAAAAY! I found these cute kicks on clearance at Target for five bucks. (Score!) I LOVE the color, but since it's summertime I thought I'd make them pop even more by adding yarn swirls and gems.
Squeeze a quarter sized amount on to shoe. Pinch the end of yarn and apply it to the shoe. Next, simply wrap around in a spiral/swirl. Repeat until you get the look you want. I like the different sizes of circles that I ended up with!
Now add a little drop of glue in the center of each swirl and add a gem. You can do the matchy-matchy thing or add some contrast like I did.
I love my new shoes, they are so cute and are great for the beach or pool side parties! Now, where is that glass of lemonade??
Hey guys! It's finally spring time!!! (Yaaaaaaaay! *awkward dance*) I was shopping around and saw ombre EVERYTHING. I conveniently had a blouse that needed a stain covered up (darn you sketti red sauce!!!) So I decided to ombre my blouse!
First, make sure you cover up your surface with a garbage bag and your hands with gloves! Tie Dye is not very friendly! Next, generously squeeze the dye on the bottom of the damp shirt. (This is going to be the darkest part) If you want it darker, Black dye at the bottom should do the trick!
Next, dip the brush in the water and spread the dye up. Do this each time so it gradually looks lighter.
After this, lay the garbage bag down and hang your shirt to dry. If you just leave it flat, the color will start to crawl up!
I've been in a sparkly mood lately and have been gluing Tulip Glam It Up Crystals on just about everything! Not only my iPhone case and headphones, but now even my charger. Think I'm crazy? Check out "crystal phone charger" on Etsy, Pinterest and eBay and you'll see from the listings that I'm not the only one. People are charging big bucks for these and now I'm going to show you how to do it on the cheap!
Side note - yes, I blinged my headphones too. Don't judge!
Use your toothpick to add a layer of glue to one side of the charger. Next, spread out your crystals. Use a crayon or Tulip® Glam-It-Up!™ Fashion Art Tweezers™to pick up and apply each one. NOTE: The mini size of crystals works best!
Apply your crystals one-by-one.
You can decide what pattern you like - flowers, ribbons, circles or just all random and mixed up like the one I made.
Halfway finished!
I also did the other end of the charger too.
Done! I love it, it makes me feel so Hollywood. Like, if I happened to be walking the red carpet and needed to charge my phone, I could whip this out and still feel glamorous!
I've been wanting to try and make zipper bracelets since, like, forever. I went to a local fabric supply store in town and bought a whole bag of remnant zippers.
When you buy zippers for this project, you really want the ZIPPER part to show so look for zipper that have chunky gold or silver teeth, as opposed to the boring ones that are painted the same color as the fabric.
For the bracelets I made, I opened them and cut them right above the zipper handle. These are going to be my bracelet bases. Cut to fit your wrist.
Now it's time to load up on all kinds of iLovetoCreate products to embellish your bracelets. I used:
When they are done, they'll look like this. I really love bright colors so I used a lot of contrast in my bracelets. Now it's time to make them wearable!
I've been wanting to try all kinds of nail art but the problem is that I can't grow my nails long! I was looking on Pinterest the other day and saw that a lot of people are buying the press-on nails and decorating them. You can buy a set of 100 nails for under $6 at the grocery store, that is right in my price range!
What I like best about this method is that you can decorate the nails on a table instead of on your fingers, which gives you more control. And you can pop them on and off as you like. Think of them as jewelry that you can make and switch in and out as you wish.
Here is something I didn't think of - I bought the loose nails as opposed to the ones connected to a strip of plastic. No prob, I just used a strip ofAleene's® Fabric Fusion® Peel and Stick Tape™ to hold down the nails as I painted them. Choose the nails by trying them on your finger to get the right size, trim with scissors if needed.
Paint the base coat with nail polish, then clear polish and let dry. Add a tiny dot of Puffy Paint, then use the tweezers to pick up a crystal and drop in the center of the paint. Do this for all the nails and let dry.
When they're dry, simply pop them off, add the nail glue and press on your fingertips. I decorated two sets and mixed and matched them. It's addicting! And you can do a set to give as a gift for Christmas.
Hey guys! It's officially December and of course- SWEATER SEASON! WOO! Anyone? No? Alright, well i'm super excited because I have tons of itchy ugly sweaters. Most of them are pretty cool, but some need re-vamping! If you don't believe me, watch my sweater video HERE .So that is what I've decided to do today!!
First I applied the crystals. I used a variety of big, medium and small crystals. I wanted to add some sort of design, so I started big at the top and gradually got smaller. I love how it looks! If this is your first time using the heat tool, have no fear! it's really simple! There's an on button, along with another button to press when you're actually applying the crystals. Careful though, it gets hot pretty quick! Use the tool as directed in the first picture for about 30 seconds. The heat will transfer all the way to the back of the crystal, activating the glue!
Okay, here is how I glued the pockets. I cut out a piece of fabric as a template.Because I used oil cloth, I had to actually use these templates for the backing. Using Aleene's No Sew Fabric Glue , I found that is not a washable glue, so instead I used Aleene's OK To Wash-It.This whole gluing process took me a full day for everything to set.
Once everything is glued, you're good to go! Now, go forth and represent your not-so-ugly-sweater!
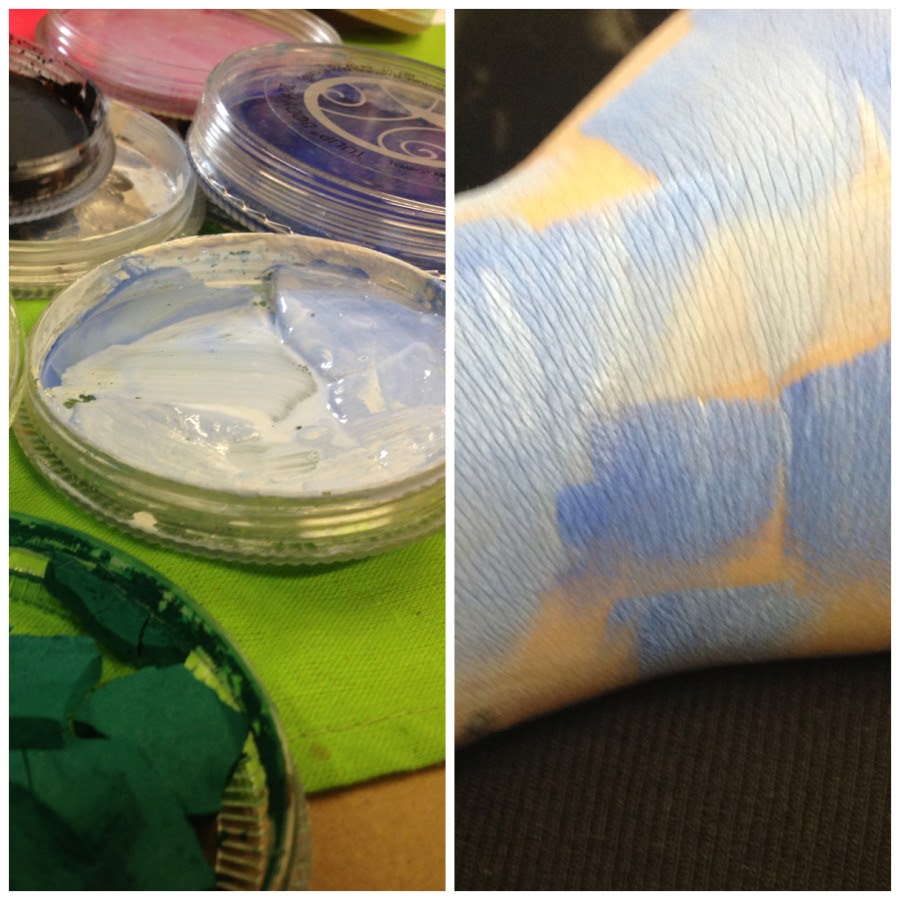
First I mixed the white and the blue and tested it on my hand. I love that these paints are super creamy and you can blend colors really easily.
You want to pull up a picture to use as a guide! I used this one:
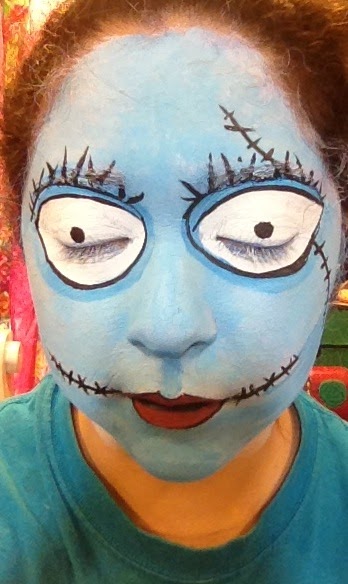
As far as the base coat - I added a dash of green to get a teal undertone. Next I covered my whole face using a make-up wedge (you can also use a soft paintbrush), and started with the painting the eyes and lips. For the eyes, create two large white ovals that go around your eyebrows and under your eyes as well. you can paint on top of the blue, or do the white separate from the blue.
Next use the deep red to create curvy lips, outline them in black, like Sally. For face painting, you always want to exaggerate the details to look more dramatic!
Next, I had my dad help me with the eyes and eyelashes. Since I couldnt see....haha :) Paint on the stitches on each end of your mouth and up the side of the face. Don't forget the eyelashes and eyelid contouring, use a darker shade for that!
I could have left it like this, but I wanted to do something cool with my closed eyelids, so we painted dots, again like Sally! Once you're done, paint your neck a little bit darker blue and add the stitches there too.
You can make a maroon wig out of yarn or buy one at the costume shop. As far as the rag dress, look at the thrift store for a patchwork style. Or you could take a solid dress and use Fabric Fusion and glue fabric swatches all over it.
Lastly add the last painted on stitches and you're done!


