Showing posts with label Glossy Gloss Varnish. Show all posts

Thursday, June 16

Pretend Polka Dot Pyrex Bowl


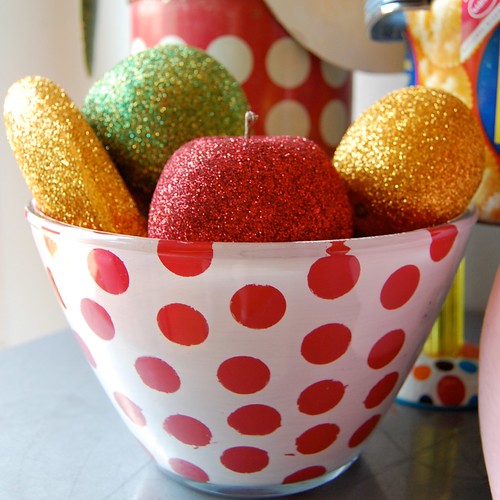
I have always loved vintage polka dotted Pyrex mixing bowls. Apparently from their price tag when I find them at the flea market so does everyone else. That got me to thinking, I wonder if I could make my own version. How hard could it be?
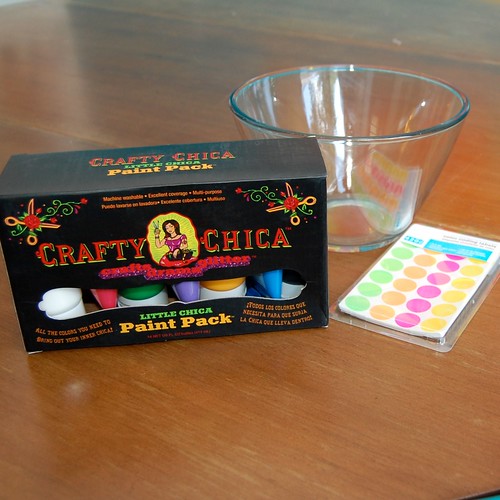

SUPPLIES
Crafty Chica Paint
Crafty Chica Glossy Gloss
Paint Brush
Dot Stickers


The first thing to do is place your dot stickers in a pattern of your choice on your bowl.


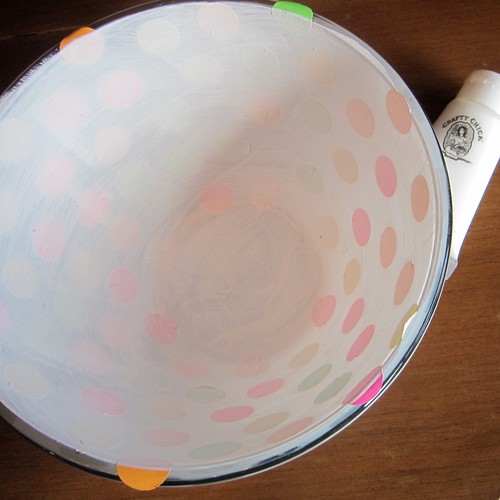
Once your stickers are in place using Crafty Chica Paint paint the inside of your bowl white. I recommend doing several thin layers. You don't want to saturate your stickers with paint so that it seeps through.


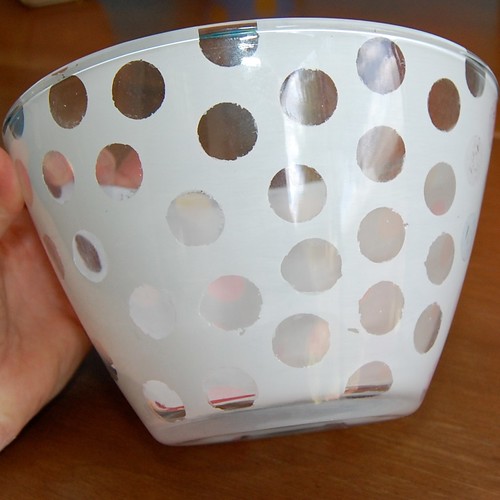
Once your white is opaque peel your stickers off. I must admit this part was trickier, messier and more time consuming than I had anticipated. Thank goodness for thumb nails. I managed to scratch my white paint in a few spots. In retrospect I wish my stickers were raised and were repositionable. However, I thought to Tim Gunn and made it work.


Next paint over the clear dots with red Crafty Chica paint. Again several thin layers will probably work best. Allow the red paint to dry completely.


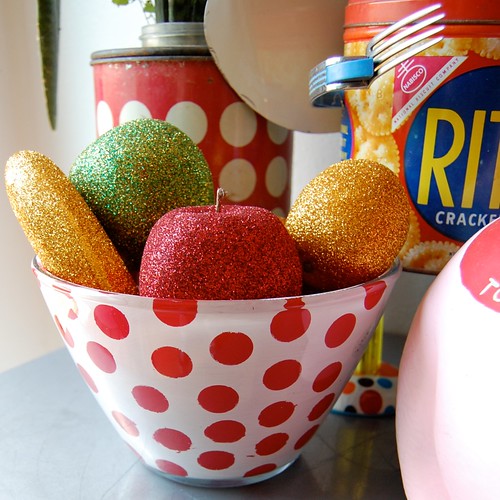
The last thing to do is coat the inside of the bowl with some varnish like Crafty Chica Glossy Gloss. Remember your new bowl is not food safe, but sure is pretty to look at. Remember my glittered fruit from a few weeks ago? I think my new faux Pyrex bowl is the perfect vessel.


Looking for more red and white polka dotted fun? Check out my Pinboard about it! Also be sure to check out all my other I Love to Create projects.

Visit us on Facebook!
Craft on! Click here for today's daily giveaway!

Thursday, May 27

Plant Marker People


Sure when you buy herbs at the store they come with a little plastic stake telling you what it is - handy yes, attractive no. It's nothing a little paint and a trip to the craft store can't fix.


SUPPLIES
Liquid Fusion Glue
Wooden People Sticks
Crafty Chica Little Chica Paint Packs
Small Wooden Ovals
Crafty Chica Glossy Gloss Varnish
Paint Brushes


PAINT YOUR PEOPLE
I found my wooden people at Hobby Lobby. They were a blank wooden canvas just begging for polka dotted bikinis and lime green tank tops. I did my best Sarah Neuburger impression to give them faces.


NAME THAT HERB
Using small wooden ovals and a thin paint brush I painted the names of the herbs in my garden.


PROTECT FROM THE ELEMENTS
Using a paint brush apply two coats of Crafty Chica Glossy Gloss Varnish, allowing to dry completely between coats.


SIGNAGE
Using Liquid Fusion Glue attach the wooden oval to the hands of the person.


STICK IT IN YOUR GARDEN
All that is left to do is stick your little people in your garden so that they can tell you which herb is which.

Thursday, April 1

A Tisket a Tasket Make a Recycled Easter Basket


Though this is not Tallulah's 1st Easter, it will be the first one that she can carry a basket. That being the case I made it my life quest to try and make her a custom Easter Basket. Gather up some Collage Pauge, balloons and scraps of paper today for I Love to Create and make your own.


SUPPLIES
Paper
Crafty Chica Glossy Gloss Varnish
Balloon
Collage Pauge
Magazines
Fiskars flower paper punch


SHRED
You might remember my Eco-Friendly Ping Pong Necklace how-to from last year and recall that I love working with shredded paper. Use colorful magazine pages for one look or black and white sheet music or newspaper for another option. If you don't have a shredder, never fear. Use scissors to cut strips or do it old school and hand shred the paper. Either way you are going to need a large pile of shredded paper.


BALLOON BASKET
Using Collage Pauge cover half of your balloon with several layers of paper. Feel free to make a nice smooth top edge now or you can go back after the paper dries and hardens to do it with scissors like I did.


TOO HOT TO HANDLE
Also using Collage Pauge and paper create a handle for your basket going over the top half of the balloon. Allow basket to dry completely.


DECORATE
Feel free to go in an add decorations to your basket: polka dots, flowers, pictures from magazines.


POP
Once your basket is completely dry, pop your balloon. Your basket is born! Coat your balloon in Crafty Chica Glossy Gloss Varnish or Paper Glaze to help prevent any tackiness. You never know when dew can strike early on an Easter morn!


FILL TO THE RIM
All that is left to do is hide a few Easter Eggs and let your kiddo fill their basket! Don't forget to make a pair of Egg Shell Mosaic Earrings with those left over dyed Easter egg shells.

Wednesday, August 19

Cute as a Button Frame!


I'm a quirky gal. It's who I am; it's what I do. So, it will probably be no surprise that I'm also a big fan of coordinating my frames with my photos. The challenge being however, that I can't always find a frame to fit my photographic whim or if I can, they're often not in my price range.

This was the conundrum of displaying a shot taken of my daughter Clover (when she was weeks old) and Jennifer Perkins' daughter Talullah (at 4 1/2 months), wearing matching outfits made by Jen's mom. Because the outfits themselves are adorably kitschy and the photo would likely live in Clover's room, I wanted something that would both coordinate and exude the playfulness of our wee, little lasses. Thankfully, with a plain frame and a few mainstay craft supplies, the task at hand was an easy one! Here's how I did it and how you can make your own version to match your mood...or your photograph!


Materials
Flat Front Frame
Assorted Buttons
Craft Paint
Sponge Brushes

How-To

  • Choose an aspect of your photo that you'd like to match colors with. It could be the blue of an ocean, the golden tones in a subject's blond hair or, like in my picture, the orange & lavender from two little cutie pies' outfits.
  • Go through your button stash and choose coordinating shades. I dig the eclectic look of varying shapes and styles, but you could also go more uniform by using just one shape or color of button. Set buttons aside.
  • Remove the back and glass from frame. Paint frame with desired color. Depending on the surface of your frame, you'll likely need to either use a primer, lightly sand or, just use several coats of craft paint. Let dry.
  • Paint on Glossy Gloss Varnish to five the frame front a more finished look. Let dry.

  • Decide what pattern you'd like your buttons to be in on your frame. Use Liquid Fusion to glue buttons down. Let dry overnight.
That's all there is to it. A cute-as-a-button, customized frame to match your sweetest of memories!

Craft.Rock.Love,

Like this post? See more I Love to Create projects here!

Vickie Howell's a designer, writer and crafty spokesperson.  Learn more about her books, videos and other projects at: www.vickiehowell.com!
Clicky Web Analytics
Pin It button on image hover

Subscribe to our newsletter

* indicates required
I am interested in products and inspiration for...
Close