I've got to be honest. I feel kind of like a cheat for sharing this as a big tutorial. And the thing is, I totally wasn't going to. This is something I did for myself. But I had so many people say "how did you do that?" that I figured it would make a great tutorial :) So today I'm sharing one of my favorite ways to fancy up my home and centerpieces when I have guests coming over.
Showing posts with label decoupage. Show all posts
Tuesday, February 18
Wednesday, November 14
Sailing, Sailing Op Art Decoupage Canvas
Avalon Potter for iLoveToCreate Teen Crafts
Avalon made this simply chic op art style canvas using old book pages and cardstock on an inexpensive craft store canvas. This is so easy to make and the variations on this theme are infinite. Fiskars has some great shape cutters that make quick work of cutting squares that are easily halved into triangles. Piece them together and adhere to your canvas with Aleene's decoupage medium in matte finish and you have a fabulous one of a kind work of art. Best of all, you're the artist!
Materials
Canvas
Various colors of cardstock
Old book pages
Collage Pauge matte finish instant decoupage medium
Tools
Shape cutter square template
Shape cutter
Scissors
Pencil
Use shape template and cutter to cut 3" squares out of cardstock and old book pages. (You may need to mark and cut with scissors if your book pages are brittle.)
Mark half point on squares with pencil and cut with scissors into triangles.
Arrange triangles on canvas. Spread a layer of decoupage under each triangle and cover canvas. There will be overlap, go back after canvas is dry to cut this off. Cover entire canvas with decoupage medium, allow to dry. Do not worry about bubbles, they should go away when canvas has dried. You can use a wet finger to smooth them or a brayer. You can start in the center and work up and down canvas for a symmetrical effect.
(Disclosure: Blogger was provided some products and compensated for project, all opinions are 100% her own.)
Thursday, August 11
Recycled Reto-Style Jewelry Box


This is not my first time at the jewelry box re-vamping rodeo. Once upon a time I even sold them on my website. Lately, I have spotted several cute recycled jewelry boxes on Pintrest and Etsy that have my creative juices flowing. Flowing so much in fact I decided to revisit my stash of vintage jewelry boxes and see if I couldn't come up with something new and improved. My jewelry collection is always overflowing and I can never have too much cute storage for it.

SUPPLIES
Jewelry Box
Crafty Chica Paint
Scissors
Paint Brush
Aleene's Tacky Glue
Fabric
Collage Pauge
Rick Rack
Pliers


At least every other trip to the thrift store I spot an old jewelry box begging for a face lift. I happen to have a small stockpile in my studio of a few that have called my name through the years. I opted for a large dark brown dude from the 1960's to re-do.

The only priming I did was to remove the drawer pulls. I needed a pair of pliers for this.

The first thing I did was using Crafty Chica Paint and a sponge brush applied several coats of green paint. Allow your paint to dry completely between coats.

Once my paint was dry I used Collage Pauge to apply my fabric. I re-covered the drawer in my vintage fabric and added a large rectangle of fabric on the lid.

Paula Deen thinks everything is better with butter and I happen to think everything is better with rick rack. I applied the rick rick with a combo of Fabric Fusion and Quick Dry Tacky Glue depending on what surface the rick rack was touching.

My new and improved jewelry box houses my Bakelite collection perfectly. I like the idea of being able to color coordinate my jewelry with my jewelry box. Ya, I've been accused of being too matchy matchy in my day - so what.

Check out more I Love to Create posts here. Be sure to check out my series on jewelry displays and boxes - Journey Through a Jewelry Box Flickr Faves, How Ya Hanging - Jewelry Displays of Crafty Ladies, Jewelry Displays in Books and Making Your own Jewelry Display.

Visit us on Facebook!
Craft on! Click here for today's daily giveaway!
Wednesday, July 7
ILoveToCreate Teen Crafts Have Your Cake Box


ILoveToCreate
Teen Crafts
Have Your Cake Jewelry BoxMargot and Avalon Potter
It's been hotter than h e double hockey sticks around these parts so most of the activities that don't include a swimming pool have been indoors. Avalon has been helping me in the studio with the new book and my various and sundry design project deadlines. Yesterday we put our heads together on a decorative decoupaged box. She had mentioned needing a place to keep her jewelry and this is a pretty solution to that dilemma. Since we all know how much she loves the Cake Boss and decorated cakes, this box fit the bill for a faux cake project!
Avalon selected the tissue paper from a pile I keep around for craft projects and gifts. She did the decoupage and after it dried I added the coordinating floral embellishments. I am loving these felt buttons from Blumenthal Lansing, you can use them for so many crafty projects! Aleene's Tacky Glue makes quick work of stacking them up and Traci Bautista's Collage Pauge in 'Sparkle' was simple and safe for Avalon to use without my supervision. There are all sorts of shapes you can buy and decorate with decoupage, this is a great way for teens to personalize their decor.
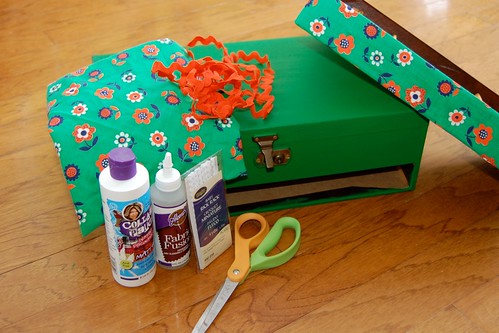
Materials
Paper box
Decorative tissue paper (save this up from gifts for crafting!)
Coordinated Favorite Findings felt floral buttons
Craft flower with wired double stem
Traci Bautista's Collage Pauge in Sparkle
Aleene's Fast Grab Tacky Glue
Tools
Foam brush
Non-stick craft sheet
Wire cutters
Pointed tool (I used a clay tool)
1. Shorten the stems on your wired flower to about 3" using wire cutters.
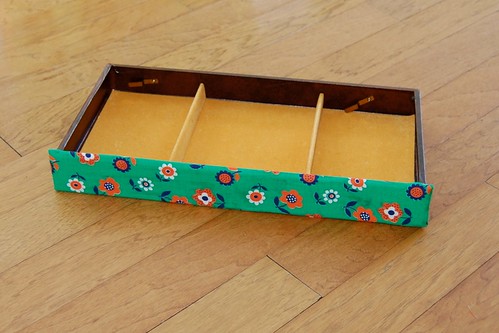
2. Tear sections of tissue paper. Apply decoupage medium to the section of the box you're decorating and apply paper, then put a thin layer of decoupage over the top. Don't oversaturate everything.
3. Keep building layers of tissue paper until the box bottom and top are completely covered. We used two different papers, you can do the same or use all one paper or combine papers. You can also, if you like, decoupage the interior of the box. Allow decoupage medium to dry.
4. Use Aleene's Fast Grab glue to adhere each layer of the the stacked felt flower buttons around the edge of the box lid. Allow to dry.
5. Use a pointed object to poke two holes in the top center of the box lid, these need to be spaced to accommodate the flower stems.
6. Slide the flower stems into the hole and twist underneath to secure.
Tuesday, March 23
ILoveToCreate Teen Crafts: Trashionista Mixed Media Purse
ILoveToCreate Teen Crafts
Trashionista Mixed Media Purse
Margot Potter
"Mom crafted, kid approved."
Copyright Margot Potter All Rights Reserved
I have an ever bursting at the seams pile of fashion mags that sit by my bed and on the kitchen table. I peruse them at night before I go to sleep and while I’m noshing to trend spot. The problem is that they start to take over my house if I’m not careful! What I don’t recycle, I love to use to make accessories. The words and images on this purse are all made of recycled paper. This is all about layers of paper, inks and paints and every purse will turn out differently. I love that!
Teaching our teens about the many ways they can recraft, reuse and repurpose is crucial. Plus this project will be a lot of fun for them to personalize. You can do this with old cigar boxes and get hardware and a handle to retrofit. Avalon loved this one and I’m hoping we can whip up some more soon together.
Materials
Wooden purse blank
Aleene’s Traci Bautista Collage Pauge Matte
Crafty Chica Little Chica Paints Red
Fashion Graffiti Paint Cannon Fabric Paint White
Fashion Graffiti Big Phat Fabric Marker Black
Fashion Magazines
Vintage book pages or newspaper
Inkadinkado Animal Print Clear Stamps
Fiskars Clear Stamp Block
Sizzix Big Shot Flower Die
Tools
Sizzix Big Shot
Mini-screwdriver
Paintbrush
Foam Brush
Old toothbrush
Scissors
1. Remove hardware from purse. Sand, clean and coat purse with a layer of racy red paint inside and out. Allow to dry.
2. Use Big Shot and die to cut three vintage book page or newspaper flowers.
3. Select words and images. Decoupage flowers and cut and torn magazine words and images to the purse front using Collage Pauge matte and a foam brush. Allow to dry. If bubbles form under the images, wet your finger with water and work them out from center. Don’t fret about bubbles, they’ll go away once the medium is dry. (I had to remove and replace a word at the top of this purse...which you can do while everything is still wet.)
4. Use the Big Phat marker to put a layer of ink on your stamps and randomly stamp the leopard and tiger prints around edge of purse. Allow ink to dry.
5. Use marker to make angled stripes on thinner edge of purse. Allow ink to dry.
6. Dip an old toothbrush into the white paint and flick it across purse front. Repeat using red paint. Allow to dry.
7. Reassemble purse.
Tuesday, November 10
iLoveToCreate Teen Room Decor: Patchwork Paper Wall Letters


iLoveToCreate Teen Room Décor
Mixed Media Patchwork Paper Wall Letters
Margot Potter Teen Crafts
“Mom crafted, teen approved.”
Teens love to personalize their rooms and this is a fun and easy way to do that in a flash. You can make an entire word to fill a wall or just an initial like I’ve done here for a door. I really fell for these retro themed papers, but you can use any papers you like including recycled scrap stash papers, wrapping paper and magazine pages. You don’t have to save this idea just for your teen’s room; these would be adorable anywhere in your home. I love the idea of seasonally themed words done in this patchwork style. Avalon squealed when she saw this, so I'm pretty sure it’s a winner!
Materials
Wood letter or letters
K&Company Carolyn Gavin Scrapbook paper (or other paper of your choice)
Liquid Fusion Glue
Traci Bautista’s Collage Pauge medium in matte finish
Vintage or new coordinating button
Tulip clear crystal to fit inside of button
Wired tinsel
Tools
Paint brush
Scissors
Exacto knife
Pencil

1. Select your papers. Place your letter on the paper, hold it down firmly, trace and cut with your Exacto knife. (If there’s a little overlap you can trim it later.)

2. Cut the accent papers (I made a small border with a coordinating paper and cut out a coordinating paper flower.)

3. Adhere the papers using an even coat of decoupage medium and paint a coat of medium on top. I love using a brush because it gives you texture, but you can opt for a foam brush if you prefer. If you get bubbles, wet your fingers and gently work them out. (Don’t fret, they will deflate when the medium dries. I promise!) Allow medium to dry.
4. Paint a second coat of decoupage medium over surface and allow to dry.
5. Run a thick bead of Liquid Fusion along the edge of the letter and above your borders and adhere the tinsel wire. IMPORTANT: Do not smash the wire into the glue or it will flatten and lose its dimension and sparkle. Just gently lay it into the glue bead. For the longer pieces you can place something small (like small glue bottles) on each end and the center until they’ve tacked into place and then remove them and allow the tinsel to dry overnight. This is kind of like using hot glue without worrying about the heat melting the tinsel or burning your fingers.
6. Attach a button to the center of your flower using Liquid Fusion. Attach a Tulip crystal to the center of the button with Liquid Fusion. Allow to dry.
Tuesday, August 11
I Love to Create: La Tour Eiffel Decoupage Lampshade

In the blink of an eye, little girls become young women. They’re more grown up and they want a more sophisticated bedroom. Total room rehab isn’t always an option but it’s not so hard to make quick and significant changes if you’re crafty. I bought this Eiffel tower lamp at Target about eight years ago, and it’s still available online! I wasn’t terribly fond of the shade that came with it, so I purchased a plain craft paper shade that I’d always intended to embellish. Flash forward eight years...
It’s perfect for my daughter’s newly revamped room! We used white tissue paper stamped with archival ink (you need to be sure your ink is waterproof or it will bleed when it gets wet.) I got a great decoupage trick from crafty diva Pattie Wack at CHA and used Aleene’s Tacky Glue® glue stick to adhere the torn pages on the shade instead of decoupage medium which can get very messy very quickly! Here are the instructions! Bon chance!
La Tour Eiffel Lampshade
Teen Craft
Margot Potter for I Love to Create
Materials
Kraft Paper lampshade
Eiffel Tower lamp base from Target
White tissue paper
Vintage or new off white buttons in various sizes
1 yard black chiffon ruffle trim (JoAnn Fabrics)
Ranger Jet Black archival ink
Hero Arts Old French Writing stamp H2365
Inkadinkado Flourish stamp 96253-P
Traci Bautista’s Collage Pauge Instant Decoupage™ in Glossy
Aleene’s Tacky Glue® glue stick
Aleene’s Fast Grab™ Tacky Glue®
Aleene’s Jewel-It®
Tools
Foam brush

1. Wipe shade off with a dry cloth to remove any dust or dirt.2. Stamp a large sheet of white tissue paper with archival ink and the writing stamp. Add stamped flourish accents. Allow to dry.
3. Tear each stamped section leaving frayed edges.
4. Adhere paper segments to lamp using glue stick. Make sure to cover back of each sheet completely. Work from the center using your fingers to gently adhere paper to lamp and work out any wrinkles or bubbles.
5. Overlap sheets and don’t worry about any small gaps, you can go back and fill those in later with smaller paper segments.
6. Spread a thin layer of decoupage medium over lamp using a foam brush. Use brush to work out wrinkles or bubbles. Don’t stress too much, texture is good! Allow to dry for several hours or overnight.
7. Adhere ribbon trim to bottom and top edge of lamp using Aleene’s Fast Grab Tacky Glue. Allow to dry.
8. Adhere buttons of various sizes to shade using Jewel-It Glue. Allow to dry. C'est tres chic, n'est pas?
Subscribe to:
Posts (Atom)


