Showing posts with label garden crafts. Show all posts

Wednesday, March 13

How to Decoupage a Terra Cotta Pot


How to Decoupage a Terra Cotta Pot
Make a Mod Squad Planter
Margot Potter for iLoveToCreate

Terra cotta pots are absurdly inexpensive and perfect for patio planting.  It's easy to dress them up with things you probably already have on hand.  Tissue paper and decoupage medium are the perfect materials to take a plain terra cotta pot from drab to fab in just a few quick steps.


You'll need a pot, a foam brush, scissors, some tissue paper cut into strips, Aleene's matte decoupage medium and Aleene's glossy spray acrylic sealer.  Brush on some medium, attach a strip working from the inside of the pot edge around the bottom of the pot.  Layer the strips on top of each other so you get some color play.  Gently press the tissue strips from the top to bottom, add medium on top and smooth with your finger tips.  Let the decoupage medium dry and then spray it with two layers of the sealer so it's water proof.  Add a plant and you can dress up a windowsill or a patio table top in a flash.  The best part, with a little help from iLoveToCreate, you can make this retrofabulous project for under $10.00!  


Friday, June 8

Helping Hands Gardening Gloves for Father's Day

What do you get the dad that does not fish, wear a tie or golf for Father's Day? It seems like most traditional gifts and cards for dad's come with this basic theme. Well the first thing to consider is what is it that your dad does. My husband likes to make ice cream, listen to vinyl records, drink beer and garden. Garden - ya that's the ticket! This year the kids and I are whipping up dad a pair of custom gardening gloves.

SUPPLIES

Gardening Gloves

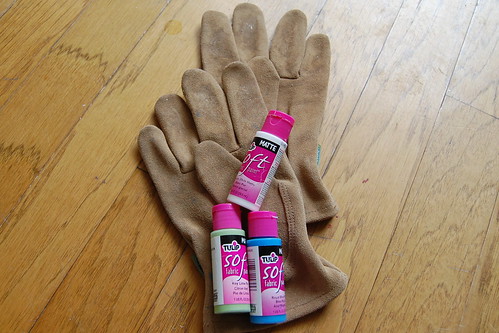
Tulip Soft Fabric Paint

Kids

Paint Brush

I scored a pair of suede gardening gloves in the outdoor section of Target. My husband's current work gloves have duct tape patching holes so I'm thinking these will be a welcome surprise.

He would be happy as a clam with a new pair of gloves, but I thought I would get Tallulah and Baxter to help adorn them. They are always trying to help daddy, especially in the garden. It seemed only fitting I put their little handprints on the gloves.

The first thing I did was paint my kid's hands with non-toxic fabric paint. Baxter was not quite sure what to make of that. Also, you want to be sure and do the prints of your oldest child first so that the larger handprint is on the bottom.

The next part is a little tricky since you only get one shot. Get your child to spread their fingers apart and smash their paws onto the gloves. This is easier said than done with small children. Tallulah's prints came out better than Baxters, but Chris will get the idea.

All that is left to do is wrap these babies up and hope that Chris does not read my blog before Father's Day.

Looking for some other Father's Day gifts you can craft with your kids? Check out the article I wrote for Learn Vest!

Visit us on Facebook!
Craft on!

Wednesday, April 11

iLoveToCreate Teen Crafts: Mothers Give You Roots Mother's Day Planter and Plant Stake

Visit us on Facebook!
Craft on!

iLoveToCreate Teen Crafts
‘Mothers Give You Roots’ Mother's Day Planter and Plant Stake
Margot Potter for Avalon Potter
“Mom crafted, teen approved.

Mothers Day is coming fast and it’s time to start thinking of ways to tell mom just how much you love her. Avalon was super busy this past week, so I stepped in to make this project.  This is the perfect gift for a mom who loves to garden or one who aspires to having a green thumb. We are giving this to my mother-in-law, shhhh...

I started out with a more colorful plan, but this shade of green is my personal favorite and it just seemed perfect in this monochromatic scheme.

The saying is one of my favorites: “Mothers give you roots.” Which is followed by: “Fathers give you wings. You need both.”

I think that’s a truly lovely thought, don’t you?

I am so utterly smitten with this; I may have to make one for myself! A teen can easily handle all of the steps here and all of the accessories were found in the dollar bins, so it’s a very affordable project too!


Materials
Terra Cotta pot
Terra Cotta pot saucer
Dollar bin wooden heart ornament
Dollar bin gloves (green)
Dollar bin mini-shovel
Dollar bin mini-rake
Dollar store flower seeds
Green raffia ribbon
10 gauge tinned copper wire
30 mm silver tone jump ring
Tulip Fabric Marker (thick tip) neon green
Tulip Fabric Marker (thin tip) black
Aleene’s Quick Dry Tacky Glue
Traci Bautista’s Collage Pauge matte finish
Aleene’s Spray Sealer matte finish
Small vine or floral pattern rubber stamp
Crafty Chica little paints green and yellow

Tools
Tulip sponge brushes
Tulip sponge pouncer
Scissors
2 pairs chain nose pliers
Round nose pliers
Memory wire shears or other heavy duty wire cutters
Dowel

1. Make sure pot and saucer are clean and dry. Mix your paints to make a darker and lighter green. Add a small amount of yellow for the dark green and a larger amount for the lighter. You will need to mix up a fair amount of paint here so the colors remain the same, small plastic drink cups and popsicle sticks work well for this task!

2. Use a foam brush to paint the body and inside of the pot and inside and bottom half of the saucer lighter green. This will probably take 2-3 coats, allow to dry in between. Use another foam brush to paint the edge of the pot and saucer darker green, also using 2-3 coats and allowing to dry.

3. Paint heart ornament on both sides and edges in the light green, 2 coats, and allow to dry.


4. Use a paint pouncer to gently apply a layer of light green paint to top of rubber stamp. Rock the stamp from left to right around edge of pot and saucer, taking your time to avoid overlapping. This is meant to be organic, so no worries if it isn’t perfectly perfect. Allow this to dry.  Use pouncer, rubber stamp and darker paint to stamp the surface of the heart ornament on front and back. Allow to dry.

6. Print out: ‘Mothers give you roots.’ Use a green ink and an easy to read font, mine is 18pt. and the font is Abyss.


7. Use green marker to write love around edge of pot working your way around, go over that with the black marker.

8. Working outside and allowing to dry between coats, spray 2 layers of Aleene’s matter sealer on pot and saucer.


9. Use decoupage medium to apply the cut out sentence to one side of your heart. Allow to dry. You can seal this with 1-2 coats of the spray sealer if it’s going to be outside.

10. Use raffia ribbon to tie a multi-loop bow around top of heart ornament. Wrap your gloves and garden tools in raffia making another multi-loop bow.

11. Use round nose pliers to bend a loop on one end of a 2” segment of 10 gauge craft wire. Create a hook by bending wire over a round dowel (I used a metal dowel; you can use a thread spool or whatever you have at hand.) If you want to 'work harden' the wire to make it more stiff, hammer on a bench block with the flat side of a ball peen hammer. Follow by adding texture with the round end. Use jump ring and two pairs of chain nose pliers to attach heart ornament to end of plant stake.

12. To assemble for gifting cut some foam to fit inside center of pot, cutting out a segment for the gloves and tools. Poke a small hole for plant stake. Add some coordinating tissue paper and insert tools, plant stake and add your seed packet.


(This blogger was compensated for this project and given materials for construction.)

Friday, June 18

Fiesta Flower Pot


Folk artists in Mexico are a shining example of what being crafty is all about. They can't simply run to Michaels or Jo-Ann Fabrics for a hunk of fuchsia clay. Instead, our south-of-the-border friends make the most of their resources. The results are shiny, happy, thrifty, and wickedly clever. From painted tequila bottles to glittered cigarette boxes to wood frames trimmed in bottle caps, the materials and concoctions are endless.

I channeled that infectious spirit for this project, and used only what I had on my art table to accessorize a bland flowerpot. Toothpicks and head pins are great for making microdots, and small paint bottles as templates for shapes. The secret to this look is to cram in as many contrasting primary colors as possible.

Materials

Large terra cotta pot
Crafty Chica® Little Chica Paint Packs™
Crafty Chica® Glossy Gloss Varnish™
Cardstock
Scissors
Polymer or air dry clay

Craft knife
Cookie sheet and oven
Head pin or toothpick (for painting small details)
Hot glue

Step 1: Prepare the pot for painting.
Base-coat your pot with a paint color of your choice, then varnish it and let dry. Set aside.

Step 2: Make a template.
Use the bottom of the paint bottle to draw a silver- dollar-sized circle template on the cardstock. Cut out the template.

Step 3: Make the circles.

flashback-flowerpots-step3.jpg

Working on a clean, flat area, pinch off a hunk of clay, flatten it, and use the template to cut out a circle.

flashback-flowerpots-step3b.jpg

Pinch off another piece of clay and roll it into a long skinny snake, about the size of a spaghetti noodle. Arrange it around the clay circle to look like a border, and cut excess with the craft knife. Add a swirly design of choice in the center and cut off excess. Make 10-12 more.

Step 4: Bake the clay.
Bake in oven according to package directions — usually about 15 minutes at 175 degrees. Remove and let cool.

Step 5: Paint the circles.

flashback-flowerpots-step5.jpg

Base-coat the circles, then let dry. Add contrasting colors to the top ridges, let dry.

flashback-flowerpots-step5b.jpg

Use the head pin to add dots and squiggles, let dry. Add a coat of brush-on varnish, let dry.

Step 6: Attach the circles.

flashback-flowerpots-closeup.jpg

Hot glue the circles around the rim of the pot. Add more painted designs if desired, and a coat of high gloss varnish for that extra punch.

Variation: Add glitter to your circles, or make them in squares or other shapes. Use the clay to spell out words or other designs. Alternate the sizes of the circles for a crazier effect. If you absolutely must, use rubber or foam stamps on clay circles instead of swirlies.

Peace, love, and glitter!
Kathy :-)

P.S. Check out my new novel!

Thursday, May 27

Plant Marker People


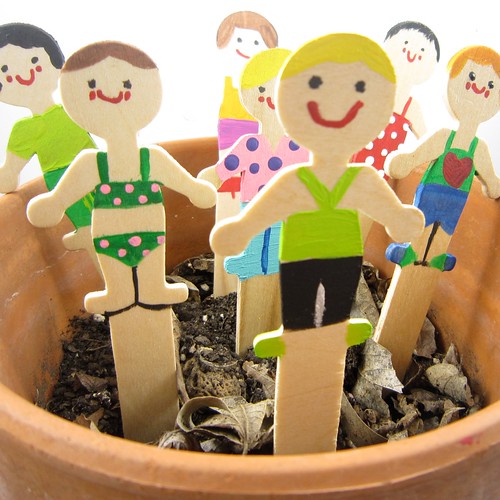
Sure when you buy herbs at the store they come with a little plastic stake telling you what it is - handy yes, attractive no. It's nothing a little paint and a trip to the craft store can't fix.


SUPPLIES
Liquid Fusion Glue
Wooden People Sticks
Crafty Chica Little Chica Paint Packs
Small Wooden Ovals
Crafty Chica Glossy Gloss Varnish
Paint Brushes


PAINT YOUR PEOPLE
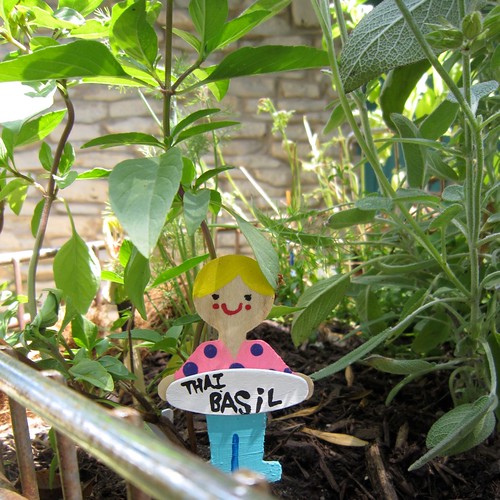
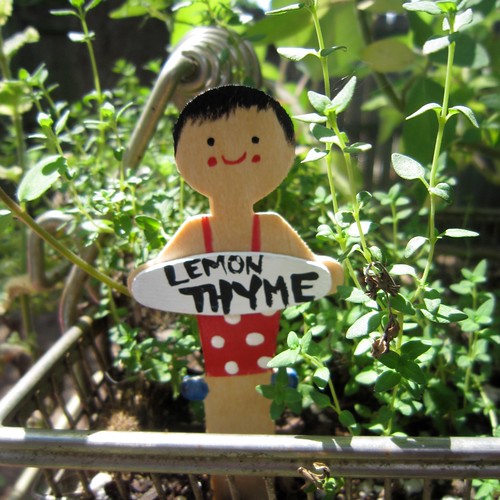
I found my wooden people at Hobby Lobby. They were a blank wooden canvas just begging for polka dotted bikinis and lime green tank tops. I did my best Sarah Neuburger impression to give them faces.


NAME THAT HERB
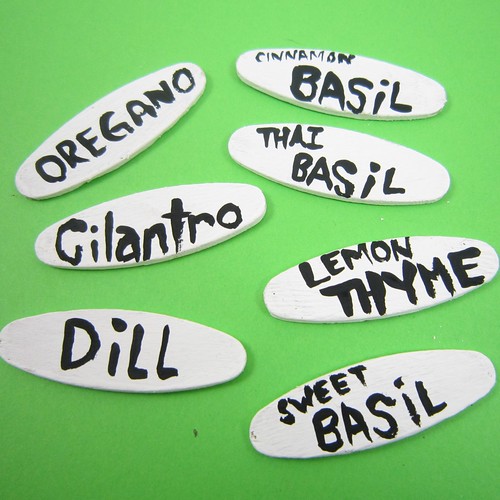
Using small wooden ovals and a thin paint brush I painted the names of the herbs in my garden.


PROTECT FROM THE ELEMENTS
Using a paint brush apply two coats of Crafty Chica Glossy Gloss Varnish, allowing to dry completely between coats.


SIGNAGE
Using Liquid Fusion Glue attach the wooden oval to the hands of the person.


STICK IT IN YOUR GARDEN
All that is left to do is stick your little people in your garden so that they can tell you which herb is which.

Thursday, April 22

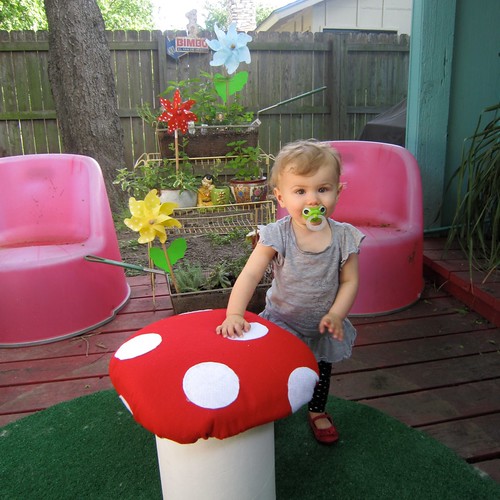
Toadstool Garden Stool


With spring in the air everyone needs a toadstool in their garden or on their patio. You could buy one from your local garden center or you could easily make one like I did.


SUPPLIES
White Felt
Foam
White Crafty Chica Paint
Red Felt
Concrete Pier Form
Batting
Liquid Fusion Glue
Staple Gun
Scissors
Fabric Fusion Glue
Paint Brush
Pen
Wooden Disc (several inches larger in diameter than your stool base)


DUMPSTER DIVE
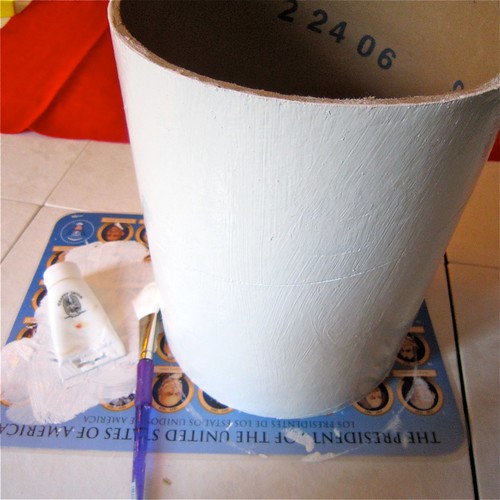
Actually I didn't do any dumpster diving. What I did do was cruise my neighborhood during bulk trash week. On a nearby street I found several large cardboard tubes which I was later informed are concrete pier forms. They were also filled with lots of wooden dowels that I snagged.


PAINT IT WHITE
I covered the cardboard in 2 coats of white Crafty Chica paint.


POLKA DOTS
Using a mug as my template I traced 12 circles onto white felt. I then cut the circles out and used Liquid Fusion Glue to attach them to a piece of red felt.


STOOL CUSHION
I traced my wooden disc onto foam and cut it out with scissors. If your foam is super thick you may need to use an electric knife.


I glued my foam to the wood using Liquid Fusion Glue. I also padded my stool with some extra batting.


READY, AIM, FIRE
Once the glue dried on my foam I sat it face down on the non-polka dotted side of my red felt. Using my staple gun and scissors I pulled, tucked, stapled and trimmed the felt. I tried to make sure the felt did not pucker and was nice and taunt on the top of the cushion.


CAP OFF YOUR TOADSTOOL
I used a heaping helping of Liquid Fusion glue to attach my stool top to it's base.


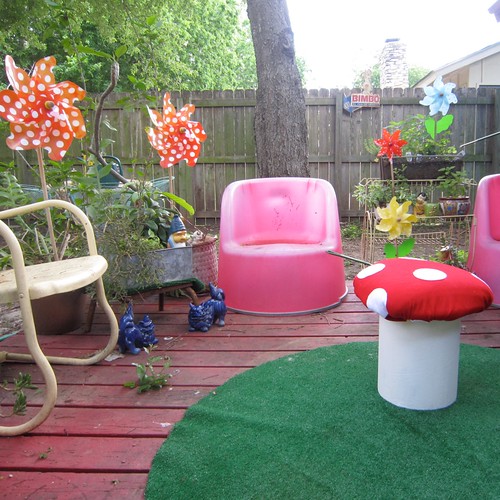
Though my stool is not water proof on a sunny day it looks pretty dang cute sitting on my back porch just waiting for someone to pop a squat.


When someone is not sitting on my new polka dotted mushroom stool Tallulah enjoys playing with it. Next I need to make a giant paper mache garden gnome.

Tuesday, April 6

ILoveToCreate Teen Crafts: Neon Impressionist Flower Pot


ILoveToCreate Teen Crafts: Neon Impressionist Flower Pot
Margot Potter
"Mom crafted, kid approved."

It's been a picture perfect spring  in Amish country.  We even managed to get our garden started early this year!  That's a first!  Avalon is planting her own little flower garden and we've started the seeds indoors.  I was thinking it might be fun for her to plant a few flowers for the kitchen windowsill too.  I didn't want to put them in a plain terra cotta pot, not in our vibrant kitchen, so this project was born.  These pots are really fun to make with teens.  Just start with a base coat of Crafty Chica paint mixed into a pretty pastel color and add Tulip Fabric Sprays in neon colors to jazz things up.  Glue on some ribbon and faux flowers and you end up with a cheery little addition to the windowsill.


Materials
4.5"x5.5" Terra Cotta Pot with Matching Saucer
1.5" Thick Grosgrain Craft Ribbon Bright Green with White Stitching
2.5" Diameter Decorative Fabric Flowers (Orange and Pink)
Tulip Fabric Spray Paints in Neon Colors (Pink, Green, Yellow and Orange)
Crafty Chica Little Paint Pack (White and Yellow)
Aleene's Platinum Bond Super Fabric Textile Adhesive
Aleene's Liquid Fusion Glue

Tools
Foam Brush
Paint Brush
Scissors
Non-Stick Craft Sheet

1.  Mix the Crafty Chica yellow and white paint to get a pastel yellow.  Paint this on the pot with the foam brush.  Paint the edges and the saucer.  Allow to dry and paint a second coat.


2.  Use the Tulip Fabric Spray to create layers of color on pot and saucer.  You have to turn the saucer over to get the edges, so this is a two step process with a drying time for the top and the sides in between. Allow paints to dry.

3.  Smear Liquid Fusion across rim of pot and attach ribbon.  Allow to dry.

4.  Cut off stems and remove backs of flowers, keep a small amount of the plastic tab so you don't separate the layers, if you do just use the glue to reattach them.  Glue the flowers to the center of the ribbon on the pot rim, allow to dry with pot resting on the side so the flowers don't slide off.

Clicky Web Analytics
Pin It button on image hover

Subscribe to our newsletter

* indicates required
I am interested in products and inspiration for...
Close