Showing posts with label Pattie Donham Wilkinson. Show all posts

Tuesday, April 12

Meet our Let's Create Live Host: Pattie Wilkinson

pattie-pic

With only a few weeks away to our Let's Create Live event, we plan on bringing you fun tidbits, interviews, and details about the live show!

First up, we wanted to introduce you to our beloved hostess with the mostest for the event...Pattie Wilkinson! Pattie is a lead designer and spokesperson here at iLoveToCreate and can churn out sketches and projects like it's no one's business! If you are a DIY/craft show fan, you may remember Pattie as a co-host on the TNN show, Aleene's Creative Living! So hosting is second nature for Pattie! Not only is Pattie a fab host and designer, she's worked all over the craft industry developing in-store merchandising, products, tools and more for major companies and retail chains.

You can peek into Pattie's crafty mind by some of these projects she's created!
mosaicec7f464296bd2e5694ccc90679bf46f31279548d

We wanted to find out more about Pattie, so we asked her 5 fun questions! This crafty lady didn't disappoint!

1. Having been raised in rural Oklahoma, what were the kinds of crafts you made as a kid? Being a preacher’s kid, my mom was always coming up with Bible School and Church Bazaar projects for us to make. Did you do a lot of repurposing? We didn’t throw anything away! I could make anything from a makeup bag out of a bleach bottle and some fabric remnants, to a wreath out of egg cartons.

2. You’ve been the host of TV shows and many video demos, but not a lot of them have been live. Are you prepared for the unexpected at “Let’s Create Live”? There’s nothing like a LIVE show, as I’ve experienced many times on QVC and HSN where thousands of people are watching. The worst thing that ever happened to me was when the thread broke as I was demonstrating a quilting attachment and I had to rethread the sewing machine right then and there. I just kept talking and smiling!

3. In your many hosting experiences, do you have a most embarrassing moment? Please share it with us. We’re dying to know! Well, I’ve told this story before, but my friend Darsee and I were doing a live show at Universal Studios one time for the Home Show, and we thought it would be fun to blow eggs and decorate them for Easter. There we were with our big hair, dressed up all fancy, blowing eggs, AND not realizing how ridiculous we looked. Of course, being LIVE, we didn’t stop and watch play-back. But, imagine our bewilderment that night when we ended up on Talk Soup for everyone to laugh at!

4. Your motto is, “If I can’t glue it, I don’t do it!” What would you say is the biggest glue project you’ve ever tackled? Wow, that’s a hard question, since I’ve done lots of BIG things, like a room divider covered with fabric swatches, and a lazy boy with repurposed jeans glued over it entirely.

5. You recently moved to a new home, what kind of crafty remodeling projects are you looking forward to? There are dozens! But, I think my first project is to cover a ghastly mural on one wall that has white cranes and cattails on it… maybe a decoupage project? And I’ve got the local thrift store holding some huge chairs that I’m going to recover with Marimekko textiles. You’ll have to check my blog and facebook page to watch the progress. It’s going to be so much fun!

Pattie is a regular contributor to our blog and you can find many of her behind the scenes projects here. Also visit her web site at Pattiewack.com for crafty projects, books, videos and more!

You can also find Pattie in various videos on our Youtube page! She's always caught on the spot at her desk in impromptu videos!


Visit us on Facebook!
Craft on!Click here for today's daily giveaway!

Monday, March 7

March is National CRAFT MONTH

In accordance with the Craft and Hobby Association, March is National Craft Month.
Created in 1994, it was designed to help people learn about and
re-discover the joy of crafting and all its many benefits.

You'll see this sign in your local craft stores and find lots of project ideas, classes, super sales, and inspiration this month as all of us crafty peeps join together to celebrate crafts!

 
Tie Dyed Bridesmaid

At the national Craft and Hobby Association's
Craft Place website
you'll find tons of projects from everyone in the industry,
including this Tie Dyed Bridesmaid Dress we designed for  iLoveToCreate,
along with dozens more fabulous ideas.

So, spread the word and throw a craft event this month to share your love for crafting...

pattie blog footer


Friday, December 24

A Very Vintage Christmas (Wall art)

  Designed by Pattie Wilkinson
Let the Ghost of Christmas Past take your home décor on a trip down memory lane! Use embroidery hoops to frame vintage-inspired fabrics displaying a special message sealed with Aleene’s® Fabric Fusion® for a modern way to deck your halls.

Materials List

  • Aleene's® Fabric Fusion® Permanent Dry Cleanable Fabric Adhesive

  • Miscellaneous

    •   (5) Embroidery hoops – various sizes
    •   Fabrics – vintage-inspired Christmas colors – to fit 5 hoops
    •   Scissors
    •   Chalk pencil (optional) 

    Instructions

    1. Stretch different colors of fabric in five embroidery hoops. Trim excess fabric from the backs of hoops.
    2. Choose three hoops for the letters “J-O-Y.”
    3.  Create letters by selecting favorite fonts from the computer, lettering book or creating your own. Enlarge to desired size and trace on to tracing paper. Flip over tracing paper, position where desired on fabric and trace outline of letter to transfer monogram. Refer to photo.  Cut out letters in contrasting fabrics. If desired, use a chalk pencil to create letters on fabrics before cutting out.
    4. Squeeze small amount of glue around back edges of letters and press onto centers of hoops, smoothing in place.
    5. Let dry.
    6. Hang as desired.
Visit us on Facebook!
Craft on! Click here for today's daily giveaway!

Monday, November 29

New Holiday Craft Videos!

We had so much fun with Holiday Craft Videos last year, 
our iLoveToCreate website team decided to do them again this year!
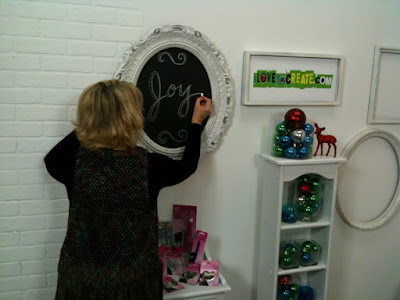
 Scott decided that a white Christmas would be fun, so he got busy painting and 
I brought in some color with ornaments and pillows.  
The cute little red deer and the
iLoveToCreate frame was added by Alexa (aka Swell Designer.)
 We have tons of Tulip holiday products,
so it didn't take long to put together some really
cute and quick crafts for the videos,
including coffee cozies with crystals to make a monogram.
 Molly was on hand to assist with set-up. 
That cute apron was just one of several darling ideas for using our
amazing adhesives, crystals, 3-D paint, stencils and glitter.
 As you can see... Victoria was not so excited about me 
snapping a candid photo of her during the shoot.
Sorry!
 And of course, Scott worked to make me look good, the audio sound wonderful,
and get those all-important close-ups for you to see
how to make your quick holiday crafts.
It was a good day of shooting at the iLoveToCreate photography/production studio.
Keep coming back to check out the videos as we post them here on the iLTC blog.
I hope you like the videos, and that they will inspire you
to be creative this holiday season!
Happy Holidays!


Craft on! Click here for today's daily giveaway!

Monday, November 22

Pompom Turkey Favor

 When I think of Thanksgiving, I think of Scott and I waking up and
having a lazy breakfast before the dinner prep begins.  
So, I thought a cute little pompom turkey sitting on top of upside
down coffee cups at our table would be just the 
perfect favor to start the day!
Here's my crafty supplies: 
Yarn, Aleene's Tacky Glue, Polka Dot Papers, and a PattieWack Pompom Tool.
 First Step:
Make a pompom
 Second Step:
Cut out 3 tail feathers and 1 circle.
Third Step:
Fan-fold the tail feathers and glue the papers into place to make your cute pompom turkey.
Happy Thanksgiving!
Pattiewack


Craft on! Click here for today's daily giveaway!

Monday, November 8

DIY Thanksgiving Dinner Party

Pilgrim Hat Centerpiece, Candles and Party Favors

If you can cut & glue, this is the perfect project for your Thanksgiving dinner decorations.

The base of each one of the pilgrim hats is a simple clay pot and the hat brims are circles of foam core boards that are cut to fit perfectly on the rim of the pots when glued on.  
I popped a pot of white daisy mums in the big one for a centerpiece.
The candles are pushed into foam and then tufts of tulle are poked around them.
The favors are circles of tulle filled with candy corn and tie up in a bow.
Super simple, and simple fun!


Here's what you'll need:
Clay Pots
Black Spray Paint
Black foam board
Pencil
Compass
Craft knife
Metallic Silver Scrapbook Paper
Grey Felt

Steps for the centerpiece:

  1. Spray paint the clay pot black, let dry completely.
  2. Turn the pot upside down on foam board.  Trace around the rim, then set aside.  Use a compass to draw a line 4 inches from the traced circle.
  3. Cut around the outside circle with a craft knife, being careful to cut a nice, smooth edge.
  4. Cut out the inside circle, 1/2-inch smaller than the traced line.  If you plan to use the pot as a cupcake tray instead of a flowerpot, don’t cut out the center hole.
  5. Glue the brim to the top of the pot.
  6. Cut out a buckle from silver scrapbook paper.
  7. Cut grey felt and thread through the buckle and glue around the rim of the pot.

Make the other pots the same way, only smaller.
Have fun!


Craft on! Click here for today's daily giveaway!

Monday, September 13

Tulip Fashion Spray- Product Sighting on The Antonio Treatment!


DIY Painted T-Shirts


I got so excited last night watching The Antonio Treatment, that I started yelling for Scott to come check it out. They were spraying t-shirts with our Tulip Fashion Spray for the kids to wear as smocks at the Hollywood Boys & Girls Club. They looked amazing as you can see here.


The renovation was unbelievable as the crew transformed the art room into a fabulously functional and fun place for kids.

Awesome!

Oh, and I grabbed my iPhone and took lots of pictures so you can see how cool the room looked when they were finished.


Come see me at Pattiewack.com for more wacky and fun crafts.

Craft on!Click here for today's daily giveaway!

Friday, September 10

Crystal Studded Stilettos


Any day is a good day for jazzing up a pair of high heels shoes, right? These gorgeous stilettos caught my eye at the Payless Shoe Store, and were perfect for a wedding project we are doing here in the iLoveToCreate Design Studio.

They are so pretty just the way they are, and perfect for the budget-minded bride. BUT, think of the options, girl! With crystals and glitter at my fingertips, I really got carried away.

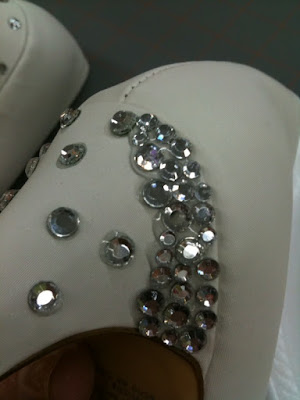
The heels are not covered in fabric, but some kind of leatherette, so instead of heat-setting I decided to grab the Liquid Fusion and get busy. I started by doing a polka dot of glue all over the heels, and then grabbed my Tulip Fashion Art Tweezers to pick up the largest crystals out of the adorable Tulip 300-pack Crystal carousel.

After those dried, I filled in the gaps with smaller crystals.

Turns out, that the carousel had just enough crystals to cover the heels.

The trick is, having those large crystals on there and letting the glue dry about an hour before you add all the rest. That way they don't move around like a big mudslide!

Of course, I had to glitter them. The Tulip Fashion Glitter Bond went on very smoothly with the little applicator that comes in the kit. I pretty much covered one side at a time with glitter bond and then sprinkled them solidly with Multi Ultra Fine Glitter is absolutely amazing, and looks so glamorous!

Not only are they perfect for a glam bride, but they are faulously fun for dancing at the reception!
You can see more of me at Pattiewack.com!

Sunday, July 18

Paper Doll Candles


I just love paper dolls and like most little girls, I collected them when I was a kid. My best friend Susan and I would spend hours drawing our own figures and then making clothes for them from old magazines and fabric from our mother's scrap bags.

But for a more grown-up version, I went online and googled paper dolls. Oh my gosh! It's unbelievable how many paper dolls you can find to download and print for free. And that's exactly how I found these great images. Instead of cutting out the clothes and gluing them or using the tabs to put clothes on them, I decided to decoupage them onto grocery store candles.

I grabbed my Collage Pauge® Instant Decoupage and a soft brush to glue and seal them to the glass. Then I attached little scrapbooking charms around the tops with some black satin ribbon. I think they'll look cute on my bathroom window sill.

Oh, and if you need more Pattiewack glue ideas, go to iLoveToCreate.com and you can also pick up "The Crafter's Guide To Glue" at any major book store or online at Pattiewack.com.

Happy Crafting!
Pattiewack

Sunday, July 11

Steampunk Jewelry Organizer


I was in the grocery store yesterday, picking up the latest Crafts N'Things magazines, when I thumbed through and saw the latest iLoveToCreate ad campaign for Aleene's adhesives, and low and behold there I was!


I had totally forgotten about the project that I made and the photo shoot, as we do them about 6 months out.

When I found out that I was doing the ad, I was totally excited because the product was Liquid Fusion, and I knew I could really do an industrial-strength-mondo project, since the glue is hard core.

I'd been dying to use this paper mache dress form and I had the idea to turn it into a jewelry caddy. So I went to the hardware store to find things to pimp it out. I found this aluminum vent cover for the base and while I was there, I picked up a roll of the thinnest aluminum flashing. I don't know what normal people use it for, but the minute I saw it, I knew it was going to be perfect to cut into a flirty metal skirt. I also grabbed 2 metal drapery tie-backs and a wooden finial. I didn't have a clear image in my mind, but I just knew I liked them.

Since I'm crazy about the steampunk trend, I decided to use old watches, metals, leather, and hardware to glue to the dress form. The drapery tie-backs made great arms for hanging jewelry, and the finial was perfect to mount at the top for holding bangle bracelets. I glued cup hooks around the waist to hold my rings.

To soften the whole look of the jewelry caddy, I cut strips of fabric and starched them heavily with spray starch, and glued the fabric loops underneath the metal skirt. I love how it turned out, and hope you like it too.

For the instructions to make your own version of my jewelry caddy, go to the iLoveToCreate website for all the details.

Tuesday, June 22

Star-Spangled Shirt


The 4th of July just wouldn't be complete without a red, white and blue outfit. This cute t-shirt was super simple and you can have it ready to wear in about an hour!

Grab your red and blue Tulip Fashion Spray and a t-shirt and a white bandanna. Cover your table with plastic before you get going. Next, lay the shirt on the table and pinch the bottom of the shirt into fan folds, and scrunch the top of the shirt. This will make it look like stars and stripes when you're done.

Now, spray red on the bottom of the shirt and blue on the top. Do the same thing to the bandanna. Wait until they're dry and then flip them over to do the back. Let them dry completely, and you're ready to add a cute denim skirt or shorts. The bandanna is cute around your neck but it would look really adorable around a ponytail, too.

All you need now is a sparkler in one hand, and a piece of apple pie in the other!
Happy 4th Everybody!
Pattiewack

Sunday, March 21

Recycle, Reorganize, Recipes


Love to cook, love to organize, and love to decoupage....
so I love this decoupaged recipe tin I made to organize my fave recipes to keep right on the counter top in my kitchen.


I'm a big coffee and hot tea lover and I just can't bear to throw away some of the cool packaging and save them in an ephemera box I keep in my studio. The maple syrup and the chocolate label were tucked away there, too. The cute alphabet caps were in my scrapbooking stash.

I started out with a humdrum recycled tin from the thrift store. It would have been fine the way that it is, but who you have to agree, it's pretty darn boring.

Then I used Aleene's® Collage Pauge Instant Decoupage to glue the labels to the tin. I laid the labels face down on a paper towel, brushed glue on the back and then applied them to the tin, pushing out any air bubbles. When I was finished with that step, I put a coat of glue over the labels to keep my tin nice & clean from flying food.


Recipe cards were a snap to make with colored card stock, clippings from magazines and the web, and glued together with Aleene’s® Acid Free Tacky Glue™ Sticks.
The whole project didn't take very long, and more recipes can be added all the time.


This project, and dozens more were designed by me and written up by Barbara Winkler in "Cookbooking, the delicious new way to scrapbook" by Sterling Publishing. You can pick yours up at Barnes & Noble or online.

Oh, and here's my recipe from the pic. I like to make this for my gal pals on the weekend.

Grapefruit Pomegranate Sunrise:
4oz. Light Rum (optional)
16 oz. Pink Grapefruit Juice
2 oz. Pomegranate Juice
2 oz. Ginger Ale
4 Wedges Ruby Red Grapefruit

Pour ingredients into a tall glass pitcher. Pop a dozen ice cubes into the pitcher. Stir briskly. Serve in champagne flutes with crushed ice and a garnish of grapefruit wedges. Enjoy!

Happy Cooking and Crafting!
PattieWack
Clicky Web Analytics
Pin It button on image hover

Subscribe to our newsletter

* indicates required
I am interested in products and inspiration for...
Close