Showing posts with label home decor. Show all posts

Wednesday, March 18

Spring Stamped Pillows


Happy Day after St. Patricks Day! I am super stoked to share with you this geometric modern stamped pillows with you today.  We have been having lots of cold weather in the South lately and the past few days it's been nice and warm. The buds are starting to come out on trees and it totally put me in the mood for spring/summer! We just added an outdoor room onto our house that faces the garden and I wanted to make some cozy inviting pillows or the chairs. 

I swear I am justThe great thing about this project is kids can do it and they will have so much fun. Let's get started!!! Check out my last post I did! It is perfect for EASTER

Wednesday, February 25

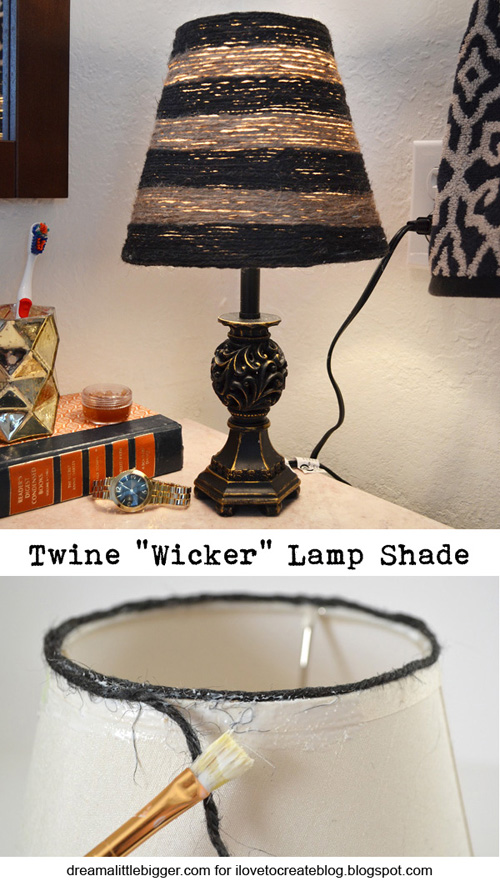
Twine "Wicker" Lampshade Tutorial

header-twine-striped-lampshade-dreamalittlebigger 
My home decor style tends to change quite frequently or at least every few years. I'm going away from the stark, clean and uncluttered rooms to something a bit more comfortable and homey. I have always loved wicker but with cats it's just not possible. Or it is but it looks like heck within a week. So I decided to incorporate the look by making a faux wicker lampshade from my newly remodeled half bath!

Tuesday, January 20

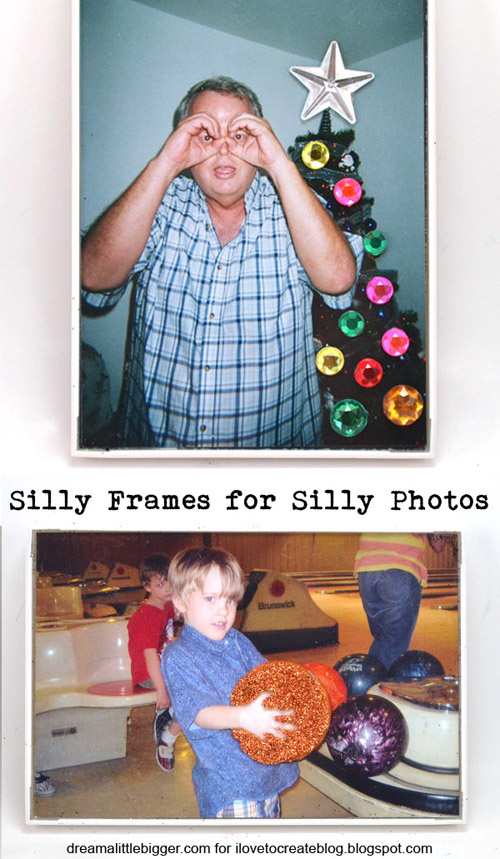
Silly Frames for Silly Photos

header-blinged-out-frames-dreamalittlebigger 

If there is one thing my family is good at it is refusing to take a serious picture. We have no pictures where we're all politely smiling with our hair and makeup done and Sunday clothes. We have pictures where we act a fool or just have fun. So I decided to bling up some silly frames for some of these silly pictures with Clear Gel Tacky Glue!

Tuesday, December 23

DIY Scribble Paint Snowflakes Window Clings

Hey everyone! Tanner Bell here, happy Tuesday. I hope you're doing well. I'm excited to be back on the ILoveToCreate Blog to create these really fun DIY Scribble Paint Snowflake Window Clings! Let me show you how easy it is in todays video. 

Tuesday, November 25

DIY Rolled Magazine Art with Always Ready Tacky Glue

Hey everyone, Tanner Bell here. Hope you're doing well, today on the blog I have a super fun DIY video tutorial for you using the NEW Always Ready Tacky Glue. You're going to love how easy these new glues are. Let's jump right into it!

Tuesday, October 28

7 Ways To Decorate A Light Switch

I originally set out to decorate 5 light switch plates, but ended up getting to 7 -- I just couldn't stop! For most of them, I used the new "Always Ready" Aleene's Tacky glues (they arrive in the checkout aisle -- no the glue section -- of JoAnn stores starting in November!). It's smart new inverted packaging that has the glue all ready to go -- in other words, no need to shake the bottle anymore to get the gluey stuff into the tip. They are great -- my only challenge was to remember to store them back in their base, tip down!
A light switch plate is a pretty sweet blank canvas -- small in dimension and fairly low-stakes (in case the creative process doesn't go as planned). But when it does work, what fun! Which switch plate theme or technique would you take and run with?

Wednesday, September 17

Halloween Burlap Pillows

With Halloween right around the corner I think it's time for us to start decorating our home! I am madly in love with burlap so when I love to Create came out with these burlap pillows my heart dropped to the bottom of the earth. Literally. OK, fine not literally but you get it right! There is something about a prickly pillow that makes me feel all warm and cozy. Maybe it's the fact that burlap kinda smells like a barn or feed store. I may be crazy but what can I say burlap is the bomb. Today we are making some fun and quick Halloween pillows so let's get started. 

Tuesday, September 2

DIY Outdoor Stenciled Burlap Pillows

Very recently my father and I made a bed bench for my mother. Basically we took an old bed and turned it into a bench for the front porch! And since my mother loves all things decor, trendy and owl I also stenciled some burlap pillows. With the new burlap pillow covers from iLoveToCreate these were tons faster to make than the bench itself!

And complement the bench perfectly!

Tuesday, August 26

DIY Fabric Lined Drawers

Hey everyone! Tanner Bell here, I'm super excited to share with you this easy DIY featuring Liquid Fusion Spray adhesive. You're going to love how simple this is to make and will have to use this tutorial to customize all your drawers.

Monday, August 4

12 Amazing Fabric Paint Projects


I've always love fabric paint because you can always make something fabulous with it at absolutely any painting skill level. So today I'm sharing with you some absolutely amazing projects to wear, to tote around or to decorate your home. Beginners more than welcome!

Tuesday, July 1

Tie Dyed House Number Banners

I'm not the only one I know who is mad about tie dye. And when I was thinking of a neat-o house warming gift I thought of an address banner. And when I realized this person was just as crazy about the multi-color fabulosity that is tie dye, I knew just what I had to do!

Monday, June 16

Bespoke Woven Wall Hanging


Weaving and macramé are big in a big way this year. Yarntastic textiles made by hand, rich in bohemian colors and patterns, harken back to 1970’s days gone by. But don’t be fooled – this isn’t your grannny’s macramé; instead of spending hours and hours memorizing confusing knot patterns, this time around we are bringing in the handmade touch with color. Vibrant, custom, one of a kind color. Thanks to Tulip’s dye powders, it’s easy to mix and match endless shades of your favorite span of the color spectrum.


You ready? Lets get started!

Monday, April 7

Modern Home Decor Projects


If you've ever thought about adding a few little stylish touches to a room or, heaven forbid, decide to overhaul the design completely, you know how expensive those little details can be. Rugs can cost you nearly a thousand dollars! Napkins ten bucks apiece! It's just crazy how much can be saved by going the route of DIY! And if you think handmade always equals handmade ugly, I've got a couple of projects that just might change your mind!

Friday, February 21

Artful Office Chair Makeover


The look of my art room is constantly changing. I'm on this kick where I want everything to have purpose and meaning. So when it came to upgrading my office chair/workstation chair, I decided that instead of buying a new one, I would paint the one I have.

Think about it - our computer or art table chairs are where we create our magic. Why not, make over your chair so it is artful and bursting with your personality and creativity? Right?

Click below to see how I did this - it was easy, I used Tulip Soft Fabric Paints. Very vibrant with excellent coverage!

Friday, February 7

Sparkly Stained Glass Jars

When you are a crafter, you see opportunity in every object - especially glass jars! I haven't exactly jumped on the mason jar craze, but I do love jars with different shapes and curves. Not only do they add a sense of beauty to a space, but can also be very functional. I gathered up the empty jars in my house and made a fun collection, yes, even a mason jar too! I used Collage Pauge, leftover Tulip One-Step Dye, and Tulip Fashion Glitter! Click below to see my full tutorial with lots of pictures!

Friday, November 8

DIY Cupcake Ornaments


Wahoo! I don't know about you but I am super excited about Christmas being right around the corner. Yes, I do celebrate Thanksgiving but not in the normal way. Last night I took down all of my Christmas decorations from the attic and my goodness I was overwhelmed. But once I put my cupcake tree up everything got better.  

Let's go make some Cupcake Christmas Ornaments! 

Wednesday, August 21

Chevron Ombre Pillow Case

I've never been happier about gas than I am right now. I don't usually get excited when I hear the work chevron because all I seem to think about is the big bold red and blue shape that takes all of my moolah.  However there is one thing I get really excited about and that is fabric paint. You can do so many great things with tulip fabric paint! Shapes, patterns and designs that are in your head can finally come to life. No special orders, no waiting for someone to make it, just you and the paint. That is all you need to create fun awesome things! Today we are making a chevron ombre pillow case that you can throw on a bed, couch or outdoors like I did.
1,2,3 LET GO!

Thursday, May 30

DIY Screen Printed Canvas

 Small canvases are very inexpensive at the craft stores.  With just a little effort, they can pack a big design punch!  This time around I've used some graphic Ikat style fabric, which we stretched and stapled around the original canvas.  Then I created a pretty permission free graphic (you'll find it below) that I burned on a screen using the Tulip Screen-It.  This was so easy to do and if you follow the video instructions on the ILTC website, you'll have a stunning screen you can use up to 75 more times! Simply fabulous!
You will need:
12"x12" blank canvas
Black Tulip Soft Fabric Paint
Painter's Tape
Staple Gun and Staples
 1.) Print your image in black ink.  Set yourself up in a light free room with the ScreenIt and a small lamp with the yellow bulb provided in the machine.  Turn off over head light and turn on yellow bulb.  You'll need to spray the platform, place the screen on the platform.  Use squeegee to remove any air bubbles.  Spray your image, place image down on screen, use squeegee to remove any air bubbles.  Place cover on top, turn machine on and burn screen for 8 minutes.  8 minutes later, turn top of machine 180 degrees, turn back on and burn screen for an additional 8 minutes.  2.)  Soak screen in a tub of cool water for 10 minutes.  Gently rub the emulsion off of the burned areas with your fingers while screen is submerged.  Remove from water and use a soft sponge to remove remaining emulsion from the burned areas, you can do this on your printing platform.  3.) Set the screen on a towel to dry.  4.) Cut fabric to fit around edges of canvas.
5.) This is a two person job, really, but you can do it alone if you work slowly and methodically.  Stretch fabric tight and staple, start with the center and work out to sides, three staples per side is good.  To get the sides done, you will need to cut a little square off of one side of the folded fabric, then tuck, fold and staple.  6.) Tape the screen flat to the front of your canvas with painter's tape. Make sure there are no bubbles, you don't want the paint to spread outside of the printed areas. 7.) Place canvas on Screen-It platform.  Squirt out a thick line of paint and squeegee it across the screen.  8.) Remove tape and screen and let your canvas dry.

 Here is the image I used, just right click and save to your computer.  Print to fit 8.5x11 in jet black ink.


It's so much fun to screen print, you may find it just a little addicting.  I'm thinking about using my screen on some t-shirts and maybe even some pillows for our outdoor porch.  Have you ever screen printed?  What would you like to create with the Tulip Screen-it?

Get more great DIY tutorials on iLovetoCreate.com and find more DIY Fashion and Style at DIYDoyenne.com!

Cheers,
Madge

Tuesday, August 16

Laundry Signs

I have a theory.  I think that if a laundry room looks a little more decorated that you'll have a strong urge to do your laundry and it will even be fun.  Okay, not really, but I'm still going to try to make a laundry room look cute today anyhow.  These are a couple of signs for my mom's laundry room.  They were fun and easy to make.

Here's a closer look at each one.


Here's how I did it.  I cut a piece of cardboard (or two layers of cardstock) the size of the opening in the frame.  Then I cut a piece of fabric a little larger than the cardboard to cover it.  I used Aleene's brush on Super gel.  (It's like super glue, but thicker.  It dries super fast, which is always helpful.  You could probably use her spray glue or decoupage as well.)


I printed off the words in a font I liked, cut them out, and antiqued the edges with a ink pad.


I attached the signs and everything else I added with Aleene's tacky dots.  I love glue dots because they stick extremely well and there's no drippy or stringy glue.

I added buttons and a mini-clothesline with socks to the other.


Throw them in the frame and you're done.


Now, it's time to actually do some laundry.


Clicky Web Analytics
Pin It button on image hover

Subscribe to our newsletter

* indicates required
I am interested in products and inspiration for...
Close