Showing posts with label boys. Show all posts

Tuesday, April 9

R2D2 Toms Tutorial


While I was perusing pinterest the other day I came upon some hand-painted R2D2 Toms.  I knew my boys would flip over them and I already had some gray plain Toms for one of them.  They were destined to become R2D2 Toms and I set out to make some myself.

I pulled out the Toms and some pictures of R2D2 to look at while painting.


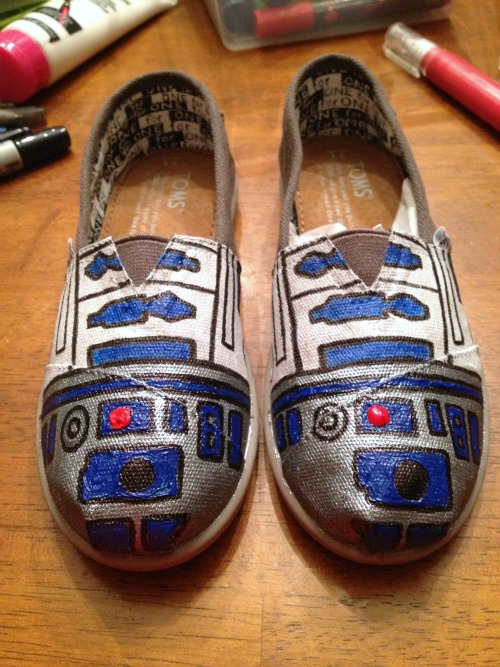
I taped off the front half of the shoe and used my Tulip soft fabric paint in metallic silver to paint the toes.


Then I painted the upper half white.


I used my Tulip fabric markers to draw in the shapes.


 I used the blue marker to color in the shapes.


The blue worked really well on the white, but it didn't show quite as well over the silver, so I got out my 3-D paint pens for the rest.


After the paint dried I went back and outlined all the black one more time and called them done.


Now I just have to wait for my son to wake up and see them all done in the morning.  I can't wait!

Tuesday, June 5

All By Myself Tee

My young kids see me craft a lot and they like to get in on it as well.  However, I obviously can't let them do everything I'm doing.  "Yeah, grab that steaming glue gun.  Sure you can paint the walls like Mommy!  Want to try the sewing machine?"  It just doesn't work that way.

And sometimes it can even be hard to let go of my inner-control freak and let them do things the way they want to.  Anyone with me?  Yes?  Okay, so here's the perfect project to let little ones do with you or all by themselves.  Why?  Because you can't mess this t-shirt up.  It's meant to look messy.


Here's how it went down.  I cut a stencil of a large number 5 from freezer paper because that's how old my oldest is going to be next month.  (FYI: You don't need a cutting machine for this.  This would take less than 5 minutes to do this by hand.)

I ironed the paper on.  (Video tutorial for freezer paper stenciling HERE.) Then I got out my Tulip fabric paint and my big phat fabric markers.  I also got out some bubble wrap to use like a stamp.  


I let my son and his cute cousin go for it and I joined in too.  It was pretty fun.


We used these big phat markers like stamps to get a checkered pattern.  My nephew filled in the holes with red paint, which I thought ended up looking really cool.


Here's what it looked like when we were done painting it.


My favorite part is always removing the freezer paper stenciling.  You can see the bubble wrap stamping, the checkered pattern of stamping the markers, and a lot of random painting on the shirt.


So if your kids are out of school and looking for a project, cut a stencil and let them go for it.


Tuesday, November 15

Little Man Cuffs

Yesterday I made some belts for my little boys and I had some extra belt fabric left, so I decided it was time for a round of little man cuffs.  I made some a long time ago, but that was when I used an old belt.  At that time I didn't even know you could just buy the belt stuff.  (I found it at Hobby Lobby for $1.20 a yard.)  Anyhow, I had some left and so I decided to make cuffs in the same way I made yesterday's belts.  Here they are.


I measured my boys' wrists (not super tight) and added an inch.  I zigzag-stitched both ends to eliminate fraying and then sewed on a little velcro to each end.  One square of velcro goes on the top side and one goes on the bottom side to they will attach when you loop the cuff.  (In the last set of cuffs I used snaps, but velcro makes is really easy for little guys to get them on and off.)


Then I cut some freezer paper stencils.  For an in depth tutorial on freezer paper stenciling you can find my video tutorial HERE.  I ironed on the stencil.


I didn't have the colors I wanted to use in regular fabric paint, so I tried something different than normal.  I used the 3D fabric paint.  I've never used it with a stencil before.  I squirted it out as I moved the nozzle back and forth quickly (as if I were coloring something in with a marker).  I removed the stencil really carefully while it was still wet.  You'd think it wouldn't work, but the paint is pretty thick so it doesn't bleed after you remove the stencil.  It worked well and it gives the images a fun 3-D look.


And this batch of cuffs went to my cute nephews.


For the Pacman cuff I added the dots and eyes without stencils.  I just squeezed out a little paint, which formed a circle.  I used a Sharpie to color the black dot in the eye.


I liked the Pacman theme so much I made another belt for my son.  (You can find that tutorial HERE.)  I love seeing it on his tiny waist.


And there you have it - inexpensive, personalized, and fun.  Thanks for reading.


Clicky Web Analytics
Pin It button on image hover

Subscribe to our newsletter

* indicates required
I am interested in products and inspiration for...
Close