Friday, July 29

Cool2Craft TV - Monday August 1, 2011


Cool2Craft TV for August 1, 2011: Mixed Messages

Join host Tiffany Windsor for a new episode of Cool2Craft TV. This week's show theme is all about mixed media. Tiffany is decorating a tin with fabric and buttons using Aleene's Original Tacky Glue and Aleene's Stop Fraying Glue, EcoHeidi is creating a mini message mixed media screen from cereal boxes, scrapbook papers and all sorts of embellishments using Aleene's Crystal Clear Acid Free Tacky Spray and Aleene's Original Tacky Glue and Candace Jedrowicz shows how to make mixed media kinetic wall art.

It’s easy to watch Cool2Craft TV right from your computer. Airing Monday August 1, 2011 9am Pacific/10am Mountain/ 11 am Central/ Noon Eastern. Go to http://cool2craft.com and find the Livestream player and chat box. See you Monday!

Visit us on Facebook!
Craft on!Click here for today's daily giveaway!

Thursday, July 28

Bound Away - An Interview with CAKE's Gabe Nelson


Before I did crafts I wrote music reviews and interviewed bands for various magazines, websites and my own zine. It has been a long time since I had a chance to chat with someone in the music industry since my focus has shifted from music to crafts over the years. Recently I discovered a project that combined both my love of music and my passion for all things handmade. "Bound Away" is a new project by the band CAKE and BANDmade Books. I got the chance to chat with CAKE bass player Gabe Nelson about their new CD book and all the DIY touches that went into making it.


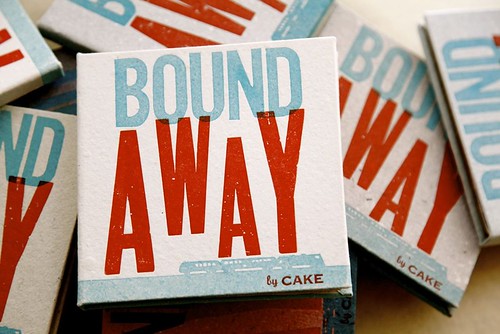
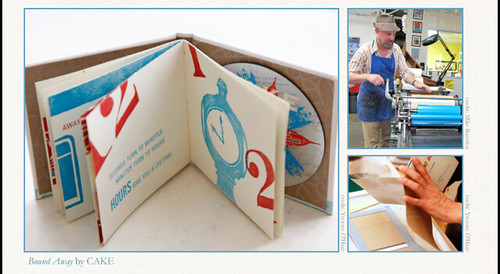
Bound Away is a CD single made into a handmade book. BANDmade Books brings together musicians like CAKE with book artists to turn a song into a limited-edition handmade book. Bound Away, which is a song from CAKE’s most recent album Showroom of Compassion, is tailored perfectly to the band. 
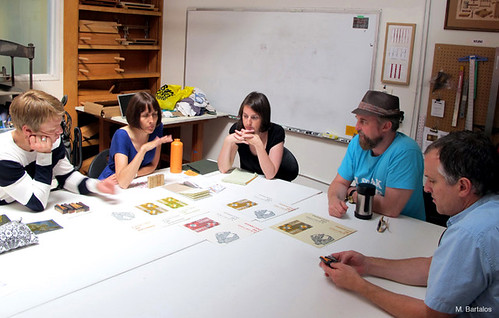
CAKE was closely involved in every step, from creative concept, through the various stages of production.

Let me break down the awesomeness of this handmade/eco friendly/charity donating little gem for ya...

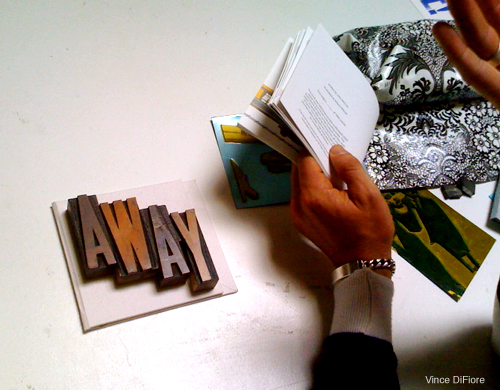
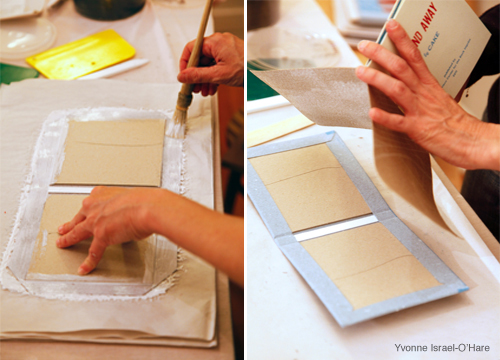
24 illustrated pages using linoleum blocks hand carved by the band and volunteers.

Type is handset in Alternate Gothic No. 2 and Universe.

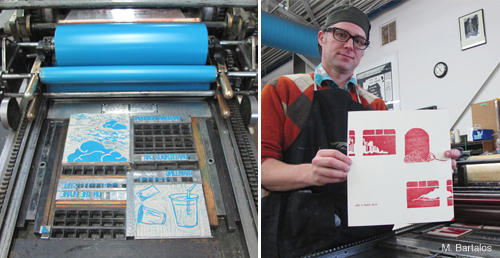
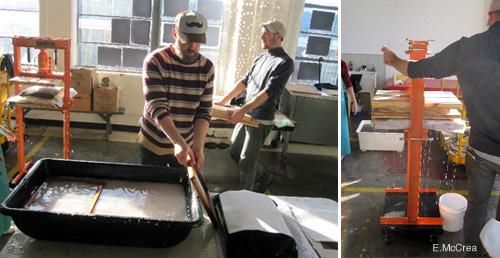
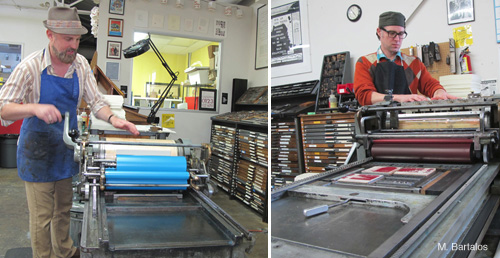
Printing: two-color letterpress Vandercook proofing presses, by members of CAKE and volunteers

Text pages: 100% post-consumer recycled paper

End sheets: hand made paper made from reclaimed jute coffee sacks from a local coffee roaster.

Covers: handmade paper made by the band using their old cotton clothing

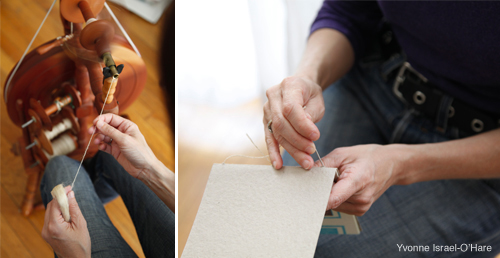
Binding: hand stitched with local hand spun thread waxed with bees wax from a local beehive

Edition: 1000 numbered copies signed by all members of CAKE 51⁄4 x 51⁄4” hardcover book Includes a CD single of the song Published in San Francisco, 2011

A portion of the sales of each edition of Bound Away will benefit 826 Valencia and the Hamilton Type Museum.


So let’s get on to that interview with Gabe. Somewhere between teaching bass lessons and touring with the band he found time to answer a few of my hot burning questions about Bound Away.

How did you guys hook up with Bandmade Books? Is CAKE the maiden voyage for the project? Do you know who is coming down the turnpike after you guys?

Pam Deluco called us up with the idea. It was timed perfectly because our album release was eminent therefore we could use a brand new song for the project. It was pretty flattering that Pam thought to ask us first. The book turned out great and is an excellent partner for the song. Regarding the next BANDmade edition... I know Pam is talking to several artists, although we are not certain who will follow next.


From what I understand you guys were very involved in the making of Bound Away both conceptually and physically. Most bands would have just ok-ed the use of their song and then that would be it. Why was it important for CAKE to be involved in every step from picking red and blue as the primary colors to doing pulls of the prints?

Pam's entire vision was complete band inclusive -- and we believed that was really the only way forward. We embraced that part of it, as we have always done much of our own labor in CAKE. John has worked a lot with print, and I have worked with paper, so we could help the other guys learn those parts. Carving the linoleum blocks was a really interesting experience as well.


How did you choose “Bound Away” as the song to make the book about? Was there a song that was a close first runner up?

"Bound Away" was the only choice for this project. It is an old fashioned song and making books by hand is also old fashioned craft. Sometimes, the right track is the obvious track. I don't recall even discussing a different CAKE song for the project.


What is your earliest crafty/DIY memory. Macaroni necklaces for your mother count. What is your earliest musical memory?

Earliest craft project was a "Happy Father's Day" plaque in 2nd grade. It was made from salt-dough. It was so salty and savory that I ate part of it on the way home from school. I remember my dad completely cracking up when I gave him his " appy Father's Day" gift. Earliest musical memory is watching the "Jerry Lewis Telethon". They had Frank Sinatra, Johnny Cash, Charro, Bobby Vinton, and a host of others. I just remember connecting with the music and thinking to myself that I wanted to make those types of sounds someday.


Besides making music do you have any other hobbies in the artsy craftsy world? Do you knit on the tour bus or paint oil portraits between tours?

Music takes up all my time. I have tried to get into other things, but there just aren't enough hours in the day. So it's pretty narrowed down at the present time.


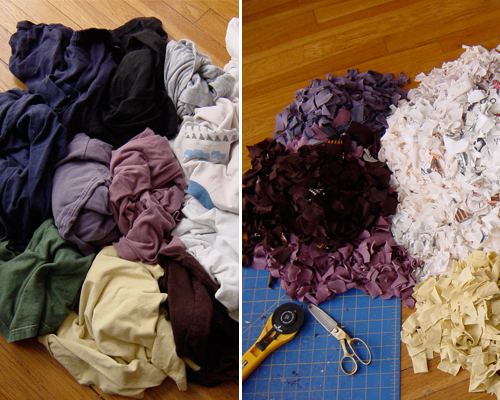
I love that the band’s old cotton clothing was recycled to make the paper for the covers of the CD. What type of clothing did you use? Could a super stalker fan tell themselves that perhaps a pair of cotton boxer shorts were used in the making of this CD cover?

I gave some old sheets that we had -- which made the paper green.


All proceeds from the sale of Bound Away go to 826 Valencia and the Hamilton Type Museum. 826 Valencia helps students with their writing skills and the Hamilton Type Museum is dedicated to the preservation, study, production and printing of wood type. How did you choose the recipients of all the loot?

We thought something that had to do with book making was appropriate. The whole experience was a journey to the past when people had to be more creative if they wanted something. You couldn't just pop into a store a make a purchase, you had to use your wits and your hands. I think science has confirmed that keeping your brain active is essential to good health. Hopefully the money will help those who are interested and have a chance to explore this old fashioned craft.


How do/did you encourage your children (if you have them) to be creative? Do you play music with them? Craft with them?

My son, Max, has always been self motivated to do art. When he was three or four he would be on the floor of his room at 6 a.m. drawing, or writing a story. He can paint water colors very well now. He also taught himself computer animation. I think he prefers it if i don't try to involve myself in what he does. He is a pretty independent spirit. He has done a little music too, but usually goes back to the visual side of art. I think perhaps the practice involved with playing an instrument doesn't suit him. I never try to push anything on him when it comes to art. Homework and chores usually require encouragement from me, but not art.


Thanks so much Gabe for taking the time to chat with me about Bound Away!


Check out more of my I Love to Create posts!

Visit us on Facebook!
Craft on! Click here for today's daily giveaway!

Wednesday, July 27

ILovetoCreate Teen Crafts: Fun Feathered Fascinator

Fun Feathered Fascinator by Avalon Potter for ILovetoCreate

Visit us on Facebook!
Craft on!Click here for today's daily giveaway!

ILovetoCreate Teen Crafts
Fun Feathered Fascinator
Copyright 2011 Avalon Potter

Recently I have noticed a fashion trend toward feathers. They are on clothes, jewelry, they are even glued into people’s hair! I didn't feel like the little skinny feather in your hair made much of a statement, so I made this week’s project as an over the top salute to the new feather trend. It’s fun, crazy, and creative so I hope you have as much fun making it as you do wearing it!


Supplies
Aleene's Liquid Fusion
Aleene's Jewel-It Adhesive
Tulip® Glam-It-Up!™ Iron-On Studs™
Multicolor felt bird scrapbook sticker
Black plastic headband
Feathers (Hot Pink, Yellow, Green, Red)

Instructions

1. Attach three feathers together by applying Liquid Fusion to the bottom of the feathers. It should be spread slightly so it has almost a fan effect but no gaps between the feathers. Let dry for 2-4 hours.


2. Next take your felt bird and lay out your seven crystals around the tail to the head. It should go in this order: purple, light pink, red, orange, dark yellow, light blue. Then put a dark blue on the eye. Put a dab of Jewel-It on each crystal, apply to the felt bird in pre-determined spot. I used glue since the felt was made of man made fiber. Allow to dry for 10 minutes.


3. Use the Liquid Fusion to glue you felt bird to the bottom of the feathers and let set for a few minutes before the next step. Now on the back of your feathers apply a line of glue on the middle feather and attach to the side of the headband. Let dry for 2-4 hours.

We're A'mused!


My sister EcoHeidi and I were busy moving Momma Aleene to her new home last week so we were not able to attend the Summer CHA show but that didn't stop us from being there in spirit! Over the last months, we were busy creating mannequins for the iLovetoCreate booth and today we're delighted to share Merrie Muse with you!

If you were able to attend the show, you know that the booth theme was "Driving Creativity" so Merrie got in the spirit with her rearview mirror magic wand! A cool quote collaged on to brown bag paper dangled from the wand with words of wisdom: "We drive into the future using only our rearview mirror." -Marshall McLuhan


Merrie's top was covered with Blumenthal Lansing buttons all glued in place with Aleene's Jewel It Glue with the tone-on-tone colors of white, ivory and crystal.


Heidi crafted Merrie's wings from chicken wire and used Aleene's Fabric Stiffener to adhere the cheese cloth. Then she used strips of the cheese cloth to create the swirled designs on the wings. This is a super cool way to make lightweight LARGE wings! Oh yeah, we also wanted to be sure she was sprinkled with some magic fairy dust so we sprayed her wings with Tulip Glitter Spray.

Heidi dug into her sewing stash to find a plastic apron hoop so Merrie's skirt was built by tying and gluing strips of fabric and brown paper and many layers. We used Aleene's Original Tacky Glue to hold the strips in place and then decided we wanted to add a feathery edging at the waist at the last minute so we grabbed our Aleene's Fast Grab Tacky Glue for that! Little butterflies and ladybugs were also scattered about her skirt.


Merrie needed some bling so Heidi created a collection of bracelets featuring her trademark soda can flowers along with fabric and button flower bracelets.

Thanks for letting us share! We hope your day is magically creative!


Visit us on Facebook!
Craft on!Click here for today's daily giveaway!

Tuesday, July 26

Superhero Arm Warmers from an Old T-shirt!

This T-shirt transformation project is my favorite of the accessories in my first book. They're super easy to stitch up in an afternoon, and even easier to embellish with iron-on glitter sheets--which seriously increase the superhero factor.


These arm warmers are especially good for:
1) Completing late night deadlines (reports, papers, presentations, tax filing, etc.).
2) Healing goose-bumped flesh in the over-air-conditioned spaces of warm-weather climates.
3) Protecting long-armed folks from that pesky draft caused by the gap between the glove and sleeve in cold weather climates.
4) Shielding the knuckles of bicyclists from biting winds when they ride really fast.
5) Executing superhero power stances.

Materials:
-1 or more old T-shirts (with the bottom hem intact)
-Fabric marking tool
-Ruler
-All-purpose scissors
-Fabric scissors
-Needle and thread (or sewing machine)
-Tulip Fashion Glitter Shimmer Transfer Sheets
-Pressing cloth
-Iron


1. Measure the distance around the middle of your forearm (x). Mark a rectangle x" wide and between 11" and 14" tall that lines up along one of the side folds of the T-shirt and extends up from the bottom hem.


2. Use the fabric scissors to cut out the rectangle through both layers.


3. Cut open the side, along the fold of the shirt.


4. Fold each rectangle, right sides in, and make two marks along each of the open edges that measure 1 1/2" and 3 1/2" from the hem.


5. Stitch along the open edge, about 1/4" from edge, leaving an opening (for the thumbs!) between the two marks.


6. Turn the arm warmers right side out and orient the thumb holes about one-third from the edge.


7. Use all-purpose scissors to cut out fun shapes from the iron-on glitter sheets (in pairs, if you want your arm warmers to match).


8. Keeping the arm warmers oriented as they were in Step 6, flip them over and arrange the glitter shapes near the hem. Peel away the shiny surface layer from the shapes, lay a pressing cloth over the arm warmers (being careful not to disturb the placement of the shapes), and press firmly with the iron for about 40 seconds. Repeat if necessary to set the glitter transfer.


9. Turn off and unplug the iron. Try on your new pair of superhero arm warmers!


10. Use all the shapes you cut out in Step 7 to make more!


Optional: Use remaining T-shirt scraps to make a matching superhero mask or headband!


Visit us on Facebook!
Craft on!Click here for today's daily giveaway!

Friday, July 22

Cool2Craft TV - Monday July 25, 2011


Cool2Craft TV for July 25, 2011: Pets

Join host Tiffany Windsor for a new episode of Cool2Craft TV. This week's show theme is all about pets. Tiffany is glamming up a plain t-shirt with Tulip Glam-It-Up! Iron-On Fashion Designs, EcoHeidi is creating a custom dog frame and Candace Jedrowicz is recycling a jar lid into a personalized pet plaque.

It’s easy to watch Cool2Craft TV right from your computer. Airing Monday July 25, 2011 9am Pacific/10am Mountain/ 11 am Central/ Noon Eastern. Go to http://cool2craft.com and find the Livestream player and chat box. See you Monday!

Visit us on Facebook!
Craft on!Click here for today's daily giveaway!

Thursday, July 21

Robots for Rugrats


Remember a few weeks ago when I showed you how to make some recycled robot wrapping paper for a robot themed birthday party my fam was attending? Well for that same party I decided to whip Baxter up a robot onesie. If you can cut out a square and a rectangle, you can make this design.


SUPPLIES
Tulip Fashion Glitter Shimmer Transfer Sheets
Onesie
Iron
Scissors


The first thing you need to do is decide on what your robot is going to look like and what colors you will use. I found that a robot is very easy to construct using squares and rectangles in various sizes. I also decided a hot pink heart would be a nice touch. Truthfully, I'd wear this robot so even if you don't have kids this idea would work. I love love love these sparkly Shimmer Transfer Sheets. They remind me on the glittery iron-on's you had in the 80's.


Place your shapes on the onesie in the desired pattern and iron in place. All that is left to do is let the onesie cool, slip it on your rugrat and head out to a robot themed birthday party!

I have a few sheets left of shimmer transfer sheets just begging to adorn a super hero cape. Keep your eyes peeled, how-to post coming soon.


Check out more of my I Love to Create posts!

Visit us on Facebook!
Craft on! Click here for today's daily giveaway!

Wednesday, July 20

MAYA IN THE MOMENT TEEN CRAFT: Beads In a Bottle Fridge Magnet

I thought my fridge needed some decorated love, so I decided to make a Fridge Magnet, using Tulip Products!
Supplies!

 I put "beads" all around and inside the star in different colors, to make it stand out!
You can do any pattern you wish, there are many cool colors to choose from!
 Next, I used Tulip Fashion Glitter in Translucent, to add a sparkle-sugar like look.
I cover it completely, for full coverage. Make sure you place a piece of paper or paper plate to catch the excess...Recycle glitter!!! 

Lastly, glue the magnet on the back with Aleene's Turbo Tacky Glue for fast action glue!
You can get these magnets at any craft store!!

 Finished product! I made another magnet using Collage Pauge, Crafty Chica Glitter, and Tissue Paper just so the other wouldn't be lonely! :)


Visit us on Facebook!
Craft on! Click here for today's daily giveaway!
Clicky Web Analytics
Pin It button on image hover

Subscribe to our newsletter

* indicates required
I am interested in products and inspiration for...
Close