Showing posts with label baby onesies. Show all posts

Wednesday, August 19

DIY- Patterned Baby Onesies

Happy HUMP day! I seriously wish I had a baby that I could put these cute onesies on. What I am really wondering is why I didn't think to do this when my now 15 year old was a baby! Well no worries, Jaderbomb is here to save the day. You no longer have to buy those boring store bought onesies because today I will show you how to make your own with minimal products. What makes this project awesome is the fabric markers! Not just any fabric markers, Tulip fabric markers! Who's ready to get started...I know I am! I will be showing you how to make 4 different designs that everyone will LOVE!

Tuesday, November 26

Fall Fashion: Decorating with Leaves, 3 Ways!

Leaf main generation-t.com
Before the snowflakes invade, I'm still celebrating the last of the fall foliage. The leaves are so beautiful this time of year in Brooklyn. I was up in New England for peak color, but even the last few weeks in Brooklyn have yielded a lovely array of color and variety. Of course, no matter how you try to keep them, the color fades, and they become dry and brittle. Here are three projects with a common autumnal theme that, like the snowflakes I made and painted last year, help make nature last a little longer.
megan-nicolay-blog-footer-1


Tuesday, June 11

No Sew Embellishing

Embellishing clothing is such a fun way to personalize things.  However, even if you don't sew there are still lots of ways to embellish clothing.  All of Aleene's adhesives can help you get that hand-sewn look without even picking up a needle and thread.

Here are a couple of ways I embellished some onesies without sewing.  For the first onesie (pictured above) I got out some lace and Aleene's Fabric Fusion.
I ran a line of fabric fusion down the sleeve and another line parallel to it since my lace was fairly wide.  I pressed on the lace, allowed it to dry well, and it was done.
While I did sew to make the hat, I actually used fabric fusion on the hat as well so that the petals on the flower wouldn't flop around or fall downward.
On another onesie I pulled out some leather I had, a Tulip fabric marker, and Aleene's Peel and Stick Sheets.
I cut a small heart out of the leather and used my Tulip fabric marker to create stitch marks.
I traced the heart onto the peel and stick sheet to cut the adhesive the same size as the heart.  
Then I peeled off the backing and pressed the heart onto the shirt.  Done.
You could even add a name right below the heart with the fabric marker for a personalized look.
So what will you embellish next?

Wednesday, November 9

iLoveToCreate Teen Crafts: Onesie, Twosie


Avalon Potter
"Teen crafted, mom approved."

I was asked to decorate a onesie for an upcoming Baby Shower.  I knew right away I wanted to use a Tulip Iron On transfer and the phrase: "Little Love Muffin."  I know lots of teens have babies in their families and it's really easy and fun to make onesies using products from iLoveToCreate.  My mom was so impressed with my design, she made one too!


Materials
Washed cotton baby onesie
Tulip Fabric Markers
Tulip Iron on Transfers
Tulip Letter Stencils
Small cardboard form to slide inside shirt while decorating

Tools
Tulip Mini Fashion Iron

1. Wash the onesie to remove the sizing. Slide a piece of thick cardboard into the onesie to protect the back from the inks. You can also use a book for this because onesies are so small!

2. Use an iron to attach applique to shirt. Allow to cool.

3. Use the fabric markers and the stencil to write your words.

4. Mom used the Tulip Beads in a Bottle paint to add dimension to her wings, halo and hand written words.

Thursday, July 21

Robots for Rugrats


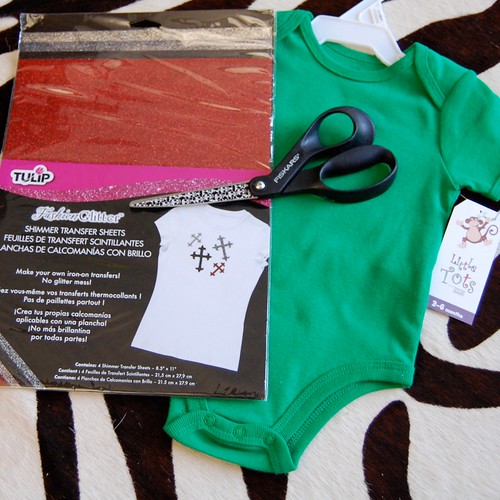
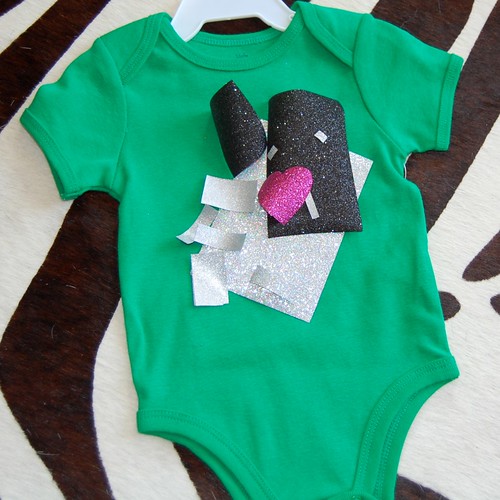
Remember a few weeks ago when I showed you how to make some recycled robot wrapping paper for a robot themed birthday party my fam was attending? Well for that same party I decided to whip Baxter up a robot onesie. If you can cut out a square and a rectangle, you can make this design.


SUPPLIES
Tulip Fashion Glitter Shimmer Transfer Sheets
Onesie
Iron
Scissors


The first thing you need to do is decide on what your robot is going to look like and what colors you will use. I found that a robot is very easy to construct using squares and rectangles in various sizes. I also decided a hot pink heart would be a nice touch. Truthfully, I'd wear this robot so even if you don't have kids this idea would work. I love love love these sparkly Shimmer Transfer Sheets. They remind me on the glittery iron-on's you had in the 80's.


Place your shapes on the onesie in the desired pattern and iron in place. All that is left to do is let the onesie cool, slip it on your rugrat and head out to a robot themed birthday party!

I have a few sheets left of shimmer transfer sheets just begging to adorn a super hero cape. Keep your eyes peeled, how-to post coming soon.


Check out more of my I Love to Create posts!

Visit us on Facebook!
Craft on! Click here for today's daily giveaway!

Friday, May 13

Wee Weenie Dog Outfits


Remember a few weeks ago when I told you about the Buda Weenie Dog Races? At the time I was questioning whether or not I had the time to pull together matching weenie outfits for the kids. Never one to let an occasion to dress in theme pass my by I made weenie outfit magic happen. Got a pair of kids and a love of dachshund? If you answered yes, today's I Love to Create post was made for you.


SUPPLIES
Cotton Fabric
Ribbon
Yellow Onesie
Yellow T-shirt
Aleene's Fabric Fusion Glue
Sewing Machine
Silhouette of a Weenie Dog
Thread
Aleene's Tack It Over and Over


Using the silhouette of the weenie dog I printed out I traced it onto cotton fabric. I cut the weenie dog out and cut it in half. Using Aleene's Tack It Over and Over half of the dog went on the onesie and the other on the T-shirt. I then stitched the dog halves onto the shirt and onesie.


Using Fabric Fusion Glue and ribbon I made Tallulah's side of the shirt a little more feminine with a few bows.


The trickiest part of this otherwise super easy project was getting a picture of my kids side by side so you got the effect. I knew and they looked cute and that is all that matters to me.


I also had to share an amazing pair of handmade weenie dog earrings I spotted at the races. Pretty much the second cutest crafty thing there.


Check out more I Love to Create projects by Jennifer Perkins right here.

Visit us on Facebook!
Craft on! Click here for today's daily giveaway!

Thursday, January 13

Angel Baby

Designed by Cheryl Ball
Make your little angel an outfit that’s heavenly with Tulip® One-Step Dye™ and Tulip® Soft Fabric Paint™!

Materials List

  • Aleene's® Fabric Fusion® Permanent Dry Cleanable Fabric Adhesive

  • Tulip® 3D Fashion Paint™

    65000 White
    65407 Silver Metallics
  • Tulip® Surface Cover™

  • Tulip® Soft Fabric Paint™

    BI15806 Platinum
  • Miscellaneous

    •   Scissors
    •   White canvas tote
    •   Paper towels
    •   Onesie
    •   Gray chalk pencil
    •   Needle and thread
    •   Small paintbrush
    •   Purple ribbon – 1½” 40010024507, 5/8”
    •   Foil
    •   Pink wired ribbon – pink ombre
  • Patterns

    Instructions

    1. Cover work surface with Surface Cover. Wash tote and onesie in washer with small amount of laundry soap and no softener. Place damp pieces on work surface and smooth flat.
    2. Starting at bottom of bag, accordion pleat fabric up to top of bag, creating about 2” wide pleats then press flat. Starting at side on onesie and about 4” from end, pinch fabric across to other side then tightly wrap a rubber band. Wrap another about 3” from first then equal sections on remainder.
    3. Wearing gloves from dye box, fill dye bottle with water to indicated line then shake until thoroughly mixed. Squeeze dye within sections on onesie, turning and inserting bottle tip within folds. Squeeze dye across pleats on tote, creating about a 2” swath along length, leaving a white space between. Carefully lift single pleats and add dye as needed.
    4. Cover dyed fabric with Surface Cover to keep damp. Let set 6 to 8 hours or longer for most intense color. Rinse dyed fabric under warm running water until water runs clear and excess dye is removed. Fill washer to large load setting with hottest water suitable for fabric and a small amount of laundry soap. Dry in dryer then iron both smooth.
    5. Squeeze a small puddle of Platinum Soft Fabric Paint on foil. Use small round brush to add a few drops of water then thoroughly mix, adding more water as needed until paint is the consistency of heavy cream. To create spatter effect, fill brush with thinned paint then flick across fabric. Fill brush again then flick in a different direction. Repeat on onesie and tote to desired effect. Let dry – a blow dryer will speed this step.
    6. Fold onesie in half lengthwise then press along fold for a crease down center. Unfold onesie, making sure you can see crease line. Flip over pattern then use gray chalk pencil to trace along pattern lines. Line edge of pattern along crease down center. Hold in place with hand then run finger over lines to transfer pattern in chalk onto fabric. Remove pattern.
    7. Start flow of 3D Fashion Paint on paper towel using an even pressure on bottle for a smooth line. Practicing on a paper towel, squeeze a few lines of thick paint on one side, fold over paper towel then press lightly over paint. Open paper towel to reveal design. Practice a few times to determine width of paint for desired effect.
    8. Squeeze 3D Paint over chalk lines, Silver for heart and White for wings. Carefully fold over other half of onesie then lightly press. Open to reveal design. Let dry. Repeat step with tote, using slightly larger pattern.
    9. To create small flower, cut an 18” length of ribbon. Carefully pull wire from both sides. Fold ribbon in half lengthwise then use needle and thread to sew a gather stitch along open edge. Gather ribbon along thread then sew a few stitches to secure. Swirl ribbon then sew gathered edges together to secure. Repeat steps for larger flower but do not fold ribbon in half.
    10. To create leaves, cut two 3” sections of narrow lavender ribbon, fold in half then use Fabric Fusion to glue ends together, holding with tape if needed until dry. Repeat step for large leaves using a 4” long strip.
    11. Use Fabric Fusion to glue flowers in place then add glue to ends of leaves and tuck under flower as shown. Let dry
    12. Tie wider ribbon into a bow around handle of tote.
 
Visit us on Facebook!
Craft on! Click here for today's daily giveaway!

Thursday, September 24

DIY Silk Screening


I realize not everyone has a Yudu or the knowledge of how to make and burn their own screens. Never fear, if you were feeling a little left out of the screen printing fun I have just the project for you. Today for I Love to Create we are silk screening using pantyhose, decoupage and an embroidery hoop!
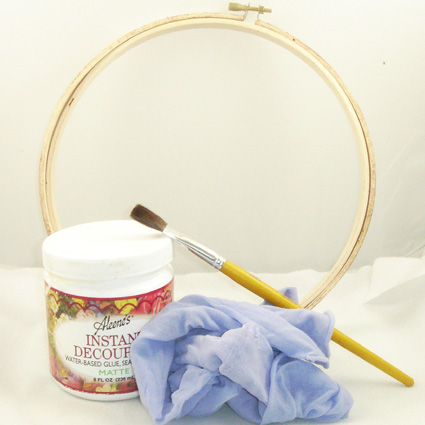

SUPPLIES
Tulip Soft Fabric Paint
Collage Pauge or Aleene’s Instant Decoupage Medium
Onesie or something to screen on
Embroidery hoop
Pen
Pantyhose
Paint brush
Business card


WHO DOESN’T LIKE UNICORNS?
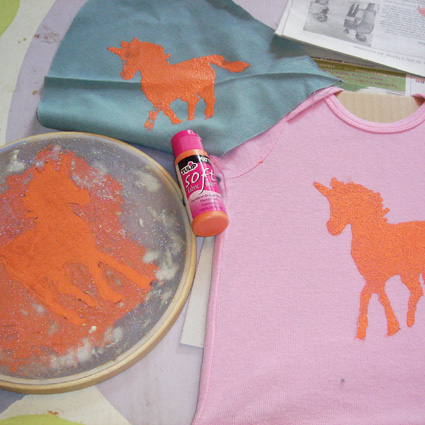
First choose your image. Something in silhouette works best. Also I would not opt for a design that was too complicated. Make sure your design will fit inside the embroidery hoop you will be working with. I chose a perky little unicorn in all its magical glory.

PREPARE YOUR SCREEN
I retired my panty hose a long time ago when I quit my day job as a secretary. Luckily my friend Susann who was the mastermind behind this project brought over a lavender pair for me to work with. All you do is stretch the hose out in your embroidery hoop nice and taunt just like you would get a piece of cloth ready to embroider on.


TRANSFERING YOUR IMAGE
Lay your image down on a flat surface and place your embroidery hoop on top. Trace the outline of your image with a pen onto your panty hose.


BLOCKING OUT THE SCREEN
Using your decoupage and a paint brush fill in the area around your image. Be sure to apply the decoupage to the top of your screen and only put the decoupage where you do not want your paint to go. Allow the screen to dry completely.


GET YOUR SCREEN ON
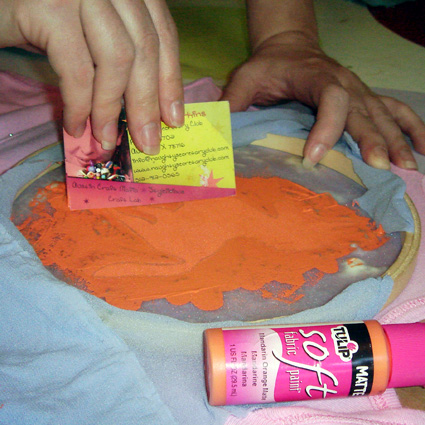
I stretched my onesie over a piece of cardboard so that the fabric paint would not soak through to the back. Once I had done this I laid my screen top side down on my onesie and squirted out a generous helping of paint.

SCREENING YOUR IMAGE
Using a business card or old hotel key scrape the paint across the image in a firm manner while holding your embroidery hoop in place on your onesie. You do not want the image to shift or your baby will have an ugly outfit.

PLAY DRESS UP
Once the paint has dried on the onesie give it a 45 minute spin in a hot dryer to heat set the image and all that is left to do is get your baby dressed!

Have you tried the embroidery hoop method of screen printing? I am particularly curious if anyone has tried to screen a multi colored layered image? I wanna hear all about it!

Also remeber this is day 4 in a week long screen printing adventure. Flip back through Print Liberation, Screen Printed Record Bracelets and a YuDu Improved Record Clock. Don't forget our Handmade Nation round up and contest tomrrow!

Wednesday, June 17

Congratulations to our Onesie Contest winner!

Well, the time has come and we had lots of great entries for our Onesie Decorating contest! We had so many, in fact, that it would be just too hard to pick a winner. There were so many super cute entries! Check out all our adorable entries in our gallery!

So we had a drawing from our participants:


And the winner is...drumroll please....

PRINCESS DOODLEBEANS!


Princess Doodlebeans created her onesie design using Tulip® Soft fabric paint in Lime and Orange Zest, a handmade Vespa scooter stencil, and a "Love" custom stamp. She loves making hand painted onesies and even sells them on her Etsy shop, so go on over and see her awesome designs!
A fabulous prize pack of $30 worth of Tulip® Fashion Art products is on it's way!

Thanks to all that participated and be sure to check back, we are going to be having more contests in the months to come, so there will be even more chances to win if you didn't win this time!
Clicky Web Analytics
Pin It button on image hover

Subscribe to our newsletter

* indicates required
I am interested in products and inspiration for...
Close