Today starts an exciting new chapter in my weekly
I Love to Create posts. We are going to start having interviews with various mavens of craft, whoo-hoo! We are starting things off with my friend
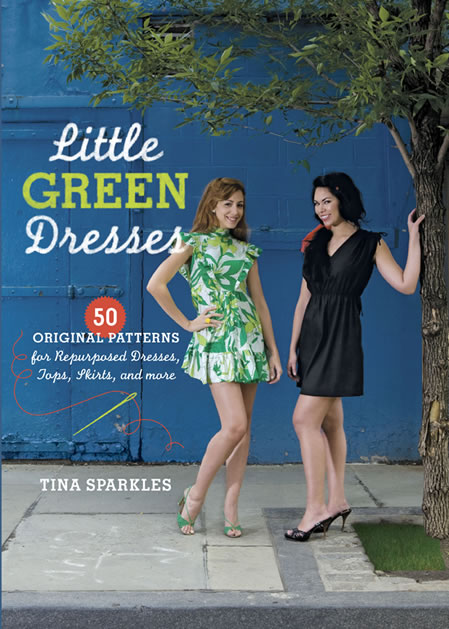
Tina Sparkles who has just released a sewing gals dream book -
Little Green Dresses: 50 Original Patterns for Repurposed Dresses, Tops, Skirts, and More
.
Let me preface this interview and book review with openly admitting that I am a little biased when it comes to Tina Sparkles. We have been friends since college, are both founding members of the
Austin Craft Mafia, ran a little fashion show and craft bazaar together for years called
Stitch and both teach at the
Stitch Lab in Austin. HOWEVER - even if I had never met Tina I would still think that she had talent oozing from every pore. She is always prising about town in custom clothing she made for herself, her last name is Sparkles, she has a fabulous new book out that even makes me want to dust off my sewing machine and she loves to teach and mentor others on sewing and going green. What is not to love?
My mother
Fredda Perkins and I contributed the 'Bib Dress', to
Little Green Dresses, but that is only one of the many reasons why I love this book. A handful of the 50+ designs are by other fabulous designers other than Tina which makes for some nice diversity. The main bonus of this book is that the clothing is cute. So many times sewing books for clothing don't do a thing for me, I often walk away thinking I would never wear a single thing inside the book. Flipping through
Little Green Dresses it was almost the exact opposite, it was more like what wouldn't I wear in this book. Not only are there little green dresses to make there are also rompers, skirts and even a coat.
Not only do the cute clothes set
Little Green Dresses apart from the rest of the sewing books out thee, but so does the information inside. Many books these days give you the actual clothing patterns, but not our friend Tina. Remember the part I said about her being a teacher and a mentor? Tina teaches you how to make your own patterns from scratch! Think of the limitless outfit possabilities once you learn to make your own patterns. Reading chapter number 2, Sewing and Creating Patterns it is if Tina is right there teaching you how to place the Curved Hip Ruler onto the newspaper.
Ok enough gushing about
Little Green Dresses, let's get on with this interview (and giveaway)....
 Let’s get a little background on Tina Sparkles. When and why did you start sewing and making clothing? Did you go to school for fashion design? As an Austin Craft Mafia founder you have a long crafty history - is clothing and fashion where you started in this industry?
I think maybe we can trace it back to a pillow that was in the shape of a pencil from Reader’s Digest Complete Guide to Sewing. My mom had a bunch of sewing books and a sewing machine and used to make clothes for me when I was really young. I used to look through the books and dream about making everything in the books and started messing around with her machine when I was in 6th grade. One of my first design projects was a velcro bow-tie that I “invented” for a school project and around that same time I started reconstructing my Kmart clothes. The whole situation got amped up even more when I discovered thrift stores when I was in high school. In college I actually studied psychology and philosophy, but after I got out into the real world after graduation I realized that I was daydreaming more about making cute outfits to wear to my cubicle job so I decided to go back to school to study fashion. I went to UT and studied in the fashion and textiles department for a few semesters and then also got some private lessons on draping. Other than that, most of my fashion education is DIY. I love getting textbooks and experimenting.
In 2001 I started an internet based business called Sparkle Craft where I made and sold glittery wall hangings and little art pieces, but after awhile I decided to transition into making guitar straps and accessories. After doing that full time for 6 years, I decided to close Sparkle Craft to write my book and focus on the world of sustainable fashion!!
 Knowing you personally there seemed to be an abrupt and profound moment when you went completely green. What happened that spurred you to quit buying new clothing and start creating your own?
Yes, I definitely had a moment when I started to become aware of our consumer culture and what it is doing to people and the environment. Once I started having this awareness there was no way that I could continue to participate in it. When I think about that time period, I think about stores like Forever 21 and H&M that I was once sooooo excited about. It was so great to be able to buy tons of cute clothes super cheap, but for me the excitement quickly turned to guilt and other bad feelings when I thought about how the clothes were made and their history and impact. It wasn’t worth it to me, and since I loved fashion so much I wanted to feel good about it, so I decided to just stop and see if I could make my own and only shop 2nd hand. I had no idea how far it would go, but that was back in 2005 and I haven’t looked back. I still buy new undies and socks and sometimes shoes & accessories, but I try to make sure to consider their elements and buy responsibly.
What is your favorite place to shop for materials? Do you love finding clothing to re-work at the thrift stores, picking up old curtains at the flea market or is finding a stash of vintage fabric at the antique mall what really curls your toes?Thrift stores are the BEST because they are so cheap and there is the thrill of the dig, but what I love most is going to vintage stores because the prints and fabrics on old clothes are so awesome. I also love just looking through the racks of vintage and looking at the shapes and details of the garments. It makes me so happy to think about how I might incorporate old design elements into something new. I recently encountered a dreamy situation.....it was a thrift store that had been closed for 10 years and all of the clothes were just sitting on the racks untouched for 10 years. They opened the store for one day only and everything was only 25 cents! I accidentally happened upon it that day and I couldn’t believe it. I spent $15 and went home with a box full of potential.
 What is the most unusual item you have ever up-cycled into a new and exciting piece of Tina Sparkles fashion?
This summer I made a dress out of recycled computer wires for a fashion show at the Austin Museum of Art. It was really hard to work with the wires, so it took me a couple of months to finish it because I kept procrastinating. To make the dress I recycled a thrift store curtain to create the base of the dress and then cut up the computer wires to create a ton of circular pieces of wire with electrical tape and then I stitched each of the wires onto the dress using a zig-zag stitch. It was a total pain, but I was really happy with the result once it was finished.
You made majority of the clothing in Little Green Dresses, but there are a handful of other designers including yours truly. How did you go about selecting the other designers in your book?I just made a list of indie designers who I admired and who I thought might be interested in the concept and sent them an invite to submit a project. After I got the submissions I had to narrow it down to only a few and those decisions were made by how well the designs fit into the book - both aesthetically and also how well the project instructions fit in with the way I organized everything.
 At what point did you get into making your own patterns? It seems like a big step to go from ready made Simplicity and Burda patterns to making your own?
When I went to UT to study fashion, I learned about flat pattern drafting and I really fell in love with it. I am very much into math, logic and geometry so the whole process really appealed to me. From there I got a bunch of textbooks on pattern-making and just started experimenting with shapes and ideas. To me, knowing how to make your own patterns is really liberating because now I can pretty much make anything that I dream up.
Out of all the clothing you made for Little Green Dresses what do you find yourself wearing the most? I was excited to discover the bib dress my mom and I made for the book translates quite nicely into a maternity dress.Right now I am really into the Deluxe Rectangle Skirt, the Genius Leggings, the Body Tube and the Such a Square Blouse patterns, but I love mixing all the Little Green Dresses designs in with the rest of my wardrobe. I feel like I have so many possibilities!
 I know you also helped style the models for Little Green Dresses. You have always had such a great eye for fashion and are always ahead of the trends – what do you think about Little Green Accessories? Do you try and make your own or buy used in that department too? Any quick and easy tips for spicing up sandals, making a necklace new or putting some pop back into an old purse?
Thanks! I have to say that you definitely inspired me to realize how accessories can really take an outfit to the next level!! I think it is important to consider the history and impact of anything we might purchase (or make) including accessories and I think it is always more fun and special to revamp old stuff rather than buy new. I recently started to fix up a pair of sandals from the thrift store....they are kinda like gladiator style sandals, but I didn’t like the color of them so I cut up a bunch of long thin strips of knit fabric in fun colors and I’m wrapping each of the strips tightly around the parts of the sandals. I think it is turning out pretty cute so far....we’ll see....I put that project aside for now since it is getting cold!
For those out there that don’t sew what are some other options for people to refashion their wardrobe?One word -- embellish! There are gobs of books and magazines dedicated to the art of embellishment and tons of ways you can really make a big difference on a garment by doing simple things like embroidering, screen-printing, painting, dying, changing the buttons, adding jewels, etc.
I also like the idea of just being fearless and taking your scissors to a garment just to see what happens. Start out with something cheap from the thrift store and don’t think too hard about it.....just have some fun being creative.
What is Tina Sparkles up to these days? Any new books on the horizons? Working on any Little Green Dresses for yourself?I’ve thought about the possibility of doing another book at some point, but not right away. Right now I am working on putting together some digital downloadable patterns for my website. Some of the designs are from my book and some are other of my designs. I figured there are probably plenty of people out there who might not want to draft their own patterns, so I want to give them an option to easily sew up some of my designs. Other than that, I always manage to keep myself more than busy teaching lots of sewing and design classes locally in Austin, organizing events and I even picked up my guitar again recently.....
Craft on!
Click here for today's daily giveaway!