Showing posts with label recycled craft projects. Show all posts

Friday, August 26

Cool2Craft TV - Monday August 29, 2011

Cool2Craft TV for August 29, 2011: EcoHeidi's Something from Nothing

Join host EcoHeidi Borchers for a new episode of EcoHeidi TV on the Cool2Craft TV Channel. This week's show theme is something from nothing. EcoHeidi crafts a necklace from water bottles, transforms bottle caps into a doll and shares the vintage Aleene's technique of Embossing with Glue featuring Aleene's Original Tacky Glue. Special guest Candace Jedrowicz creates a soda can lightcatcher. It's creatively cool!

It’s easy to watch the Cool2Craft TV Channel right from your computer. Airing Monday August 29, 2011 9am Pacific/10am Mountain/ 11 am Central/ Noon Eastern. Go to http://cool2craft.com and find the Livestream player and chat box. See you Monday!

Visit us on Facebook!
Craft on!Click here for today's daily giveaway!

Thursday, January 13

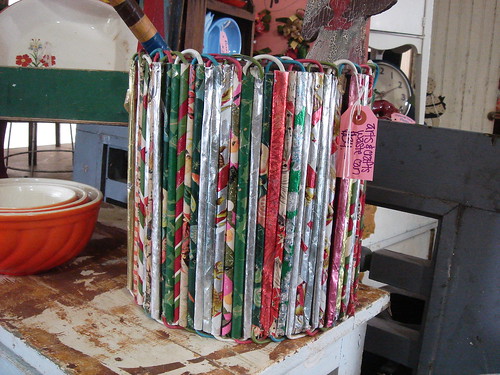
Crafty Can Corral

I have oodles of left over orange straws from my Halloween Party and Fall Themed Baby Shower.  Apparently straws are not the big hit that I thought they would be.  What is a girl to do with all these leftover straws?  Recycle them into a new more functional craft was my first thought.

I was inspired by a trashcan I saw at Round Top once that was clearly made using straws or tubing and left over Christmas wrapping paper.  I recently saw the picture in my Flickr stream and thought of my stock pile of orange straws.  Today for I Love to Create just because no one wanted to drink from my straws does not mean they will not get used!

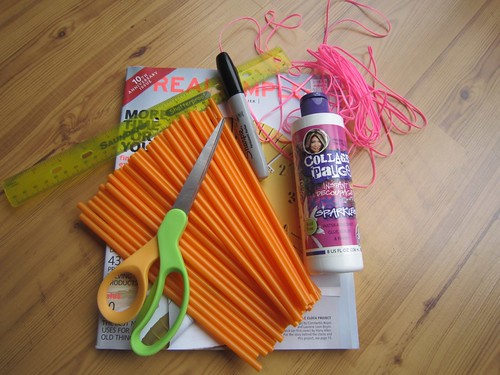
SUPPLIES
Pen
Empty Can
Straws
Plastic Lacing
Scissors
Ruler

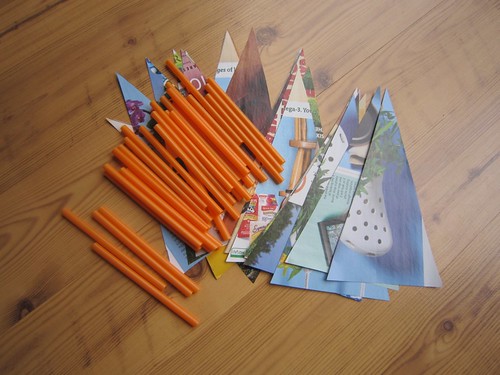
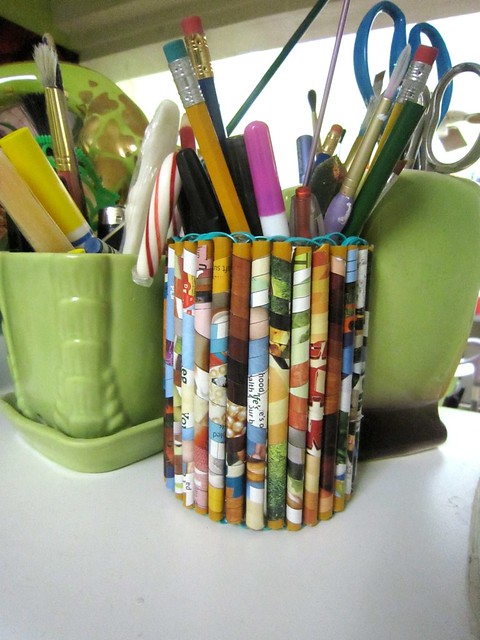
The first thing I did was cut all my straws in half.  Next I needed to adorn them.  If you have ever made paper beads, covering these straws is pretty much the same thing.  I made triangles with a 4" base on colorful magazine pages.  After cutting them out I wrapped them around my straws starting with the wide end.  I swiped the wide end with my Aleene's Glue Stick before adhering to the straw and did the same to the very tip of the triangle.

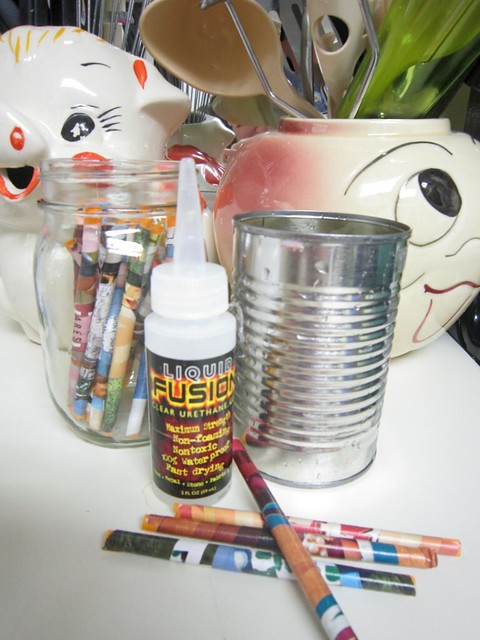
Once I had all my straws wrapped I coated them in Collage Pauge to protect them.  After the Collage Pauge dried I attached all my straws to an empty and clean tin can with Liquid Fusion Glue.

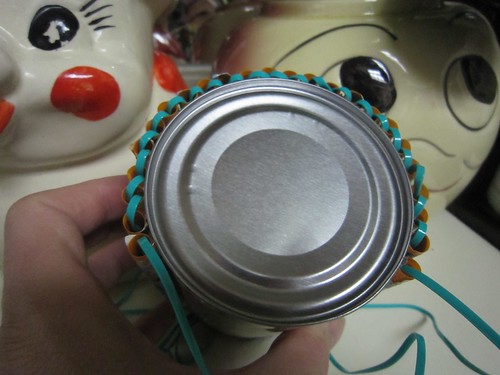
Just for decoration and to make my can more like the original inspiration I used plastic lacing (the kind you use in Vacation Bible School to make key chains) on my can.  You could skip this step, it is just for decorative purposes.

All that is left to do is fill your can with pens, scissors, knitting needles and whatever stray mess you have lying around that needs a crafty corral.  


Visit us on Facebook!
Craft on! Click here for today's daily giveaway!

Monday, September 27

DIY Russian Nesting Doll Purse + Enter to Win it!


Check out this video of designer Cheryl Ball and this fabulous Russian Nesting Doll purse she made for a past issue of Haute Handbags! Cheryl tells us how she made this cute bag (you won't believe what it's made out of! All it took was a little ingenuity, Aleene's Fabric Fusion, and fun glitter and accents!

And today, September 27th, 2010, enter to win this amazing purse on ilovetocreate.com to show off with your outfit or display! It is a definite conversation piece!! Click here to win in our daily giveaway!

Thursday, August 19

5 (more) Kitschy Upcycled Frames


Almost a year ago this week I did an I Love to Create post entitled 5 Kitschy Upcycled Frames. I thought it was time for an update with 5 new and exciting picture frame options!


First up is a frame I have been dreaming about for a good long while. I had this adorable picture of Tallulah brushing her teeth for the first time that has been begging for a customized frame. Months of brushing later Tallulah is in the process of getting 5 new teeth and it put the fire under me to get my dream toothbrush frame made. I bought these colorful child's toothbrushes at Target and using Liquid Fusion Glue I attached them to a pre-existing frame. Now the picture sits on a shelf in my bathroom and every time I brush my own teeth I look at Tallulah and smile.


Everyone seemed to enjoy the Etch-a-Sketch picture frame from the previous post. It even got mentioned on Etsy! Anywhoo thanks to the Artistik Diva I was informed that Etch-a-Sketch also came in mini form! I used Aleene's Acid Free Tacky Glue Stick.
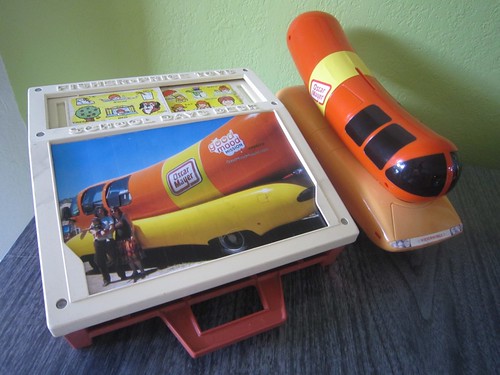

As you know I love vintage Fisher Price Toys. Last time I made a frame out of a TV toy. Recently I scored a vintage Fisher Price School Desk. I already have one in good condition and this one's chalkboard is all screwed up so why not convert it into a frame! An enlarged picture and some Aleene's Crystal Clear Tacky Spray and presto magic! I chose to frame a pic of the fam in front of the Oscar Meyer Wiener Mobile, goes nicely with my wiener mobile bank.
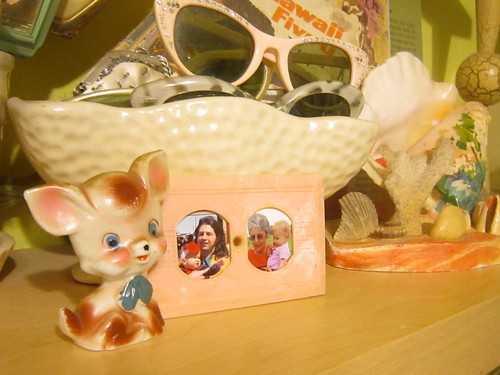

Eons ago I bought several vintage switch plate covers not sure what I was ever going to do with them. With the help of some Aleene's Tacky Transparent Tape for Crafters they sure do make a swell picture frame. You could buy new ones and gussy them up with some Crafty Chica Paint too.


Vintage cameras are one of my bazillion collections. I have several Brownies and thought I would convert the flash on one into a picture frame. I used a thin bead of Aleene's Fast Grab Tacky Glue.

I'd love to hear about your picture frame making adventures. Got any ideas for me? If your looking for some other ideas about how to showcase your favorite photos I just so happen to have a few posts on the subject: old TV, mosaics, puzzles, cupcake wrappers, bobble heads, shrine, 6 pack of beer, terrariums and cafeteria trays.

Tuesday, September 15

I Love to Create Recycled Magazine Mixed Media Decoupage Bangle Bracelets


Designing Diva Pattie Wack had a super fun make it/take it for I Love to Create at CHA Summer and on the last day of the show I sat down with her and created a one of a kind decoupaged mixed media bangle. I ran out of time and had to leave it unfinished...and fast forward to yesterday morning when I decided to make a similar project and finish the first one.

I adore these wooden blanks from
DIY Bangles and I’ve been playing with images from magazines since my second book The Impatient Crafter Gets Inspired. I’m particularly fond of using a section of a fashion image and adding layers on it to see how far I can take it while still being able to tell what the original image was. If your teen has a pile of fashion or teen mags sitting around gathering dust, this is a great project for them to do and to personalize with images and embellishments they love. The base layer is made from thin tissue or handmade fibrous paper.

This same idea would be fab for frames or other room décor items...so don’t be afraid to take it to a bigger scale. Think how cool a dresser would be layered up like this!

So...without further ado...let’s get started!

Recycled Magazine Bangles
Margot Potter for
I Love to Create Teen
Copyright 2009

Materials

Wooden bangle
Recycled magazines
Fuzzy yarn
Patterened and solid tissue paper in coordinated colors
Tulip Iron-On Crystals in 2 sizes
Traci Bautista’s Collage Pauge Instant Decoupage™ in glossy

Traci Bautista’s Collage Pauge Instant Decoupage™ in sparkles
Aleene’s Quick Dry Tacky Glue™
Jet Black Archival Ink
Flourish rubber stamp

Tools
Foam brush
Tulip Cordless Heat Setting Tool
Scissors

1. Tear small pieces of your tissue paper and adhere to the wooden bangle. Spread a thin layer of Collage Pauge glossy on the back of the paper with a foam brush and use your fingers and the brush to apply to the bangle. It’s okay if there are some wrinkles. Spread a thin layer of medium on top of the paper as you work.


2. Cover the entire bangle inside and out with collaged tissue. Allow to dry.


3. Cut out images to fit the flat oval surfaces on your bangle. I pressed the image on the surface and used my pointer finger to press it along the edge, then removed the paper and cut along the indentation I made so the image fit the surface.


4. Adhere images with a thin layer of Collage Pauge glossy and allow to dry.


5. Put a thin smearing of Extreme Paint in Paradise Pink on the front of each image. Allow to dry.


6. Paint the entire bangle inside and out with Collage Pauge sparkle. Allow to dry.

7. Stamp images using archival ink and a sparsely detailed flourish stamp.


8. Run a thin bead of glue along a length of yarn and work your way around the bangle wrapping and adhering the yarn to the spaces in between the images. Allow to dry.


9. Use heat setting tool to adhere crystals to images. I used two sizes and two on each image, alternating their placement.

Tuesday, September 8

I Love to Create Recycled Denim Book Covers


Recycled Denim Book Cover Margot Potter for I Love to Create Copyright 2009

When I asked my daughter if she needed to make book covers for her school books she looked at me what that, “Are you daft?” expression on her face. Yes, it’s official, I’m daft and I’m old. Undaunted by these facts, I was certain that book covers hadn't gone the way of record albums and After School Specials and then we saw some ready made stretchy covers at our local Big Box store.

A ha! Maybe I'm not so daft after all!

I thought we'd try and make some recycled covers instead of buying ready made. Back in my day, we whipped up covers to protect our school books using brown paper shopping bags. Those brown bags aren’t as easy to score these days. No worries! I have a huge stash of recycled jeans from a class I taught last year and that’s where this project was born. I got these jeans for pennies at my local Goodwill. You can do this for school books or for any books that get a fair amount of use to protect them. I love the little pocket for your pencils and pens or anything else you want to take along with you. Teens can personalize these any way they like and make a different one for every book.

Recycled Denim School Book Covers
Margot Potter for I Love to Create Teen Crafts
Copyright 2009

Materials
Pair of recycled stretchy jeans (You’ll be using a pant leg and a pocket)
Aleene’s Quick Dry Tacky Glue
Aleene’s Patch and Applique Glue
Tulip Fabric Spray Paint Emerald and Fuchsia

Tulip Soft Matte Fabric Paints in Azalea, Ebony and Glacier White
Tulip Pearl Dimensional Fabric Paint Clover Green
Tim Holtz idea-ology Mini Masks Regal

Star Stencil
Hero Arts Writing Stamp

Tools
Ruler
Stencil Brush
Fabric Scissors
Foam Brush

1. Cut a leg from a pair of old stretch jeans. Cut a pocket off of the back of the jeans, leaving the backing so it’s still a pocket.

2. Place your book on the jeans and determine width and length of your material. You want the material to be able fold over on both sides about 2.5” and to be able to overlap the edge of your book cover about 2.5”. The fabric when folded top and bottom should hit at exactly the width of your book. Measure twice and then cut to size.


3. Run a bead of glue along the top and bottom edge of your folded fabric, stop gluing approximately 2.5” from each edge. Allow to dry.

4. Slide the front of the book cover into each side of your folded and glued fabric, creating protective sleeve.

5. Adjust the fabric tension and glue the edge down on each side. Repeat for the back cover. Allow glue to dry.
6. Glue pocket on front of cover with Patch and Applique glue. Allow to dry.7. Decorate the pocket using a variety of fabric paints, stencils, rubber stamps and splatters. I used the Tim Holtz flourish mask with pink and green fabric spray paint, the Tim Holtz flourish stencil with the azalea paint, smeared and flicked on the green paint on the pocket with my pointer finger and stenciled the stars on with the stencil brush and black paint.8. Use a foam brush to apply fabric paint to a rubber stamp with text and stamp on the center of the pocket. Allow to dry.

Clicky Web Analytics
Pin It button on image hover

Subscribe to our newsletter

* indicates required
I am interested in products and inspiration for...
Close