Showing posts with label julianna Hudgins. Show all posts

Monday, June 24

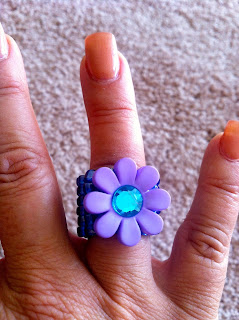
Jewel Loom Flower Bling Ring


Making beaded rings is fun and easy on my NEW Jewel Loom but the "Glue" holding the bling is the real MAJIC! Aleene's Jewelry & Metal Glue is not only the BEST but it holds really really well! 
Materials needed include: 
Beadalon Wild Fire .15 
Size 6/0 Toho Seed Beads 
Decorative Buttons (if buttons have shanks you will need a pair of wire cutters to remove them) 

Set up the Jewel Loom with 7 Warp Threads following the Warp Set Up instructions included in the kit. 
Measure your finger of choice with a sewing tape measure and build base of ring according to length. My ring was 2.5inches long 
When base is finished thread needle up one row and back through bottom row at least 3 times. This will lock in rows so they do not slide once they are cute off of warp threads. Continue weaving through base of ring until you reach the top and repeat weaving through top two rows to secure as you did on bottom rows. Make sure that needle and thread are all the way too the top. Do not cut off, leave needle and thread attached to ring. 
I love working on the Jewel Loom because you can create multiple projects at once 
Flip Jewel Loom over and very carefully cut warp threads off the bottom and top of loom
Find the middle of warp threads and very carefully cut 
Tie Warp threads together by gathering and tying two pieces together 
Adhere Aleene's Jewelry & Metal Glue to knots let dry 
Trim excess thread above knots carefully 
Sew bottom and top ends together with needle thread 
Using your needle tuck knots inside of beads 
Continue to stitch entire base of ring making sure that top and bottom ends are secure 
If decorative button has a shank remove it using a pair of wire cutters. Apply Aleene's Jewelry & Metal Glue to base of button and to ring where two ends meet. This will help to hide knots and to give the ring a finished look. 
Let dry and Wear! 
Super Fun & Easy! You can check out my Blog at juliannahudgins/blog Cheers, Jewels 

Monday, May 20

DIY Tie-Dye Flower Power Necklace

I was so excited to hear that we were featuring Tulips One-Step Tie-Dye kits this month! They are so easy to use and the results are amazing! I had already used the Tie-Dye Kit to create Wearable Art so this time I wanted to make Jewelry combining my Spellbinder Dies and Beadalon findings. 
All of my Favorite goodies in one project equals one Happy Girl! 
I cut my bandana in squares by following the crease lines from the fold
Next I used some of the folding techniques from the instructions that are included in the kit. I also chose to randomly roll and add rubber bands to my squares to create a unique look. 
I placed my bottles of Tie-Dye in a rubber container to protect my area. I also made sure to put my gloves on that come in the Tulip Tie-Dye kit. Using a pair of tongs to hold the folded square I randomly added different colors of Tie-Dye. 
After applying the Tie-Dye I placed each square in a plastic bag. I let these little beauties set for about 6 hours. I then rinsed each one carefully and let them dry by natural sunlight.
They are so AWESOME! I wanted to stitch them all together for a super cool pillow topper! But wait I am making Jewelry! LOL! 
I know what you are thinking.....BUT No I did not Tie-Dye Billybob's Pee Paws! However I am keeping these for a future project. 
Using my Spellbinders Grand Calibur, I cut the Jewel Flowers out of the Tie-Dyed squares and felt for added support. I glued the pieces together using Aleene's Super Thick Tacky Glue
To assemble your Flower Power Necklace, lay chain down on your work surface, add a 1/8 hole punch to one set of the petals on each flower stack then secure them to the chain by adding a jump ring. 
Last minute Inspiration! I did not want to take away from the cool Tie-Dye but felt the urge to add a little "Jewel" using Tulips Glam-It-Up. For extra security I added a little Aleene's Super Thick Tacky Glue to the center of the flower then adhered the stone.  Enjoy Life! 

Monday, April 22

Body Art Birthday & House Warming Party


We had the most fun at my Girlfriends combination 50th Birthday and Home Warming party this past weekend. I thought it would be oodles of creative fun if we painted each others faces and one belly with Tulip's Body Art kit. 
But first we did a little doodling with Tulip's Fabric Markers. I so love these markers! 
Arielle & Tess got really quite and serious while creating their Inspirational statements on this bandana that I purchased from Michaels Craft stores
I love the intense look on Tess's face! These girls are super talented! 
We continued to add more artwork through out the night. A really fun and inexpensive way to create and give a gift all at the same time. 
Smile...Your Beautiful! 
Next it was off to Tulips Body Art. I must say that everyone was super eager to paint someone's face, belly or arm. It was so much fun to watch. 
The Birthday Girl and her Lovely daughter Tess picking out a design to paint on momma's face. 
It was so sweet watching these two. 
She did a GREAT job, it was so easy and quick! 
We all picked Kaileen as the perfect candidate for a silly Mustache.
She ROCKED it big time! 
Watching these two almost Newlyweds paint each others faces was beyond Hysterical! 
Not bad......its a Tulip, Tracy's favorite flower.
This girl has "Mad Skills" and she did it so quick! 
Santos, you are such a "Doll Baby", hehe! So cool! 
Hey its called Tulip Body Art, Do my Belly! 
Love how Arielle incorporated Natalie's belly button ring as the nose and mouth for her smiley face!
Hey...Whats that crawling on your forehead? Tess's friend Sam pull out her own free hand painting skills with this Pinterest inspired image of a snail.
and then it was my turn! 
Great job Kaileen! Love my sunshine. 
Needless to say a great time was had by all! We are definitely taking our Tulip Fabric Markers and Body Art to the Jersey Shore this summer. In fact we are already brainstorming on quick and easy images that we can paint for each day. Don't worry I am sure there will be a Blog entry featuring that crazy trip! Enjoy! Jewels 

Clicky Web Analytics
Pin It button on image hover

Subscribe to our newsletter

* indicates required
I am interested in products and inspiration for...
Close