Fabric markers are one of my favorite crafting tools, but the only problem is their limitation to what kind of fabric and what colors you can work on. The Tulip Opaque Fabric Markers have solved that problem. You can even use them on leather as I have for these fun bracelets! I love how easily you can get great strong color right on leather that won’t rub off. I even tried getting it wet and rubbing it and it’s permanent! So get ready to create your own patterns and art on all kinds of leather or pleather. These opaque fabric markers are awesome!
Showing posts with label DIY jewelry. Show all posts
Monday, May 25
Leather Bracelets with Opaque Fabric Markers
Fabric markers are one of my favorite crafting tools, but the only problem is their limitation to what kind of fabric and what colors you can work on. The Tulip Opaque Fabric Markers have solved that problem. You can even use them on leather as I have for these fun bracelets! I love how easily you can get great strong color right on leather that won’t rub off. I even tried getting it wet and rubbing it and it’s permanent! So get ready to create your own patterns and art on all kinds of leather or pleather. These opaque fabric markers are awesome!
Tuesday, December 16
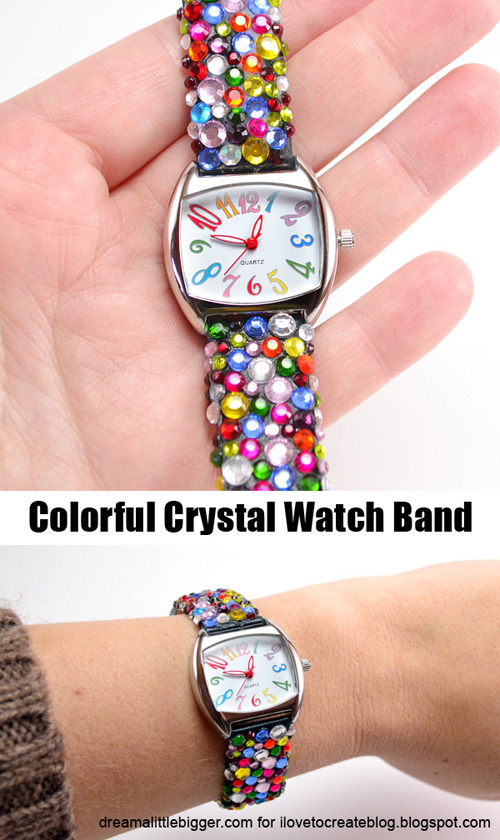
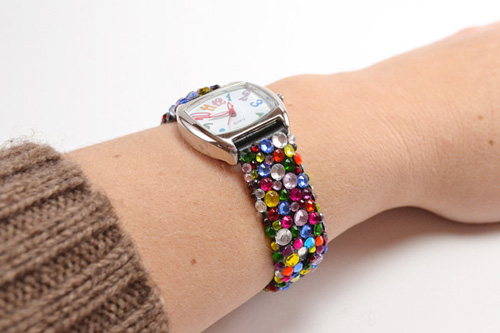
Colorful Crystal Watch Band
I have a jumbo thing for watches. They're functional so I can wear them any time and there is something comforting about the way they wrap around my wrist. So I thought a personalized, crystallized watch band would make an amazing gift.
Unfortunately I've decided to gift myself with this one because I LOVE it! Oops!
Friday, October 3
Sugar Skull Necklace

I don't know about you, but my favorite part of Halloween is the day after -- November 1. Not only do you have a bucket full of candy, it's Dia de los Muertos. The day of the dead. A celebration of those who have past. It is equal parts colorful and creepy, and I for one can't get enough of it! Thanks to I Love to Create's new Crafty Chica line of Dia de los Muertos goodies, we can all join in the fun!
This necklace is easy to make, inexpensive, and can be worn all autumn long. It's the festive touch your outfit needs!
Tuesday, September 9
Rhinestone Choker DIY
I have been looking for a choker like this forever
but could never find anything close to what I had pictured in my mind.
I finally had to make what was in my head,
and Aleene's jewelry and metal glue made it super easy to create.
but could never find anything close to what I had pictured in my mind.
I finally had to make what was in my head,
and Aleene's jewelry and metal glue made it super easy to create.
Monday, April 14
Hex Nut Cuff DIY
Create a cool honeycomb design on a cuff using hex nuts with this hardware store inspired Hex Nut Cuff DIY tutorial. Turn up the chic factor even more by adding Tulip glam-it-up crystals to the centers of some of the hex nuts.
Monday, January 27
DIY Neon Friendship Bracelets
Neon is making a comeback and these DIY Neon Friendship Bracelets are one cool way to add some serious color to your arm candy and they have a bit of sparkle!
OK, so neon is on it’s fourth or fifth come back. But, this time there are so many new and creative ways to incorporate it into your wardrobe without looking completely ‘80’s dayglo!
These bracelets so quick and fun to make you’ll want to make lots and that’s good because they look amazing stacked together and don’t forget to make them for your friends too!
Wednesday, January 22
DIY BFF Earrings
Best friends are forever, true blue and faithful to the end. Why not show your BFF a little love with these super simple DIY BFF Earrings? A little paper, some decoupage medium and twine turn craft store wooden hearts into two sided earrings that are sure to cheer your BFF up every time she wears them! PLUS they're cute coming and going! Avalon and I put our heads together here, she loves these muted colors and simple jewelry, I scaled back on my usual over the top size to make them easy and comfortable to wear every day. These are perfect for a trend savvy teen.
Monday, January 20
Friday, January 3
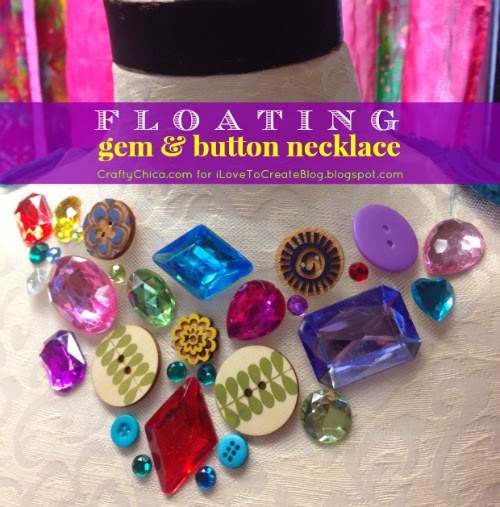
Floating Gem Necklace (with buttons!)
I'm starting the new year by completing a project I've been thinking about all of 2013 - the floating gem necklace! I've seen versions online and wanted to do my own thing. I love all things bright, chunky and sparkly and this project fits that bill. To add a different spin, I incorporated buttons as well.
Monday, November 11
DIY Rhinestone Bungee Bracelets
Create fun and sparkly bracelets using bungee cords as the base with this Rhinestone Bungee Bracelet DIY tutorial. These bungee cords from Tulip have smooth ends that won’t scrape you and are surprisingly perfect for bracelets.
Wednesday, September 18
HOW TO MAKE: FAUX BEADED SNEAKERS
What's going on people! It's already time for cinnamon-pumpkin candles, veggie soups, football and lot's of Fall and Halloween crafting. I always try to have something in my daily outfit that POPS and the fact is some day's all I want to wear is a cute pair of skinny leg blue jeans and white v neck shirt. What is one to do to make their outfit POP at this point?
I know! Make FAUX BEADED SNEAKERS!
Monday, May 20
Five Fab Flower DIY Jewelry Projects
Over the years I've made a host of floral themed DIY projects for iLoveToCreate. Perhaps it's driven by my allergies to pollen, but I have a long standing affinity for using flowers in my designs! Here's a virtual bouquet of five fab flower DIY jewelry projects from me and my lovely daughter Avalon, all created with an array of pollen free DIY craft products from iLoveToCreate!
You can use chipboard, grungeboard or wood to make similar designs. Tulip Fabric Paints and Aleene's adhesives work on an endless variety of mediums. These pieces were all very inexpensive to make, but they look very chic when worn.
Follow the links below to the step by step tutorials!
Pink Splash 3-D Spinning Flower Bangle Margot Potter for iLoveToCreate
Floral Stacked Bib Necklace Margot Potter for Avalon Potter for iLoveToCreate
Mod Girl Chipboard Necklace Margot Potter for iLoveToCreate
Pretty Poppies Pin Avalon Potter for iLoveToCreate
Proenza Schoeller Inspired T-Shirt Flower Necklace Margot Potter for iLoveToCreate
Do you love floral themed crafts? Would you wear mixed media jewelry like this? We'd love to see your creations! Join us on Facebook and share your creativity! Tune in this Wednesday, I'm working on a fun new tie dyed t-shirt floral jewelry DIY I think you're going to love!
Find more DIY fashion inspiration at DIY Doyenne!
DIY Tie-Dye Flower Power Necklace
I was so excited to hear that we were featuring Tulips One-Step Tie-Dye kits this month! They are so easy to use and the results are amazing! I had already used the Tie-Dye Kit to create Wearable Art so this time I wanted to make Jewelry combining my Spellbinder Dies and Beadalon findings.
All of my Favorite goodies in one project equals one Happy Girl!
I cut my bandana in squares by following the crease lines from the fold
Next I used some of the folding techniques from the instructions that are included in the kit. I also chose to randomly roll and add rubber bands to my squares to create a unique look.
I placed my bottles of Tie-Dye in a rubber container to protect my area. I also made sure to put my gloves on that come in the Tulip Tie-Dye kit. Using a pair of tongs to hold the folded square I randomly added different colors of Tie-Dye.
After applying the Tie-Dye I placed each square in a plastic bag. I let these little beauties set for about 6 hours. I then rinsed each one carefully and let them dry by natural sunlight.
They are so AWESOME! I wanted to stitch them all together for a super cool pillow topper! But wait I am making Jewelry! LOL!
I know what you are thinking.....BUT No I did not Tie-Dye Billybob's Pee Paws! However I am keeping these for a future project.
Using my Spellbinders Grand Calibur, I cut the Jewel Flowers out of the Tie-Dyed squares and felt for added support. I glued the pieces together using Aleene's Super Thick Tacky Glue.
To assemble your Flower Power Necklace, lay chain down on your work surface, add a 1/8 hole punch to one set of the petals on each flower stack then secure them to the chain by adding a jump ring.
Last minute Inspiration! I did not want to take away from the cool Tie-Dye but felt the urge to add a little "Jewel" using Tulips Glam-It-Up. For extra security I added a little Aleene's Super Thick Tacky Glue to the center of the flower then adhered the stone. Enjoy Life!
Labels:
DIY Fashion,
DIY jewelry,
julianna Hudgins
Monday, March 18
DIY Emerald City Necklace
Margot Potter for iLoveToCreate
We loved Oz the Great and Powerful and of course, it has inspired a lot of new design ideas here at Studio Madge. This necklace is made of chipboard, which is a surprisingly durable medium. I wouldn't recommend wearing this in the rain, but you can make it water resistant with a coat or two of Aleene's Spray Acrylic Sealer.
Use a ruler to mark green chipboard into triangles. These are 1.5" wide and 2" long. Cut triangles with sharp scissors. Mark and punch holes in top edges of triangles, I used my Crop-a-dile. Cut the back off of a vintage rhinestone earring, any green sparkly item will work here, even a button or an array of Tulip Glam-it-up crystals!
Using aged brass chain, cut it into six link segments, you want them to span the top of your beads. The beads are 20mm emerald green frosted Lucite. Glue chain and earring to beads using Aleene's 7800 adhesive. Use the same adhesive to attach the beads to the triangle pendants. Attach the triangle pendants together with three 8mm jump rings. Attach 2 5.5" segments of chain to the outermost triangles on the necklace using 8mm jump rings. Attach a clasp to the open ends of your chain, open and close the chain links using chain nose and bent nose pliers.
Friday, March 15
Tri-Collar Fabric Necklace Tutorial!
What do you do when you have fabric scraps that you can't bear to toss? You use them to make a necklace! This is beautiful fabric from Guatemala and I thought a necklace would look stunning with a black top.
My style?
I LOVE bold design, but if you don't, simply reduce the size of the fabric pieces. It's that easy!
Ok, let me show you how I constructed this thing!
SUPPLIES:
Fabric circles (Note, use Aleene’s® Stop Fraying™ if your fabric frays)
Necklace chain, clasp
Beads, needle nose pliers, jump rings
Apply tape along center fold, then cut sheets in a half circle.
Remove backing paper from the tape, center chain and press in place.
Remove backing paper from the sheet and fold the top flap down. Press in place.
My necklace needed some trim, so I added Tulip® Beads in a Bottle™ Paint
.
Add grommets, jump rings and beads. Add the closure to the chain ends. Try it on and adjust to the length you want!
VARIATIONS: Use more (but smaller) circles for a different look. Instead of circles, make triangles, rectangles, squares or ovals. Add glitter or crystals too!
Subscribe to:
Posts (Atom)