Friday, May 28

Win a Tulip® Fashion Graffiti™ Prize Pack!!!

Win a Tulip® Fashion Graffiti™ Prize Pack!

We are super excited to tell you about our new I Love Tulip® Fashion Art™ page on Facebook and wanted to celebrate by having a fun Fashion Graffiti™ contest!! Tulip® Fashion Graffiti lets you push the boundaries of creativity and trick out all your fabric surfaces in poppin' style!

Before we tell you about the contest, we want to tell you more about the I Love Tulip® Fashion Art™ page on Facebook. It's a great place to be inspired in all your Fashion Art endeavors. We will be featuring cool links, videos, techniques, projects, insight, behind the scenes features and so much more! Also participate in our discussions and upload your own fan photos of your projects created using Tulip® Fashion Art! We love to see what you create!!!

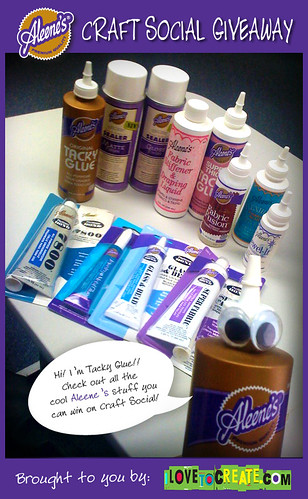
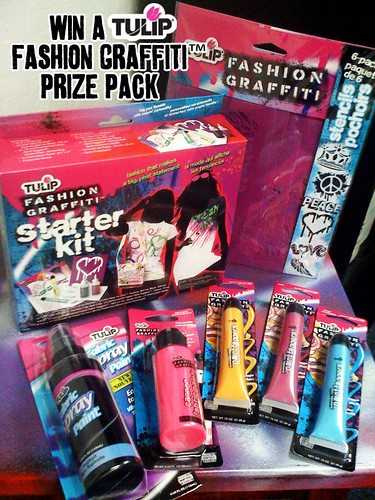
What you'll win (approximate retail value $40)

Tulip® Fashion Graffiti™ Starter Kit™
Tulip® Fashion Graffiti™ Cannon Fabric Paint™
Tulip® Fashion Graffiti™ Stencils (Peace/Love Set)
– 3 Tulip® Fashion Graffiti™ Dimensional Fabric Paint Taggers™
Black Tulip® Fabric Spray Paint™

In order to win, all you have to do is hop on over and fan/like the I Love Tulip® Fashion Art™ page on Facebook page! If you don't already have a Facebook page, you will need to sign up for an account. Contest begins at 12:01 a.m. PDT on May 28, 2010 and will end at 11:59 p.m. PDT on June 18, 2010 (the “Contest Period”). Following this date, one lucky winner will be chosen randomly from all the fans of the I Love Tulip® Fashion Art™ page on Facebook. The winner will be notified by the iLoveToCreate staff shortly following the contest.

Please scroll down to the contests section on our web site and read our privacy rules for entering this contest. Read about the contest rules here.

So hop on over and get inspired! We're so excited you get to share in the Tulip® Fashion Art fun!!!!

Thursday, May 27

Plant Marker People


Sure when you buy herbs at the store they come with a little plastic stake telling you what it is - handy yes, attractive no. It's nothing a little paint and a trip to the craft store can't fix.


SUPPLIES
Liquid Fusion Glue
Wooden People Sticks
Crafty Chica Little Chica Paint Packs
Small Wooden Ovals
Crafty Chica Glossy Gloss Varnish
Paint Brushes


PAINT YOUR PEOPLE
I found my wooden people at Hobby Lobby. They were a blank wooden canvas just begging for polka dotted bikinis and lime green tank tops. I did my best Sarah Neuburger impression to give them faces.


NAME THAT HERB
Using small wooden ovals and a thin paint brush I painted the names of the herbs in my garden.


PROTECT FROM THE ELEMENTS
Using a paint brush apply two coats of Crafty Chica Glossy Gloss Varnish, allowing to dry completely between coats.


SIGNAGE
Using Liquid Fusion Glue attach the wooden oval to the hands of the person.


STICK IT IN YOUR GARDEN
All that is left to do is stick your little people in your garden so that they can tell you which herb is which.

DIY Sex in the City Glitter Shoes


It's time to Carrie On! Sex in the City 2 hits theaters nationwide today and in honor of the return of Carrie, Charlotte, Samantha,and Miranda on the big screen, we wanted to show you how easy it is to get the SATC 2 look without breaking the bank.

In the movie, Carrie wears the sparkly and golden Christian Louboutin shoes you see in the graphic above (here's a closer look we found of Carrie wearing them on the Streets of NYC). We wanted to create our own version using fabulous Tulip® Fashion Glitter™ and Fashion Glitter Bond™. And the cool thing is that you can get this look for under $20 bucks using a pair of fabric pumps you pick up at your local discount store or your local thrift shop. You may even have a pair in your closet that you need to revamp!

DIY Sex in the City Glitter Shoes

– Tulip® Fashion Glitter™ (in gold or color of your choice)
– Tulip® Glitter Bond™
– Paintbrush or make-up sponge
– Paper towels
– Shoes (we used some with a fabric texture, it makes it easier for the glitter to grab on)
– Plastic Tablecloth
– Foil

Instructions:
For best results, please read all instructions before beginning project. Refer to photo for color and design placement.

1.
Cover work surface with plastic tablecloth. Set shoes on prepared surface.
2. Squeeze out Glitter bond onto foil. Using paintbrush or make-up sponge apply glue to shoes.
3. Once desired areas are covered, immediately cover with Fashion Glitter.
Optional: Use glitter bond and paint over glittered areas to seal.

Tip: Lay paper towel down underneath shoes while applying glitter, shake excess glitter onto paper towel then back into glitter bottle.
Let shoes dry completely.

Birthday Crown-Bands!

DSC01094

My daughter Clover's 1st birthday is on friday which in our house means, time for a celebratory accessory! I thought about sewing her a Fabric Birthday Crown like the ones I made earlier this year for Craft Apparent but decided it might be fun to work up a sassier, no-sew version that would work well on her smaller head. Since Miss Clo is a little light in the hair department, she (read, I) loves headbands. Enter, the Birthday Crown-Band!

To commemorate her big 0-1, I used some hot pink vinyl along with fabric I had left over from her birth announcement collage. Whatever you have laying around your craft stash will do, though! Whip one up in no time flat and let the headgear hilarity begin!

DSC01084

Materials
1/8 yd Vinyl
1/8 yd Contrasting Fabric
1/8 yd Iron-On Adhesive
Small piece of Tulle
Hot Glue & Gun OR Needle & Thread
Scissors
Pen
Iron
Ruler or Straight Edge
Glitter Paper
Alphabet Scrapbooking Letter
Headband

How-To
  • Cut out 5"x 10" strips of vinyl, fabric and iron-on adhesive.
  • Following the iron-on adhesive manufacturer's instructions on the package, adhere the wrong sides of fabric and vinyl together.
  • Use a ruler and pen to draw the the points (see below) of the crown on the fabric side of the piece. Cut out.
  • Draw and cut out the number on glitter paper that corresponds with the year your child is celebrating. Glue on to center of vinyl side of piece, Fabric Fusion. If desired, glue a scrapbooking letter of your child's initial on top of the number. Let dry.
mosaic9844994058b57a849e8c012188b9d9c363e4d746
  • Roll piece into cylinder shape; use Fabric Fusion to glue in place. Let dry.
  • Glue Glam-it-Up Crystals to each crown point.
  • Using hot glue or needle & thread, attach a tulle bunch to headband. Repeat for crown to tulle. Let dry, then let your little royal bask in their birthday glory!
DSC01097


Crafat.Rock.Love,

Tuesday, May 25

ILoveToCreate Teen Crafts: May Flowers Embellished Tank Top


IloveToCreate Teen Crafts
May Flowers Embellished Tank Top

Margot Potter

“Mom crafted, kid approved.”

Summer is almost here and it’s time for tank tops, flip flops and shorts. Yippee! Here’s a fun project teens can do in the back yard with their friends. Just buy a bunch of inexpensive tanks or t’s and give them a pile of Tulip 3D Fabric paints andTulip Fashion Graffiti Big Phat markers and let them make their own wearable works of art. This isn't a 'make it perfect' kind of project, it's meant to be playful, so don't worry about coloring inside of the lines.

My color palette and design were inspired by the charming new graphic buttons from La Mode. Tulip fashion paint comes in virtually every color so it’s easy to match the button colors. I had so much fun with this; I think I’m going to have to make one for myself!

Materials
Cotton tank top (pre-wash to remove sizing)
3 Blumenthal Lansing La Mode buttons
Tulip 3D Fashion Paint poppin' purple, deep turquoise, yellow and clover green
Tulip Fashion Graffiti Big Phat fabric marker black
Aleene’s Fabric Fusion glue
Coordinating DMC Color Infusions embroidery threads

Tools
Embroidery needle
Paint brushes
T-shirt form

1. Slide a t-shirt form under your tank top. (Secure the back with safety pins to tighten if the shirt is too loose.)

2. Using the button pattern as inspiration, paint three flowers with graduated circles of color in pink, teal and yellow. Change the brushes out between colors. Allow paints to dry.

3. Use the marker to draw graphic circles to define the flowers. Draw stems and add leaves. Use green paint to color inside of leaves. Allow to dry.


4. Glue buttons to center of flowers. Allow glue to dry.

5. Add embroidery thread accents to each button, one yellow, one teal and one pink.

Friday, May 21

Painted Patchwork Carmat

Looking for a cool way to customize your auto interior? How about a set of car mats made to your liking? This method is thick and durable and you can paint it any way you want!

Supplies:
Crafty Chica® Little Chica Paint Pack™
Crafty Chica® Glossy Gloss Varnish™
Heavyweight canvas (primed)
Brushes
Rubber stamps or stencils
Your old car mat
Sewing machine with heavy needle

Directions:
Use your old car mat as a guide. Cut shapes out of the canvas and lay them on top of the old car mat until you have the general shape. Make sure your design overlaps the carmat because you will need to sew the pieces together. Turn the pieces over and number them on the back, and then take a picture on your cell phone for reference. I'm sure there is an easier method, but this is how I made mine...)

Paint and embellish the pieces, let dry and then coat them with 5 to 6 coats of varnish 9let dry between coats). Set them back on the car mat and sew them piece by piece until you have the whole thing. Cut away excess. Sew around the edges.

Add two more coats of varnish. Repeat for the remaining car mats.

TIP: If you want, you can glue rug grippers to the back of the mats so they don't slide in your car.

Thursday, May 20

Recycled Cardboard Cupcake Coozies


Tomorrow is my monthly mommy meet-up. Every month we get together, let the kiddlets frolic and eat snacks. Last month I brought a batch of cake pops and this month I thought I would go with plain old cupcakes. The cupcakes might be plain, but the custom cupcake wrappers are not.


I have made cupcake toppers a bazillion times and decided today for I Love to Create I would spice things up. It all started with my new issue of Green Craft Magazine and a project called From Trash to Treasure: Embellishments From Boxes by Lisa Guerin. Tune in Monday for a full magazine review (it's more like a book than a magazine) and a chance to win your own copy!


SUPPLIES
Collage Pauge Instant Decoupage Medium
Scissors
Pictures
Circle Paper Punch
Boxes (I used cereal, cake mix and coke)
Sizzix Big Shot
Sizzix ScoreBoards XL Die - Cupcake Holder, Ruffle


REDUCE, REUSE and RECYCLE
Cardboard piles up around my house. Sure I recycle it like a good girl, but for my custom cupcake wrappers I thought I would revamp them. Cut your boxes open and measure to fit for your Big Shot Machine.


ADORN
Decorate your boxes with scraps of paper or scrap booking paper like I did. I used a Circle punch to cut out pink circles and a smaller punch to cut out circles of photographs of all the kids in my mommy group. Using Collage Pauge I adorned my boxes. I found it was best to decoupage on the side of the box without print. Plus I kind of like seeing the print inside my cupcake wrappers.


DRY
Let your boxes dry completely. Trust me on this, it will get ruined running it through your machine damp I know from experience. Being the impatient gal I am I put my boards in the oven at 175 for 30 minutes to speed the drying time.


BIG SHOT
I lined my boxes up with the cutting tool on the Big Shot to be sure my pictures would show on the cupcake wrapper. The Big Shot is my new fave craft tool all you do is crank the handle and the pieces roll right through with a perfect die cut waiting for you at the end. The cupcake wrapper is one of many options they have (I already invested in flowers).


CINCH IT UP
The Big Shot instructions call for using 3 small brads. 1) I did not have any brads 2) These cupcakes were going to be around little kids who love to swallow things like brads. All that being the said I decided to use a needle and hot pink embroidery thread to stitch the wrapper together. The bottom of the wrapper just has fold tabs.


CUPCAKES
I made up my cupcake recipe. I wanted something pink to match my wrappers, so I invented my own Pink Lemonade Cupcakes. I bought Lemon Cake Mix and subbed in Pink Lemonade concentrate for the water amount the box called for. I added red food coloring until a pink color was achieved.


I also used a can of store bought vanilla icing and mixed in the remainder of my pink lemonade concentrate. This made it a little runny so I added powdered sugar until it was thick again. I also added red food coloring to make the icing pink.


I baked the cupcakes in some fun polka dotted cupcake liners from Bake it Pretty. All that was left to do was sprinkle with pink sugar crystals.


The cupcakes are tart, but delish and most importantly look fab. I can't wait to show all the mommy's in my group tomorrow.


Just because you don't have a Big Shot, does not mean you can't join in the fun. Draw your own design onto a cardboard box and create a custom wrapper of your very own.

Aleene's Prize pack on this week's Craft Social!

craft-social-giveaway

This Saturday, May 22nd, is another Craft Social!! Craft Social is a new concept on Twitter cohosted by Barbara Forbes-Lyons (@penguintrax) and Diane Gilleland (@sisterdiane). Each month they host an online social via Twitter and crafters, artists and creative types can share current projects, talk about the process of art and craft, and meet new people to follow on Twitter!

You can read more about Craft Social and how to participate on the Craft Social site.

Here's what you win in the Aleene's Prize Pack we are giving away! Thanks Tacky (click on his name to follow him on Facebook) for being "Vanna" for our ad.

* 8 oz Aleene’s® Original Tacky Glue®
* 8 oz Aleene’s® Super Thick Tacky Glue™
* Aleene’s® Platinum Bond 7800® All-Purpose Adhesive
* Aleene’s® Platinum Bond® Glass & Bead Slick Surfaces Adhesive
* Aleene’s® Platinum Bond® Super Fabric Textile Adhesive
* Aleene’s® Jewelry & Metal Glue™
* Aleene’s® Fabric Fusion® Permanent Dry Cleanable Fabric Adhesive
* Aleene’s® Jewel-It Embellishing Glue™
* Aleene’s® Flexible Stretchable Fabric Glue™
* Aleene’s® Fabric Stiffener & Draping Liquid
* Aleene’s® Spray Acrylic Sealer™ in Matte and Gloss

To enter the drawing for this pack of crafty goodness, you just need to be at the Craft Social on Saturday, May 22. It’s from 2-4 pm EST.
The theme this month is Garden Party. There’s also a Blog Carnival that goes along with the theme!

Please make plans to attend and win.

Wednesday, May 19

2nd Annual List: 25 Signs that You Love to Create!

2nd Annual List of 25 Signs that You Love to Create

1. Instead of taking clippings of plants for your garden, you take swatches of lace and fabric for future applique opportunities.

2. You've started referring to craft bloggers in conversation by their first names, even though you've never met them.

3. Your most cherished childhood memory is of raiding grandma's button tins.

4. You buy a pair of shoes solely based on the fact that they'll look amazing displayed against your newly painted walls.

5. You're thrilled by the fact that you can pull up a 40% off coupon on your iPhone, when you're at the local Hobby Lobby.


6. You hoard fabric, glitter, paint, yarn and paper...you know, just in case any of those things should suddenly become unavailable to the masses.

7. Some people see plain fabric, you see a challenge.

8. You organize movie nights based on the craft-based content of the films. Character's knitting? Check. Fantastic quilt a part of the set? Excellent. Oh wait, they're garrish, feathery head dresses in a scene? Even better!

9. You convince your family that a road trip to see Mt. Rushmore, the Grand Canyon and Yosemite would PALE in comparison to a vacation encompassing the Rhinebeck Sheep & Wool Festival, Maker Faire, the Houston Quilt Festival and the Craft SuperShow!

Spotted: Crochet Tagging on S. Lamar in Austin!

10. Dinner conversation at your house consists of debates about the relevance of traditional graffiti vs. yarn bombing.

11. You purposely choose a dress in a pale color that will look terrible on you, because you like the challenge of dyeing it the perfect shade to contrast with your hair.

12. You consider the day of the Project Runway's "Fashion Week" episode, a holiday.

13. If something can be ripped into strips, it's not safe around you because you immediately want to knit, crochet or weave with it.

Setting up for newspaper yarn demo

14. You're a "fan" of at least 10 craft related pages on FaceBook (including of course, I Love to Create's.)

15. You signed up for a Twitter account specifically because you can't bear to miss out on up-to-the-minute crafty gossip.

16. When a friend tells you a piece of good news, your mind wanders mid-story as you begin mentally planning the the design of the "Congratulations" card you'll make for him.

17. You plan the color scheme of an entire room in your house, based on a stack of your favorite Amy Butler and Alexander Henry fabrics that you'd like to have displayed on a shelf.


18. Collage Pauge is right up there with toothpaste and hand soap, as a must-have staple in your home.

19. You've not only read the interviews in Craft Corps, you've taken notes in the margins and highlighted your favorite, inspirational quotes. Ok, this may be more my personal wish than an actual sign. Humor me, though.

Craft Corps book Proof of Life!

20. You feel that one person's buttons & zippers are another person's necklace and headbands.

21. You may not know that Malawi is in Africa, but you sure as heck know that MJ Trim is in New York! I probably wouldn't admit to that one though, if I were you.

22. There's nothing like the smell of Tacky Glue and Fabric Paint in the morning!

23. Who needs ocean sounds and bird chirping? You feel that the hum of your sewing machine is a perfect form of audio relaxation.

24. You have bumper stickers on your car that say things like, "Heavens to Etsy!" and "All Hail Handmade!"

25. You're constantly in need of a manicure because of a perpetual case of "crafter's hands".

Got more signs? Post 'em here!

Craft.Rock.Love,
Vickie

Tuesday, May 18

ILoveToCreate Teen Crafts: 'Let Them Eat Chocolate' Tampon Case


ILoveToCreate Teen Crafts
'Let Them Eat Chocolate' Tampon Case
Copyright 2010 Margot Potter
"Mom crafted, teen approved."

My husband and I used to own a gallery where we sold a variety of fair trade handicrafts, jewelry making supplies, vintage clothes and fun gift items. One of the items we carried was a wonderfully subversive Tampon Case created by an innovative young fella named Vinnie. Vinnie and I spoke a few times over the phone and I told him I'd love to see a more girly version. So I made a pink and felty one for my second book The Impatient Beader Gets Inspired (there's a pic below this post of that case.) My embroidered tampon case almost didn't make it into the book, but I fought for it and it stayed. Here's a new upcycled version made for the eco-conscious young lady who needs a stylish place to keep her feminine hygiene products and prevent them from getting destroyed at the bottom of her purse or book bag.

I'm of the mind that we need to be a little less weird about these things. Girls have periods. Got a problem with that?

Get over it.

So here's one for the girls! Being a girl is the best thing going. We should celebrate every aspect of what it is to be a girl and not be ashamed or afraid or uncomfortable. It's up to us moms to help our teens do that. This is a great project to do together and you can find fabulous old ties at the thrift stores for pennies. Aleene's Liquid Fusion glues turn this into a no sew project! Ya gotta love that. You can use the skinnier ties for iPod and cell phone pouches too. Vintage ties also make super cute skirts, bib necklaces, lamp shades, accents on purses...so get thee to the thrift store!


Materials

Vintage Tie (for this project a wider tie works best)
Coordinating Buttons
Large Heart Shaped Acrylic Charm
Metal 3-D Crown Charm
1" thick black grosgrain ribbon
Snap
Thin cardboard
10mm SP jump ring
Aleene's Fabric Fusion Glue
Aleene's Liquid Fusion Glue
Archival ink jet black
"Eat Chocolate" stamp Inkadinkado Amy Smyth 97479-MM

Tools
2 pairs chain nose pliers
Wire cutters
Chasing Hammer
Snap Setter
Steel Bench Block
Bench Block Pad
Disposable nail file or sand paper
Fabric Scissors
Crop-a-dile or 1/16" hole punch


1. Find a tie that's wide enough to create a sizeable pouch. You'll need to determine your needs based on the products you use. Measure tie taking into account a hem at the bottom and cut.


2. Use a seam ripper to open center of tie. Trace body of tie (not including top flap) on a thin cardboard or thick card stock.


3. Insert card stock into body of tie, cut off any excess card stock.


4. Fold bottom edge of tie and add a line of Fabric Fusion glue. Fold flaps over and add glue to secure. Add glue along seam of tie to secure closed.


5. Measure and cut bottom end of tie to wrap around bottom of pouch. Use Fabric Fusion glue to secure closed.


6. Attach snap to top of tie and corresponding area on pouch so it can be secured closed. I used a steel bench block, chasing hammer and bench block pad with the setting tool that came with the snaps.


7. Cut off and sand flush any shanks on the backs of your buttons using wire cutters. Glue layers of embellishments together with Liquid Fusion. Allow to dry. Glue to fabric surrounding snap using Fabric Fusion. Allow to dry. Add a second layered button accent to bottom tie flap on pouch with Fabric Fusion (see finished photo above.)


8. Use stamp and ink to stamp "eat chocolate" sideways on body of pouch. Allow to dry.

9. Glue a length of ribbon tucked into the tie accent at the bottom along the center seam to hide it.

Auntie Flo's Pretty Little Tampon Case from The Impatient Beader Gets Inspired
(Use Aleene's Fabric Fusion to glue layers after adding embroidery floss edges)

Clicky Web Analytics
Pin It button on image hover

Subscribe to our newsletter

* indicates required
I am interested in products and inspiration for...
Close