


I've never been happier about gas than I am right now. I don't usually get excited when I hear the work chevron because all I seem to think about is the big bold red and blue shape that takes all of my moolah. However there is one thing I get really excited about and that is fabric paint. You can do so many great things with tulip fabric paint! Shapes, patterns and designs that are in your head can finally come to life. No special orders, no waiting for someone to make it, just you and the paint. That is all you need to create fun awesome things! Today we are making a chevron ombre pillow case that you can throw on a bed, couch or outdoors like I did.
1,2,3 LET GO!


What you'll need:

1) First thing you want to do is lay out your pillow case. If it is really wrinkled then I would iron it.
2) Carefully insert manilla folders into the empty pillow case. I ended up putting 8 into mine. You are putting this so the paint does not bleed to through to the back of pillow case.
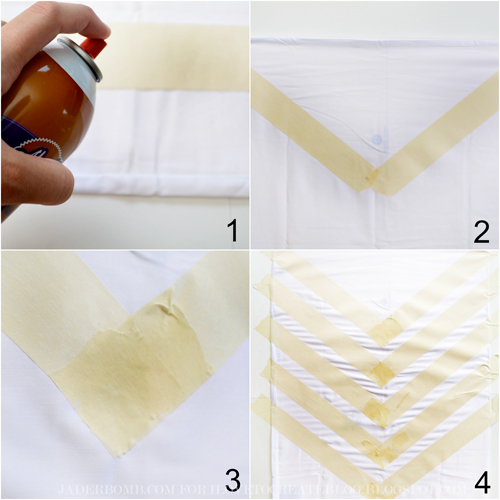
1) I am using cheap masking tape. I really want perfect lines so I sprayed the back of the tape with tacky spray to make sure that baby was not moving. This stuff is amazing!
2) Now since I am a rebel I am not measuring anything. I simply eyeballed each line. To start I put two pieces of tape at the end of pillow to create a big V.
3) To create a perfect point I kept adding little pieces of tape until it was just right. You will see when you are doing this how easy it is.
4) Tadahhhhh! Once you add the first one the rest is like making a box cake. Easy. Pinky Promise.

Believe it or not, this part of the project is super easy and fun!
1) I like to put my paint on a manilla folder. It gives you a flat surface that is clean to work on and you can toss it when you are done. We are doing an ombre chevron pattern so we have to add white with each of our individual colors. Remember, ombre means the shade starts out dark on one end and slowly fades into a lighter color. The two ends of each line will be dark and the lightest part will be at the point.
1) I like to put my paint on a manilla folder. It gives you a flat surface that is clean to work on and you can toss it when you are done. We are doing an ombre chevron pattern so we have to add white with each of our individual colors. Remember, ombre means the shade starts out dark on one end and slowly fades into a lighter color. The two ends of each line will be dark and the lightest part will be at the point.
2) Grab your pouncer and apply white paint on it. I start with white first and gradually add a little color to is as I work my way up the line.
3) Gently pounce on the fabric. Take your time because in the end you want clean crisp lines.
4) This is how each color should look. Do not take the tape off until the paint is dry to the touch.

Pure happiness.

Before I start painting I lay out my colors just to make sure I have enough spaces for each color.

How pretty is this!

This is what it will look like when you are done. Leave it like this outside until it is dry.

Check out that awesome line! It's perfect.


I even created a nice "elephant" with my left over tape. What? You don't see it?

I am so happy with the way they turned out. I even made a more "manly" pillow to show you that it really can look completely different without bright colors! I hope you enjoyed this tutorial and I can't wait to see what you create.
What colors will you use?
*Find more of my DIY decor at JADERBOMB.COM*
Oh and check out my other posts for iLoveToCreate below!
10 comments:
Fabulous!
Thanks Angie!
I absolutely adore this project! Jade, I would put these pillows in my house in a heart beat.
Awe thanks Pattie! I am so happy about that. I think they are precious and not to mention fun to make!
Very pretty! The pillows are a perfect touch of color.
Express Bedz
This is soooo cool! I don't know why we've never used this before, but you can bet it's on my list now!
Moving Internet temporary broadband services are the perfect solution for those in need of short-term internet access. Stay connected with ease during your transition.
I highly recommend Boxes 4 Products for anyone in need of reliable packaging solutions. Their website, boxes4products.com, offers everything you need to ship with confidence.
Your insights are consistently impactful thank you for sharing. Don’t miss the engaging content on this profile Mental Age Test. Mental age tests explore cognitive patterns and preferences.
Post a Comment