Showing posts with label vintage inspired crafts. Show all posts
Wednesday, October 9
DIY Screen Printed Good Witch Tote Bag
Monday, August 5
DIY Earring Organizer
If you are anything like me, you are constantly searching for a more efficient way to organize your jewelry. It's sad to admit this, but my jewelry is mostly clumped into boxes and bags and I spend far too much time digging around to find both earrings from any pair. These small painted laser cut frames are the perfect (and pretty) solution to your earring storage needs. You can drill these with room for more earrings, hang some up and down and some sideways, add hooks to some for your necklaces and bracelets, arrange them on your dressing or bedroom wall and before you know it, you've got a lovely display for your closet or bedroom that helps you keep your baubles organized and untangled! You can also opt to use two frames and sandwich some mesh screen in between, though I was pleasantly surprised at how many earrings these wires held. I think you will be too!
Monday, November 19
Retrofabulous Yarn Wrapped Tabletop Christmas Trees
Bring on the holidays! Hooray! I'm so excited for year two of Retrofabulous Christmas Craftabration at Studio Madge! These Yarn Wrapped Tabletop Christmas Trees are vintage inspired, with a clean modern twist, which is the heart of all things retrofabulous. The cones are available for a song at Michaels as is this lovely Dew Drops yarn. Aleene's adhesives make this project a breeze to create. You can make a whole forest of these trees very inexpensively and quickly yet, they look so rich and opulent. This technique works well with papier mache or cardboard Christmas balls too. You don't need to spend a fortune to make your home cozy and chic for the holidays. And yes, it's obvious that my obsession with pom poms (or pom pons if you will) has not faded. Ho ho ho!
Love
Madge
Materials
1 large 13" tall cardboard papier mache cone
2 smaller 10.5" tall cardboard papier mache cones
3 skeins Dew Drops yarn in silver, taupe and electric blue
Aleene's glue sticks
Aleene's Fabric Fusion adhesive or Aleene's Quick Dry Tacky Glue
Tools
Clover pom pom maker (medium sized 2" pom poms work best with these cones)
Scissors
Aleene's glue gun
(Snip off yarn tail.)
Cut yarn wraps, tie pom pom center while still on tool with a knotted length of yarn, cut off tails.
Monday, October 15
DIY Retrofabulous Halloween Masks
Margot Potter for
iLoveToCreate
“These are your grandmother’s crafts, ya gotta
problem with that?”
I found these vintage inspired paper mache masks at Target and my only regret
is that I didn’t buy every last mask.
Alas, they’re sold out locally and I’m kicking myself for not getting
more. If your local Target is sold out don't fret, you can find similar masks
made of fabric and paper at craft chains and costume supply stores. It’s so easy to dress them up with
inexpensive glitter, gems, feathers and decoupage using Aleene’s Tacky Glue, Fabric Fusion tape and
decoupage medium. These also look
fabulous painted or covered with sequins or ribbon, so make them your own. I love them for Halloween, but they’re so fun
you could use them for Home Décor year round!
You can give these masks even more vintage appeal if you remove the
stretchy straps and attach a painted dowel and satin or lace ribbons.
Watch the video on Knoxville's WBIR Channel 10 Live at Five at Four here!
Materials
3 paper mache masks (I got mine at Target)
Hot pink feathers
Various sizes faux rhinestones
Vintage sheet music (we have lovely packs of old book pages at our website)
Wired silver tinsel
Chunky silver glitter
Tulip Fashion Glitter in pink
Aleene’s Quick Dry Tacky Glue
Tulip sponge pouncers
Traci Bautista Collage Pauge Matte
Aleene’s Fabric Fusion Peel and Stick tape
Tools
Round nose pliers
Awl or drill with 1/16” bit
Sparkle Kitty Mask
Cover mask with a thick layer of Tacky Glue using a sponge
pouncer. Working over a paper plate or
cardboard folder, douse mask with chunky glitter. Tap off excess. Dump unused glitter back into jar. Allow to dry.
When mask is dry, use an awl or a drill to create three holes on both
sides of nose. Cut each wire tinsel stem
in half, turn a small loop in the end and thread into hole, dabbing back of
hole with Tacky Glue to secure whiskers.
Allow to dry. Purrrfection!
Circus Showgirl Mask
Cover mask with a thick layer of Tacky Glue using a sponge
pouncer. Working over a paper plate or
cardboard folder, douse mask with fine fabric glitter. Tap off excess. Dump unused glitter back into jar. Allow to dry. When mask is dry add faux
rhinestones. Squeeze out a small amount
of glue on a paper plate. Dip each
crystal in glue and add varied sizes around eyes and top of mask. Glue three features to back top of mask. Allow to dry.
Now you’re ready for the center ring!
Divine Music Mask
Working in small sections, tear pieces of sheet music and
adhere them on to surface of mask using decoupage medium Brush medium on mask, add paper, add more
medium. Old paper tears easily and works very well for this technique. (Old book pages or sheet music will work, if
you’re thinking of using new paper try printed tissue or stamping text on plain
tissue.) Allow decoupage medium to dry
completely. Squeeze a bead of glue
around edges of mask and eye holes. Work
in sections. Sprinkle chunky silver
glitter over glue and tap off excess working over a paper plate or cardboard
folder. When all glue is covered, dump
unused glitter back into jar. Allow to
dry. Attach a Fabric Fusion tape strip
across the top at the back of your mask, peel off top of strip to expose
adhesive. Working from your crepe paper
spool, adhere paper making small folds as you move across tape. See photo for details. When you reach the end of the mask, cut off
excess paper on both sides. I feel a
song coming on!
Wednesday, August 22
iLoveToCreate: Retrofabulous All Occasion Greeting Card
iLoveToCreate Retrofabulous All Occasion Greeting Card
Margot Potter
"These are your grandmother's crafts, ya gotta problem with that?"
Avalon has been taking advance placement and honors classes and her homework straw pile is epic! It's my birthday today, so I decided to whip up my own birthday card. I'm a Leo, we're kooky like that. You can make one too using layers of coordinating paper, trim and faux rhinestones and a vintage image sized with text added in photo editing software. I share my birthday with the ever so lovely and talented Miss Cathie Filian, so I used her fabulous Podgeables to add some dimension to the card! Aleene's Dry Adhesives make putting it all together as easy as 1-2-3!
Materials
Podgeables tag shape
Yellow and orange cardstock
Patterned scrapbook paper (I used Retro Collage from Michaels)
Patterned tissue paper
Genevieve Gail Felt Floral Ribbon Trim
3 large faux rhinestones
3 medium faux rhinestones
Aleene's Tacky Sticker Sheet
Aleene's Tacky Dot Roll
Tools
Paper cutter (largest cardstock layer is 5.5"x11"-folded to make card.)
Scissors
Bone folder
My image came from a vintage Vogue pattern from the early 1950s, Dover books is a great source for permission free images. I scanned, edited, sized, added the text Retrofabulous and printed it out. Decide how you wish to frame the image, trace and cut out.
Use a paper trimmer to cut yellow cardstock and patterned scrapbook paper in decreasing size. Cut ribbon to fit card. Use Aleene's Tacky Sticker Sheets to adhere image to front of acrylic frame and tissue paper to back of frame. Layer and stack remaining papers and trim using Tacky Sticker Sheets. Add faux rhinestones with Aleene's Tacky Dots!
Monday, August 6
iLoveToCreate Retrofabulous: Craft Wars Inspired "Twister" Lampshade
Margot Potter
"These are your grandmother's crafts, ya gotta problem with that?"
Last week on Craft Wars the contestants had to DIY a lamp from an array of sun and safety glasses and craft closet schtuff for the Pop Craft challenge. I am on a mission these days to use up the vast and ridiculous amount of craft supplies that I already own. I could not justify buying new glasses and taking them apart to make a lamp. I also wasn't so excited about building a lamp. I'm impatient, have I mentioned that?
I put on the old thinking cap and began pondering lamps, iLoveToCreate adhesives and glasses...which morphed into a bag of glass pebbles, cardstock and a super cheap lamp from Target. I'm fond of repetition in design and I have a proclivity for circular shapes. I selected some colors from my pile of paper, punched out small circles and started mapping out a design. Mr. Potter joined the fun and we came up with this shade.
I couldn't figure out what was so familiar about these circles in these particular colors and then...it hit me! TWISTER! YAY!
And that's...how my mind works. Scary, isn't it?!
(GLUE NOTES: To attach the circles, we punched out Aleene's Fabric Fusion sheets, but it does make the punch sticky, so alternately you can try using *Aleene's Fabric Fusion tape cut with non-stick scissors in stripes across back of circles.)
Materials
Small table top lamp with white shade
Cardstock in orange, blue, light yellow, dark yellow, green
Small clear glass flat back pebbles
Aleene's Fabric Fusion Sheets or *Tape
Aleene's Super Thick Tacky Glue
Tools
Fiskars 1" round circle punch
Optional Hot Glue Gun
Monday, July 2
iLoveToCreate Retrofabulous Embellished Straw Tote
Margot Potter
'These ARE your grandmother's crafts...ya gotta problem with that?
I didn't think so."
I'm afraid I have always had a serious soft spot for retro beachy looks. Straw hats, straw totes, sundresses and seersucker rompers all make my little heart go pitter pat. When I saw this plain straw tote in the dollar section at Target, I could not resist. I knew immediately how I would DIY it into a retrofabulous summer bag! Some felt, rick rack trim, pom-pom fringe and a judicious smattering of sparkly crystal accents take a plain bag from drab to fab and with the help of Aleene's Tacky Glues literally in seconds flat! Now THAT's retrofabulous!
Materials
Plain straw tote
Craft felt in four colors
Coordinating pom pom fringe
Coordinating rick rack trim
Tulip Glam-it-up Crystals in Metallics
Aleene's Quick Dry Tacky Glue
Aleene's Tacky Glue Dots Singles 3/16"
Tools
Scissors
Ruler
Marker
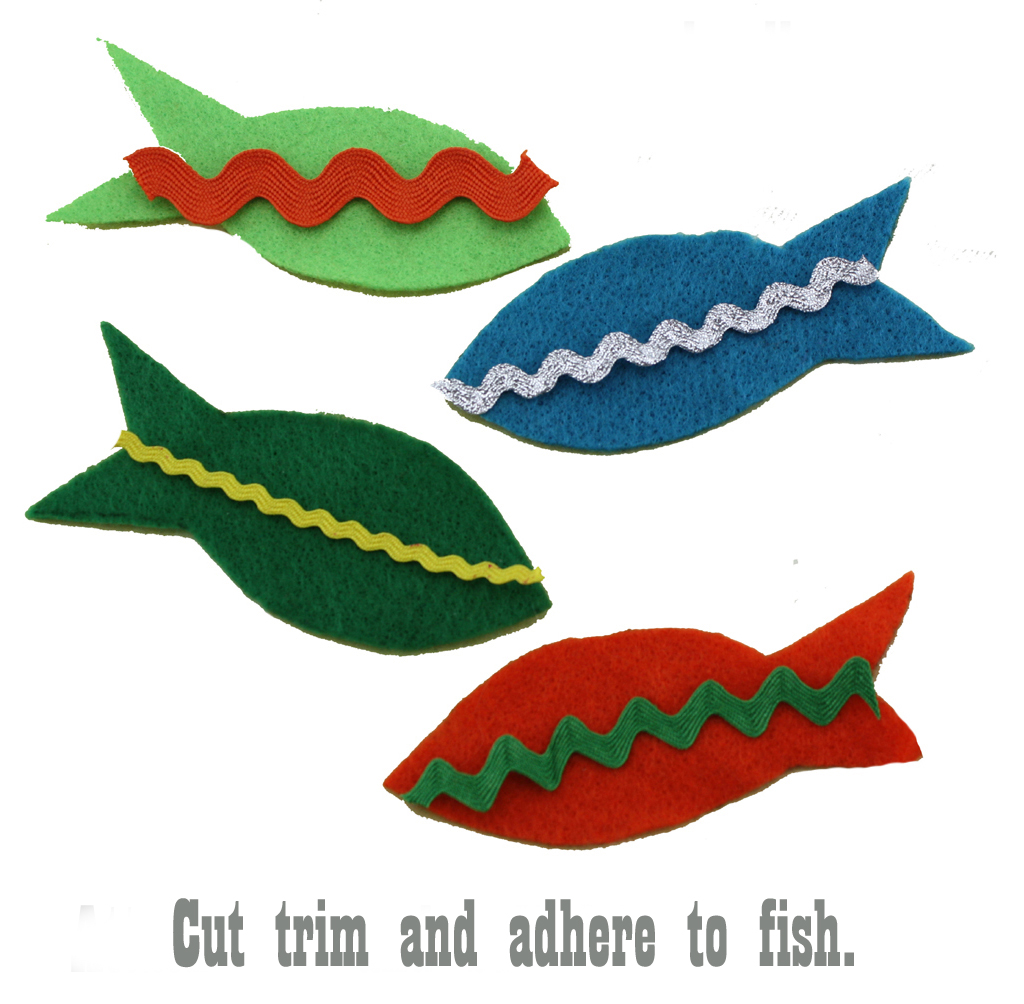
Hand draw a simple 4"lx1.5"w fish shape, cut out to use as a template.
Place template on felt, trace and cut out four fish.
Cut rick rack and adhere to fish.
Glue fish and pom pom trim to tote with Aleene's Quick Dry Tacky Glue. Finish one fish with metallic crystal accents using Aleene's Tacky Glue Dots. Allow it all to dry, toss on your favorite vintage or vintage inspired sundress and sunglasses and ta da...go get 'em, you retrofabulous creature, you!
Monday, June 18
iLoveToCreate: Burnt Offerings Decoupage Necklace
iLoveToCreate Retrofabulous Crafts
Burnt Offerings Decoupage Necklace
Margot Potter
In 2009 I published a book called Beyond the Bead. It is by far my favorite book. I had a blast making beads and components out of all sorts of wonderful things I found in the aisles at the craft and hardware stores. One of the projects in the book used old book pages, wooden craft stars and a wood burning tool to create the look of aged and burned charms. I loved making it, I love wearing it and I thought I'd share it with you. I've seen some similar projects making the rounds on Pinterest, but this is my version from a few years ago. Aleene's Collage Pauge is an amazing medium with endless uses and here you can see how nicely it seals the old paper to create charms that look fragile, but are tough and durable. Add a little Aleene's sealer spray and you've got a necklace that will last a lifetime.
Materials
Old book pages
Wooden craft stars
Traci Bautista Aleene's Collage Pauge Matte
Aleene's Spray Acrylic Sealer Matte
Tiny key charms
Crystal beads
Aged brass chain
Clasp
10mm gold tone or aged brass jump rings
Tools
Chain nose pliers
Bent nose pliers
Wood burning tool
Attach paper to star using Collage Pauge. Make all five stars at the same time, cutting the paper around them after they dry with scissors.
Seal the top of the star with decoupage medium, after it dries repeat. Turn star over and repeat the process
for the opposite side.
Use a wood burning tool to CAREFULLY burn the edges of the stars and add some burned areas in the centers. Work in a ventilated area, take your time and be careful, the tool gets very hot. Did I mention it gets hot? Because it does. So be careful. After burning, spray with Aleene's Spray Sealer in matte.
If your stars are not pre-drilled, use a 1/16" drill bit to drill a hole at the top of one point on each star. Attach the stars and the charms and beads to the chain using jump rings and your bent and chain nose pliers.
Visit us on Facebook!
Craft on!
Monday, June 4
iLoveToCreate: Retrofabulous Mini-Frame Pendants
iLoveToCreate Retrofabulous Mini-Frame Pendant
Margot Potter
"These are your grandmother's crafts, ya gotta problem with that?"
Making these miniature wearable paper artworks is easy peasy and a ton of fun. Old book pages make great collage backgrounds and you can find images in Dover Books titles or do this with upcycled new magazine pages for a more modern look. No matter how you do it, Aleene's Dry Adhesives and Jewelry Glue make this a breeze!
Materials
Miniature Frame (HHH Enterprises)
Tiny metal Tim Holtz idea-ology flower
4mm crystal AB SWAROVSKI ELEMENTS round
Old book page
Red construction paper
Artistic Wire mesh black
Aleene's Tacky Tape Runner
Aleene's Tacky Sticker Sheets
Aleene's Jewelry and Metal Glue
Chain
Clasp
Jump rings
Tools
Chain nose pliers
Small scissors
Pencil
Trace background paper to fit frame and cut with small paper scissors.
Cut out and adhere tiny collage elements using Aleene's dry adhesives.
Use Aleene's Jewelry and Metal glue to attach flower and crystal. (Be sparing, a little goes a long way!)
Visit us on Facebook!
Craft on!
Subscribe to:
Posts (Atom)