Showing posts with label aleene's adhesives. Show all posts

Wednesday, August 26

Yarn Wrapping Bottles: The Easy Way

Wrapping twine around bottles is one of the oldest handcrafts in the western world. Hundreds of years ago, people would use elaborate series of knots to incase glass bottles, not only as a form of decoration, but as a way to mark their property (things could get confusing down at the town water well!). The craft has come a long way since then, and wrapping yarn around bottles with glue has since taken over, but, if you have ever tried to wrap yarn around a non-straight surface you know the truth: it's actually really hard. You think it'll be easy - but it isn't; the glue slip-slides on the glass and the yarn rides up as you move along making it so you have to stop and let the glue dry every inch or so. It isn't easy....or shall I say, it wasn't easy

Good news! I found the secret ingredient that makes this process super easy. No more messy glue globs or wrestling the yarn from keeping it from creeping up as you work along. 
Want to know how you can turn one out in under 30 minutes? Let's go!

Tuesday, September 9

Rhinestone Choker DIY


 I love simple elegance, not too fussy but makes a statement. 
I have been looking  for a choker like this forever
but could never find anything close to what I had pictured in my mind.
 I finally had to make what was in my head,
and Aleene's  jewelry and metal glue made it super easy to create.

Wednesday, September 25

Fuzzy Monster Snap Bracelets


As soon as I spied these fun fur snap bracelets in the Halloween aisle at Target, I knew exactly what I wanted to do with them.  They're only $1.00, so I scooped up three!  Using various sizes and colors of googly eyes, some craft felt scraps I had in the studio and three types of Aleene's adhesives I made an armful of fuzzy monster snap bracelets that are sure to scare up some fun!  These are so easy and inexpensive to create, they'd make a great craft project for kids or teens.  (Though I'm a fully grown woman and I would rock these in a hot second. 

Monday, March 18

DIY Emerald City Necklace

DIY Emerald City Necklace
Margot Potter for iLoveToCreate

We loved Oz the Great and Powerful and of course, it has inspired a lot of new design ideas here at Studio Madge.  This necklace is made of chipboard, which is a surprisingly durable medium.  I wouldn't recommend wearing this in the rain, but you can make it water resistant with a coat or two of Aleene's Spray Acrylic Sealer.


Use a ruler to mark green chipboard into triangles.  These are 1.5" wide and 2" long.  Cut triangles with sharp scissors.  Mark and punch holes in top edges of triangles, I used my Crop-a-dile.  Cut the back off of a vintage rhinestone earring, any green sparkly item will work here, even a button or an array of Tulip Glam-it-up crystals!


Using aged brass chain, cut it into six link segments, you want them to span the top of your beads.  The beads are 20mm emerald green frosted Lucite.  Glue chain and earring to beads using Aleene's 7800 adhesive.  Use the same adhesive to attach the beads to the triangle pendants.  Attach the triangle pendants together with three 8mm jump rings. Attach 2 5.5" segments of chain to the outermost triangles on the necklace using 8mm jump rings.  Attach a clasp to the open ends of your chain, open and close the chain links using chain nose and bent nose pliers. 


Wednesday, January 9

How to Make a Zig Zag Chevron Canvas


Learn how to make a super cute glittered Zig Zag Chevron Canvas in a few quick steps in this easy to follow tutorial from the talented Miss Avalon Potter for iLoveToCreate Teen Crafts!
You'll need a canvas, some scrap cardboard, painter's tape and a pencil to trace. Print a chevron pattern out for a guide, cut the cardboard, line it up and trace, then add tape. 
Mix up some Crafty Chica Little Chica Paints to make a soft yellow and turquoise blue. Paint on canvas in exposed areas with a Tulip paint pouncer. Let paint dry completely. 

Once paint is dry, remove tape. 

Apply a very thin bead of Aleene's Clear Gel Tacky Glue Paint Pen to top edge of stripes. Start with the yellow stripe adding gold Crafty Chica Goddess Gold chunky glitter to the top of the stripe. Allow this to dry completely before applying more glue and Crafty Chica Nova Blue chunky glitter to the top of the blue stripes. Allow to dry.  Make some coordinating canvases for a wall filled with pattern and color!  Here's a tutorial for the Op Art Decoupage canvas shown above!

Monday, January 7

How-to Make a DIY Collar Necklace

I Love.  Love.  Love collar necklaces!  I've been brainstorming how to make my own for a while now and I finally dove in and got it done.  It turned out even better than I had hoped, even Avalon was smitten!  When my teen is cheering on a craft project, I know I'm in the sweet spot!  Woot! 

This would look stunning on canvas, denim, linen...don't limit yourself to felt or to a black background.  Change it up to suit your style, darling.

DIY Collar Necklace
Margot Potter for iLoveToCreate

Materials
Black felt (2 sheets)
Acrylic rhinestones in various sizes
2 black grommets
Black button with shank and flat top
1" segment silver plated chain
2 10mm silver plated jump rings
Aleene's Fabric Fusion peel and stick sheets
Aleene's Fabric Fusion glue
Aleene's repositionable Tacky Spray
Aleene's Glass and Bead adhesive
Template (4 copies)

Tools
Fabric scissors
2 pairs chain nose pliers
Tracing pencil in white

Hand draw a Peter Pan style collar shape to fit your neck.  It needs to meet in the center and wrap around to back in a crescent shape as in picture. Make four copies of template.  Spray back with adhesive, position, cut out.  You'll need two facing left and two facing right!  Remove templates carefully.

Use Fabric Fusion sheets to adhere two layers together for both sides of necklace.  I traced and cut, using several sheets.  Peel sheet backs and attach. 

Use a grommet setter to set grommets on both sides of back of necklace.

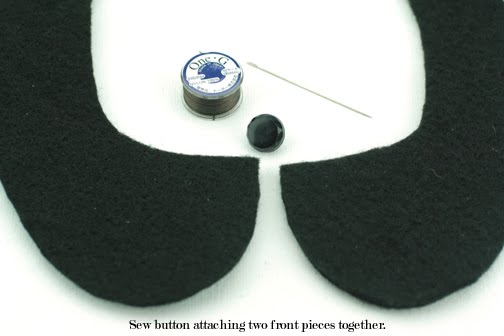
Sew button attaching two front portions together.

Use Fabric Fusion adhesive to attach acrylic rhinestones, there is no pattern here, just scatter them!

Glue gem to button center. Attach jump rings, chain and clasp to back using chain nose pliers.

Wednesday, October 24

Hooty Owl Hallowe'en Cards


Hooty Owl Hallowe'en Cards
Margot Potter for iLoveToCreate


Avalon has been busy as a little bee getting straight A's in her honors classes!  Can you say proud mama?  I can!  Go Avalon!  So I stepped in to whip up some fun and festive Hooty Owl Halloween cards today.
These are so easy to make and you can layer them however you please with whatever papers and embellishments you have at hand.  The lenticular owl came off a panel on a Puff's tissue box, which I simply could not throw away!  The other owl is a permission free Art Deco era image from Dover to which I've added text and is here for you to download if you'd like to use it.  I can't resist the urge to add googly eyes whenever possible.  Teens can use these for party invitations or greeting cards or even frame them for room or locker decor.  Fun, fast...and fabulous!


Materials  Hooty Owl Upcycled Hallowe'en Card
Lenticular owl image from Puff's tissue box
Cardstock
Patterned coordinating papers
Jute or hemp twine
Clear acrylic tile
Large orange rick rack or other ribbon trim
Glam-it-Up crystals
Googly eyes
Tulip fabric marker in black
Aleene's Tacky Glue
Aleene's Tacky Dot Runner
Aleene's Jewel It Glue

Tools
Paper trimmer
Scissors
Bone folder

Remove image from tissue box.  Create a frame for image out of patterned scrapbook paper using paper trimmer or scissors.  Cut cardstock with a small border around edge of framed image, fold and crease with bone folder, marker or scissor handle.  Adhere image and frame to front of card using tape runner.  Cut rick rack to fit along the bottom edge of framed window.  Adhere with tape runner.  Cut twine to fit edges of frame, adhere with Tacky Glue.  Attach patterned paper behind acrylic tile using tape runner.  Cut a small piece of paper to fit center of tile and adhere to front of tile with tape runner.  Write Boo! on front of paper with marker.  Use Jewel-It glue to attach crystals to right edge of tile.  Attach googly eyes to owl's eyes using Jewel-It glue.  Use marker to add details to frame.


Materials Hoot Hoot Card
Hoot, hoot owl printed on white paper
Coordinating scrapbook papers
Orange cardstock
Plastic rhinestone accents
Googly eyes
Aleene's Tacky Dot Runner
Aleene's Tacky Glue
Tulip fabric marker in neon orange

Tools
Paper trimmer
Scissors
Bone folder
FREE DOWNLOAD!


Print owl image.  Cut, fold and crease cardstock.  Cut coordinating scrapbook papers for background and right edge of image.  Use marker to add orange accents to owl image.  Adhere paper layers to card with Tacky Dot Runner.  Use Tacky Glue to adhere faux rhinestones on bottom and top edge of owl image.  Attach googly eyes to center of owl's eyes with Tacky Glue.
This blogger was compensated and provided products for this post.  All opinions are 100% my own!

Monday, October 15

DIY Retrofabulous Halloween Masks


DIY Retrofabulous Halloween Masks
Margot Potter for iLoveToCreate
“These are your grandmother’s crafts, ya gotta problem with that?”

I found these vintage inspired paper mache masks at Target and my only regret is that I didn’t buy every last mask.  Alas, they’re sold out locally and I’m kicking myself for not getting more.  If your local Target is sold out don't fret, you can find similar masks made of fabric and paper at craft chains and costume supply stores.  It’s so easy to dress them up with inexpensive glitter, gems, feathers and decoupage using Aleene’s Tacky Glue, Fabric Fusion tape and decoupage medium.  These also look fabulous painted or covered with sequins or ribbon, so make them your own.  I love them for Halloween, but they’re so fun you could use them for Home Décor year round!  You can give these masks even more vintage appeal if you remove the stretchy straps and attach a painted dowel and satin or lace ribbons.  

Watch the video on Knoxville's WBIR Channel 10 Live at Five at Four here!

Materials
3 paper mache masks (I got mine at Target)
Hot pink feathers
Various sizes faux rhinestones
Vintage sheet music (we have lovely packs of old book pages at our website)
Wired silver tinsel
Chunky silver glitter
Traci Bautista Collage Pauge Matte

Tools
Round nose pliers
Awl or drill with 1/16” bit


Sparkle Kitty Mask
Cover mask with a thick layer of Tacky Glue using a sponge pouncer.  Working over a paper plate or cardboard folder, douse mask with chunky glitter.  Tap off excess.  Dump unused glitter back into jar.  Allow to dry.  When mask is dry, use an awl or a drill to create three holes on both sides of nose.  Cut each wire tinsel stem in half, turn a small loop in the end and thread into hole, dabbing back of hole with Tacky Glue to secure whiskers.  Allow to dry.  Purrrfection!


Circus Showgirl Mask
Cover mask with a thick layer of Tacky Glue using a sponge pouncer.  Working over a paper plate or cardboard folder, douse mask with fine fabric glitter.  Tap off excess.  Dump unused glitter back into jar.  Allow to dry. When mask is dry add faux rhinestones.   Squeeze out a small amount of glue on a paper plate.  Dip each crystal in glue and add varied sizes around eyes and top of mask.  Glue three features to back top of mask.  Allow to dry.  Now you’re ready for the center ring!


Divine Music Mask
Working in small sections, tear pieces of sheet music and adhere them on to surface of mask using decoupage medium  Brush medium on mask, add paper, add more medium. Old paper tears easily and works very well for this technique.  (Old book pages or sheet music will work, if you’re thinking of using new paper try printed tissue or stamping text on plain tissue.)  Allow decoupage medium to dry completely.  Squeeze a bead of glue around edges of mask and eye holes.  Work in sections.  Sprinkle chunky silver glitter over glue and tap off excess working over a paper plate or cardboard folder.  When all glue is covered, dump unused glitter back into jar.  Allow to dry.  Attach a Fabric Fusion tape strip across the top at the back of your mask, peel off top of strip to expose adhesive.  Working from your crepe paper spool, adhere paper making small folds as you move across tape.  See photo for details.  When you reach the end of the mask, cut off excess paper on both sides.  I feel a song coming on!

Wednesday, October 10

'A' is for Awesome DIY Framed Initial

(It's another AWESOME DIY Teen Craft Project from the AWESOME Ms. Avalon Potter!)


A is for Awesome (Avalon and Autumn) 
DIY Framed Initial
Avalon Potter foriLoveToCreate
'Teen Crafted, Mom Approved'

Autumn has always been my favorite season. The way the leaves form a masterpiece of color, and the crisp air rejuvenates the mind amazes me. Even though I have never been a large fan of Halloween (I don’t do scary), I still love the thick textures and shabby chic appeal that pops up during this time. I have a beach theme throughout my room the blends naturally with this style, so I am always finding new things I would love to hang up. I decided for this project I would make something that would go with the theme of my room and the theme of the season. I hope you enjoy it!


Materials
Weathered wood frame
Sturdy cardboard
Burlap
Wooden letter
Crafty Chica white paint
Aleene’s Fabric Fusion
Tulip Glitter Spray Paint diamond
120 grit sand paper
Paint the letter with the Crafty Chica white paint and let dry.


Measure and cut cardboard to fit inside of frame.

Glue burlap to fit cardboard with spray adhesive.  Glue one layer, allow to dry.
Glue second layer and allow to dry.

Trip burlap leaving a 1" edge.


Install burlap board into back of frame.

Sand paint in various spots to distress.

Spray glitter paint on paint brush and brush on letter. Allow to dry.

Use Fabric Fusion glue to adhere letter to center of burlap.

Clicky Web Analytics
Pin It button on image hover

Subscribe to our newsletter

* indicates required
I am interested in products and inspiration for...
Close