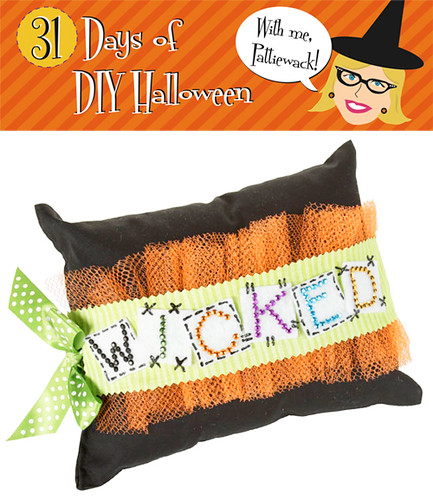
I went absolutely mad for this wickedly charming pillow, perfect for spookifying your home this Halloween! Team up
Aleene’s® Fabric Fusion™ and
Tulip® Glam-It-Up!™ Iron-On Studs™ with ribbon, felt and tulle to make a pillow that’ll have your family screaming with delight!
Wickedly Charming Pillow
Materials List:–
Aleene's® Fabric Fusion® Permanent Dry Cleanable Fabric Adhesive –
Tulip® Glam-It-Up!™ Iron-On Studs™ –
Tulip® 3D Fashion Paint™ in 65038 Black
–
Tulip® Cordless Heat Setting Tool™ – Ribbon – 1½ yards (or enough to tie around pillow and tie bow) – 1” wide – lime
– Ruler
– Pinking shears
– Sewing pins
– White felt – 1 sheet
– Black pillow
– Fabric – 4” strip by circumference of pillow – lime
– Sewing machine with matching thread
– Paper towels
– Scissors
– Tulle – ¼ yard – orange
– Crayon
– Pencil
Materials List:
Instructions:1. Find center of ribbon and place on right side of pillow then pull ends to other side and tie a bow. Place a pin just before bow on each side to mark for wording. Untie and remove ribbon, carefully keeping pins in place.
2.Fold tulle over lengthwise, creating several layers. Sew two lines of gather stitches down center through all layers. Gather tulle to fit ribbon between pins, pinning in place to secure. Sew down both sides of ribbon then remove gather stitches.
3. Use pinking shears to cut lime fabric into strip wide enough to show 1” of tulle extending from top and bottom edges and long enough to reach ends of gathered tulle and fit between pins on ribbon. Apply a thin bead of Fabric Fusion along both edges on backside of fabric piece and one down center. Press in place over tulle piece as shown. Let dry.
4. Trim tulle to desired width then tie ribbon piece around pillow.
5. Measure and cut six squares in desired size from white felt, using size of pillow to determine proportional size of squares.
Squares will need to fit on ribbon across front of pillow as shown.
6. Working on one square at a time, use crayon to position Iron-On Studs into a letter to spell out “WICKED”. The wax on the crayon will hold stud just long enough to transfer to felt square. Turn on Cordless Heat-Setting Tool following package instructions. Touch tip of hot tool to top of stud and hold for two seconds. Remove heat tool and let stud cool, then touch stud with fingernail making sure it has adhered, if not add one or two more seconds. Add one letter from one color to each square.
7. Apply a thin bead of Fabric Fusion around back edge of felt square, smooth with finger and then press in place. Start with “W” then equally space remainder of letters across ribbon as shown. Let dry.
8. Start flow of Black Slick paint on paper towel using even pressure on bottle for a smooth line. Add faux stitching lines as shown. Keep tip of bottle wiped often for clean lines. Add all stitching and let dry.
9. The ribbon can be removed after the holiday.