Showing posts with label halloween crafts. Show all posts

Wednesday, October 23

DIY Cat Ear Headband

Last winter while visiting Urban Outfitters, Avalon and I were both smitten with a fabulous rhinestone accented cat ear headband.  Avalon liked it so much, she wanted to make one for herself.  We put our heads together to devise a way to make one using black felt, Tulip Glam-it-up crystals in black and a store bought headband.  A thick craft wire to give it some stiffness and some Aleene's Fashion adhesives helped to bring it all together.  
and

Monday, October 21

DIY Witch Hat

 The Halloween decor isn't quite complete here at Casa de Potter, I've still got a few crafts up my sleeve.  This DIY Witch Hat was so fun and easy to create using an inexpensive paper mache form from a craft store, black Tulip Soft paint, black Tulip glitter and some ribbons, trims, feathers and bits I had in my studio.  

Wednesday, September 25

Fuzzy Monster Snap Bracelets


As soon as I spied these fun fur snap bracelets in the Halloween aisle at Target, I knew exactly what I wanted to do with them.  They're only $1.00, so I scooped up three!  Using various sizes and colors of googly eyes, some craft felt scraps I had in the studio and three types of Aleene's adhesives I made an armful of fuzzy monster snap bracelets that are sure to scare up some fun!  These are so easy and inexpensive to create, they'd make a great craft project for kids or teens.  (Though I'm a fully grown woman and I would rock these in a hot second. 

Monday, September 16

Retro Halloween Tabletop Decor

 
Paper mache cones lend themselves to all manner of retrofabulous DIY projects, like these DIY Retro Tabletop Decor objets d'art.  That's a fancy pants way of saying, stuff you can use to decorate for Halloween.  I like these cones because they can be interpreted a lot of different ways, as Halloween party hats, Halloween trees or if you add black cardboard circles to the bottoms and take the felt balls off of the tops, fabulous witch's hats!  There are so many yummy trims out there that would be perfect for these, from rick-rack to rhinestones to lace ribbon.  If you want to take this further, make each hat slightly different but color coordinated.  Add black glitter to give them a little more sparkle.  These make delightful tabletop centerpieces for a party!  Tulip Soft fabric paint works like a dream on the paper mache and dries to a perfect matte finish.  Tacky Glue and a glue gun make quick work of adding trim.  This is a great girl's night in project too.  Have a glass of wine while the glue dries and then dive right in!

Wednesday, October 24

Hooty Owl Hallowe'en Cards


Hooty Owl Hallowe'en Cards
Margot Potter for iLoveToCreate


Avalon has been busy as a little bee getting straight A's in her honors classes!  Can you say proud mama?  I can!  Go Avalon!  So I stepped in to whip up some fun and festive Hooty Owl Halloween cards today.
These are so easy to make and you can layer them however you please with whatever papers and embellishments you have at hand.  The lenticular owl came off a panel on a Puff's tissue box, which I simply could not throw away!  The other owl is a permission free Art Deco era image from Dover to which I've added text and is here for you to download if you'd like to use it.  I can't resist the urge to add googly eyes whenever possible.  Teens can use these for party invitations or greeting cards or even frame them for room or locker decor.  Fun, fast...and fabulous!


Materials  Hooty Owl Upcycled Hallowe'en Card
Lenticular owl image from Puff's tissue box
Cardstock
Patterned coordinating papers
Jute or hemp twine
Clear acrylic tile
Large orange rick rack or other ribbon trim
Glam-it-Up crystals
Googly eyes
Tulip fabric marker in black
Aleene's Tacky Glue
Aleene's Tacky Dot Runner
Aleene's Jewel It Glue

Tools
Paper trimmer
Scissors
Bone folder

Remove image from tissue box.  Create a frame for image out of patterned scrapbook paper using paper trimmer or scissors.  Cut cardstock with a small border around edge of framed image, fold and crease with bone folder, marker or scissor handle.  Adhere image and frame to front of card using tape runner.  Cut rick rack to fit along the bottom edge of framed window.  Adhere with tape runner.  Cut twine to fit edges of frame, adhere with Tacky Glue.  Attach patterned paper behind acrylic tile using tape runner.  Cut a small piece of paper to fit center of tile and adhere to front of tile with tape runner.  Write Boo! on front of paper with marker.  Use Jewel-It glue to attach crystals to right edge of tile.  Attach googly eyes to owl's eyes using Jewel-It glue.  Use marker to add details to frame.


Materials Hoot Hoot Card
Hoot, hoot owl printed on white paper
Coordinating scrapbook papers
Orange cardstock
Plastic rhinestone accents
Googly eyes
Aleene's Tacky Dot Runner
Aleene's Tacky Glue
Tulip fabric marker in neon orange

Tools
Paper trimmer
Scissors
Bone folder
FREE DOWNLOAD!


Print owl image.  Cut, fold and crease cardstock.  Cut coordinating scrapbook papers for background and right edge of image.  Use marker to add orange accents to owl image.  Adhere paper layers to card with Tacky Dot Runner.  Use Tacky Glue to adhere faux rhinestones on bottom and top edge of owl image.  Attach googly eyes to center of owl's eyes with Tacky Glue.
This blogger was compensated and provided products for this post.  All opinions are 100% my own!

Monday, August 20

iLoveToCreate: Glitterville's Handmade Halloween Inspired Chick or Tweet Display


iLoveToCreate Retrofabulous Crafts
Glitterville's Handmade Halloween Inspired Cheek or Tweet Display 
Margot Potter
"These are your grandmother's crafts, ya gotta problem with that?!"

Er mah gerd, this project was EPIC!  Yes, I started yesterday and did not finish until this afternoon!  I did sleep, eat and drive my daughter to school, which was an expletive filled epic adventure this morning.  Forgotten school event pass, back up mountain, slowest old person EVER in front of us on the way back down the mountain, miss turn, u-turn, drive-up ATM closed, out of gas...what?!  Ergh.  Tiny baby spiders covering gas pump, leap back into car and go to next pump, walk of shame into gas station cafe in dog hair covered pajamas to second ATM, miss bus, dog leaps in lap while driving, extract dog from lap, drive daughter to school with teen age boy riding our rear and stuck directly behind slow moving school bus the entire ride...HEY KIDS!  YUP!  WE MISSED IT!

Return home to one minor craftastrophe after another...have I mentioned I'm impatient?!

MANY hours later...SUCCESS!

This lovely Hallowe'en project is inspired by the RETROFABULOUS new book by Craft Wars' judge and Glitterville mastermind Stephen Brown Glitterville's Handmade Halloween.  This is the most luscious, scrumptious, stunning visual feast of a craft book created, photographed, designed and edited entirely by Stephen and his Head Studio Elf Chico.  Stephen shares his secrets for making 20 exquisite projects inspired by his wildly successful Glitterville line.  You may recognize Mr. Brown from TLC's Craft Wars, he's one of the judges!

So Madge, being the brave and crafty fool that she is, decided to make her own project inspired by the book, rather than, say, making one actually in the book.  I suggest, you follow Stephen's exacting directions and not veer off the garden path into chicken town.  But hey, Stephen has a pet chicken named Dolly Poulet, Craft Wars host Tori Spelling has a pet chicken named Coco and I used to have 30 pet chickens...so what could be more apropos than a Hallowe'en Chicken?  Meet Hen-rietta Henpeckt and her pecky chicks!  This project is made of inexpensive materials easily found at your local craft store and Aleene's Tacky Glue brings it all together perfectly.  So here's how to make one!

Materials
2 foam Balls (1/5", 2")
Paperclay
3 Standard Wooden Toothpicks
2 5" Wooden Toothpicks 
2 12" Long Wooden Skewers (cut to 8")
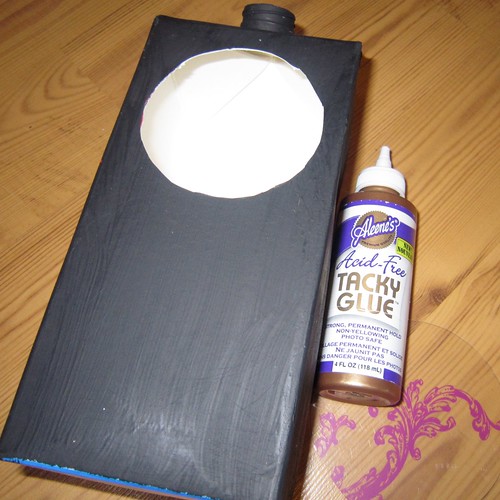
4" Square Cardboard Box
20 Gauge Silver Plated Craft Wire
3mm Jet, Black Diamond SWAROVSKI ELEMENTS rounds
4mm Hyacinth SWAROVSKI ELEMENTS bicones
5 Small Chenille Baby Chicks
1" Wide Felt Flower Trim cut to 4" (or other 1" wide trim thick enough to showcase letters)
4.25" Segment Krienik Orange Metallic Thread
Orange and Pink Cardstock
Printed Letters in Century Font 36pt. c h i c k or tweet!
Orange Krinkle Shredded Paper (I cut my on using a paper trimmer and orange tissue paper)
Aleene's Super Thick Tacky Glue
Tulip Beads in a Bottle Pink Glitter
Tulip Black Fashion Glitter
Crafty Chica Little Paints (I mixed pink, orange and used yellow and black)
Micron or Other Fine Tip Pen

Tools
Round nose pliers
Chain nose pliers
Flush cutters
Fiskars Shape Templates Frames
Fiskars Shape Template Cutter
Scissors
Paintbrushes
Foam brush
Bowl for glitter
Spoon for glitter
Cover foam balls with clay. Keep clay sealed and use small amounts at a time, use fingers to smooth, keep water nearby to help with this process. 

Use a toothpick to connect two balls, add clay around neck and smooth, use small cut toothpick segments as armitures, add clay to form beads. Use the end of a marker to create eyes. Create wings and attach to sides by wetting and smoothing clay. Repeat for comb, waddle and tail. Go back over bird with wet fingers until smoothed. Insert a dowel into bird and allow to dry overnight.
Sand bird to smooth using a fine grit sandpaper. Mix paints and use small brushes to paint bird. Start by making bird all one color, pink. Allow this to dry, then add orange on the comb and waddle, yellow on the beak, pink inside of the beak, white black and white for eyes and allow these to dry.  (Use Micron to add small details to bird's eyes and mouth.)
Use Tulip Beads in a Bottle in pink to add dots. Let dots dry for ten minutes. Use a flat wide brush to flatten dots and spread extra medium across bird. This adds a little sparkle and keeps bird from looking too bumpy!
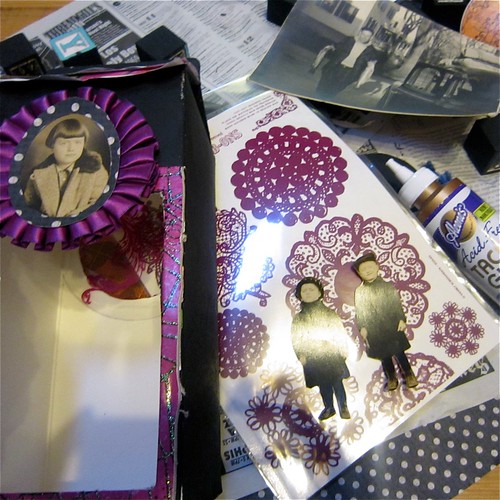
Cut a piece of floral foam to fit a 4x4" cardboard box, I used a saw to cut a little off of the top of my foam block. Leave some space for bedding and bird.
Make a necklace using 20 gauge wire and 3-4mm crystals in black, orange and grey.  Loop one end, bend the opposite end at a 90 degree angle, slide on bird, thread bent wire into loop, use round nose pliers to loop bent wire and secure closed.
Make a tiara using 20 gauge wire. Thread 9 crystals on center of a 4" segment of wire, grasp and twist forming loop, add 11 4mm crystals to each end, loop on end, bend the other leaving a 1/4" tail. Add glue to tail, use chain nose pliers to insert tail into top of chicken's head behind comb. Adjust.
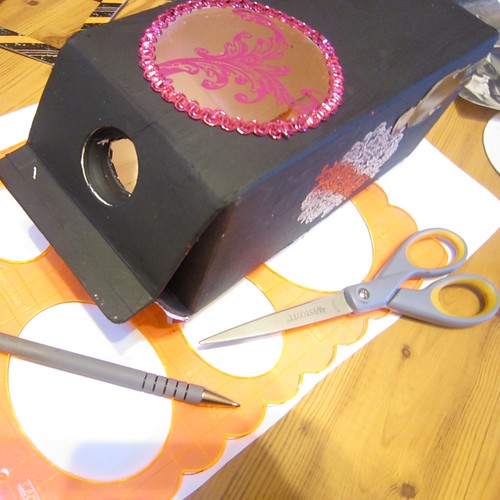
Paint box black and allow to dry. Paint inside and outside! Use a flat wide brush to paint a layer of Tacky Glue on all exterior sides of back. Pour glitter into bowl, use spoon to add to box edges, gently spread with fingertips and tap off excess glitter.
Paint your dowels black, allow to dry. Insert into foam at front left and right side of box. Place bedding into box, cut off any stragglers. Insert a longer toothpick into bottom of bird, insert into foam using chain nose pliers. Attach felt trim to front tops of dowels using Tacky Glue.
Cut all words and letters out. C h i c k is cut into separate letters, or is cut into a small flag and tweet! is cut into a rectangle. Tie metallic thread to dowels, leaving room for your flag. Attach flag with Tacky Glue to thread.  Cut card stock frame (I used my Fiskars Shape Templates and Cutter), adhere to front of box, add pink card stock behind the word 'tweet!' and the letters to center of flowers on felt trim using Tacky Glue.
Try your best not to make a mess this epic in the process. This is what happens when you take the side road to Chicken Town...HELP!

Wednesday, October 26

iLoveToCreate Teen Crafts: Hallowe'en Jack-o-lantern Earrings

Visit us on Facebook!
Craft on!
Hallowe’en Jack-o-lantern Earrings
Margot Potter for Avalon Potter for iLoveToCreate

Avalon was busy with school this past week and I had some free time, so I agreed to make her project for her. We love Halloween around Casa de Potter, but Avalon isn’t into scary stuff. These little vintage jack-o-lanterns were so cute; they seemed like the perfect fit for a flirty seasonally apropos pair of earrings. Permission free images are easy to find and decoupage on Grungeboard allows you to create water resistant and lightweight jewelry. A little touch of Collage Pauge sparkly and some Glam it Up Crystal accents add the perfect dash of sparkle!


Materials
Grungeboard plain sheets
Permission free jack o lantern (image can be downloaded from here)
2 Small Glam it Up crystals
2 10mm silver tone jump rings
2 silver tone ear wires
Traci Bautista’s Collage Pauge sparkly
Traci Bautista’s Collage Pauge glossy
Aleene’s Fast Grab Tacky Glue

Tools
Hole punch (I used a Crop-a-dile)
Sharp craft scissors
Foam paint applicator tool
Computer with publishing software
Printer

Download this permission free pumpkin image to use for your project!


1. The image should be sized correctly, but if you want to print multiples you can size it and put it into publishing software before printing. Print a sheet with at least two jack o lanterns on it. Cut out two.

2. Use glossy decoupage medium to attach images to Grungeboard. Smooth any wrinkles gently with finger tip and allow to dry.


3. Use crop-a-dile to punch a hole in the top center of each jack o lantern.

4. Use sharp scissors to cut out dried jack o lanterns.


5. Paint two thin layers of sparkly decoupage medium on each earring. Allow to dry.

6. Adhere crystals to eyes using glue. Allow to dry.

7. Attach ear wires to earrings using the jump rings.

8. You can decorate the backs of your earrings as you wish, I painted some sparkly dimensional fabric paint on the back of mine.

Thursday, October 28

31 Days of DIY Halloween - Cute Critter Pillows

monster-pillows

Clean out your fabric stash and make this Halloween spooktacular with pillows that are just too cute! Thanks to Aleene’s® Fabric Fusion™ this is a totally no-sew project that is a quick and easy way to add fun and color to your Halloween festivities.

Materials:
Aleene's® Fabric Fusion® Permanent Dry Cleanable Fabric Adhesive
– 2 Pillows
– Zipper - optional
– Scissors
– Buttons
– Yarn - optional
– Lots of fun, funky fabric

Instructions:
1. Pick fun fabric to create pillow face.

2. Cut different shapes from fabric, making sure to cut out multiple layers!

3. Once mouth and eyes are cut out, play around with positioning on pillow. When in desired position, apply Fabric Fusion to back
of each layer and press on pillow.

4. When layers for eyes are complete, finish off by gluing on a button with a drop of Fabric Fusion.

5. When face is finished, add some finishing touches like the bandaged heart and cherries! Give the little critter some colorful hair by gluing yarn to top of pillow.

6. Let pillows sit to dry then enjoy!

Craft on! Click here for our daily giveaway!

Wednesday, October 27

31 Days of DIY Halloween - Bat Puppet

bat puppet

How fun is this? The kids will think you're a genious when you make your own felt glove and turn it into an awesome bat with Aleene's® Foamtastic® ! And for a really girlie girl bat, add a darling little bow!

Materials:
– Aleene's® Foamtastic®
Pompons, orange, 1¼”
Felt, black, 2 squares
Fun Foam, black, orange
Scissors
Peeper eyes, 20mm
Clothespins
Pipe cleaners, yellow
patterns (click here for patterns)

Instructions:
1. Cut two glove and ear patterns from black felt, two wings from black Fun Foam and two inner ears from orange. Glue orange pieces inside ears.
2. Squeeze out an Orange line from top point of wings to bottom. Set aside to dry.
3. Glue peeper eyes to orange pompons.
4. Cut 3” pieces of pipe cleaners for fangs. Pierce two holes in upper part of mouth and insert pipe cleaners and pull.
5. For legs, cut a strand of pipe cleaner in half. Cut second strand into four pieces. Twist two shorter pieces together in center to form claws. Twist larger strand onto feet for leg.
6. Pierce two holes in felt glove and insert legs, coiling reverse side to secure.
7. Fit both gloves parts together. Apply glue to edges of one side, leaving 1” open for mouth. Position mouth and glue entire glove, leaving opening for hand. Secure with clothespins.
8. Glue wings to back of glove. Secure with clothespins.

Craft on! Click here for today's daily giveaway!

Tuesday, October 12

31 Days of DIY Halloween - Fright Night Tee

boo shirt

If you look close, the scary skeleton hand is making a “peace” sign, and the rest of this designs says the rest.  And if you look even closer, you’ll see the fun little monster faces painted with 3-D paint that glows in the dark!  They’re made with Tulip Multi-Surface Stencils, and they were way easy to do. 

Materials List
Tulip® Fashion Glitter™
23556 Purple Jewel
Tulip® Multi-Surface Stencils™
Faces
Tulip® Glam-It-Up!™ Iron-On Fashion Designs™
Skeleton Peace
Tulip® Glam-It-Up!™ Iron-On Crystals™
Pumpkin
Tulip® Fashion Glitter Bond™
– Scissors
– White chalk – sharpened to a point
– Foil
– Scratch paper
– T-shirt – black
– Pressing cloth
– Cardboard to fit inside shirt
– Small paint brush
– Iron
– Crayon

Instructions:

1. Prewash T-shirt; do not use fabric softener. Dry in dryer and iron smooth.
2. Flip over pattern then use chalk to trace along pattern lines. Position pattern, chalk side down, on shirt. Hold in place then run a finger along pattern lines transferring chalk to fabric.
3. Place shirt on ironing board. Remove heavy backing sheet from Skeleton Hand Crystal design and position where shown. Cover with pressing cloth then iron in place following package instructions. When cool, peel off top sheet.
4. Use crayon to fill in “B” with Pumpkin Iron-On Crystals. Press tip of crayon to top of crystal – the crayon wax will hold crystal just long enough to position in place. Place all crystals then carefully cover with pressing cloth. Iron in place following package instructions.
5. Insert cardboard into shirt to prevent seepage.
6. Squeeze a puddle of Glitter Bond™ onto foil. Working quickly, use paintbrush to apply an even coating onto one “O”. Immediately pour Purple Jewel Glitter over wet adhesive. Pour excess glitter onto scratch paper. Glitter can be returned to container and reused.
7. Repeat step with other “O”. Let thoroughly dry then use paintbrush to remove all remaining excess glitter.
8. Use scissors to carefully cut apart faces from stencil design leaving as much border possible around each. Peel off paper backing removing inside pieces. Place where desired on shirt. Squeeze a small puddle of 3D Natural Glow paint onto foil. Tap flat end of wedge sponge into paint then swipe paint over stencil making sure not to go past outside edges. Repeat with all face designs. Carefully remove stencil. Let dry.


If you need more Pattiewack, you can come see me at http://www.pattiewack.com/ !

Craft on!Click here for today's daily giveaway!

Friday, October 8

31 Days of DIY Halloween – Doodle Pumpkin

doodle pumpkin

Turn an ordinary decorative pumpkin into a Funkin with Scribbles® Dimensional Fabric Paint™! Doodle your favorite designs all over your pumpkin for fun effects.

Materials:
–Scribbles® Dimensional Fabric Paint Value 20 Pack
– Pumpkin
– Small paintbrush
– Foil
– Paper towels
– White chalk

Instructions:
1. Use white chalk to draw basic shapes onto pumpkin.
2. Start flow of Scribbles® paint on paper towel using an even pressure on bottle for smooth line. Keep tip of bottle clean by wiping with paper towels.
3. Fill in basic shapes with all colors of dimensional paint. Refer to photo. Let dry.
4. Add second layers of design and detail as shown then add dots and finer detail. Let dry.
5. Squeeze a puddle of Green paint on foil. Use a small brush to paint onto stem. Let dry then repeat step.

Wednesday, October 6

31 Days of DIY Halloween - Creepy Cobweb Umbrella

halloween umbrella

When I designed this spooky umbrella with Tulip® Soft Fabric Paint™, I thought it would be fun for mommy or daddy to hold when walking the kids around the block. The kids will know exactly where you are! Oh, and wouldn't it be fun to hang several from the ceiling to decorate your Halloween party?

Materials List:
Tulip® Glam-It Up!™ PDA: Personal Dazzle Assistance™
26641 Clear

Tulip® Soft Fabric Paint™
BI15790 Crimson Red
BI15793 Grape
BI15797 Lime

– Paintbrushes – Liner, Round
– Umbrella – black
– White chalk pencil
– Small round sponge
– Water dish
– Foil
–Pattern (click here for pattern)

Instructions:
1. Set umbrella in “open” position. Referring to photo as a guide, use chalk pencil to lightly sketch cobweb lines all around umbrella.

2. Print out spider pattern and flip over to backside. Trace design with chalk pencil then flip back over and place chalk side down onto umbrella. Run hands over paper to transfer spider design in chalk onto umbrella.

3. Squeeze puddles of each color of Soft Fabric Paint onto a piece of foil. Using Liner brush, paint Lime over cobweb design. Note: two coats may be needed for optimum brightness. Let dry between coats.

4. Using the Round brush, apply two coats of Grape to spider. Let dry between coats.

5. Sketch hourglass shape onto spider with chalk pencil, then apply two coats of Crimson Red to hourglass and “button” at top of umbrella, letting dry between coats.

6. Allow all paint to thoroughly dry, then wipe away any remaining chalk with damp sponge.

7. Peel crystals from backing and stick onto eyes of spider and all cross-sections of cobweb.

ILoveToCreate Teen Crafts: Hallowe'en Masquerade Ball Mask

Craft on!Click here for today's daily giveaway!


I was really impressed when Avalon showed me the mask she created and the outfit she styled to go with it! Tres chic, n'est pas? I must admit, seeing my little girl look so sophisticated and grown up was a little tough to take, but I'm so very proud of her creativity. Here's this week's fabulous teen craft created by the lovely and talented Avalon Potter!

Hallowe'en Masquerade Ball Mask
Copyright Avalon Potter
ILovetoCreate Teen Crafts
"Teen crafted, mom approved."

Since I created an invitation to a Halloween masquerade ball last week, I decided that this week I would make a mask for the ball. Every girl needs a sparkly mask to complete her fabulous ensemble. This is a great project because you really make it your own, for example you can switch up the pattern or size of the crystals or you could even change the color pallet of the mask. I had a lot of fun making this and I hope you will too.


Materials
• A plain mask of any color (preferably fabric)
• A fabric flower of any color
• Tulip Glam-it-up™ crystals
• Tulip Glam-it-up™ cordless heat setting tool
• Aleene’s Liquid Fusion glue


Instructions
Step 1. Once you have gathered all of your materials get your mask, hot fix crystals, and applicator. Plan out where you want your crystals to go so you know where to apply them ahead of time.

Step 2. Apply crystals using your applicator. Designer Note: If your mask is plastic or made of plastic do not use the applicator it will melt the mask. Use Liquid Fusion glue to apply the crystals instead.

Step 3. Once you have finished applying your crystals, decide where you will want your fabric flower to go. I put mine in the upper corner of the mask.

Step 4. Use Liquid Fusion to glue the flower to the mask.

Step 5. Allow glue to dry. Once you finish you’ll have a beautiful mask to complete your costume.

Tuesday, October 5

31 Days of DIY Halloween - Mummy Mania

halloween day 5

The kids will love these funny water bottles I created for Halloween. You can make these perfect Halloween party favors in no time at all with a little help from Aleene’s®.

Materials list:
Aleene’s® Crystal Clear Tacky Spray™
Aleene's® Original Tacky Glue®
– Gauze bandage
– Scissors
– Plastic “googly eye” appliqués
– White plastic water bottle

Instructions:
1. Use Aleene’s® Original Tacky Glue® to adhere googly eyes to neck of bottle as shown in photo. Let dry.
2. Cut three strips of gauze that are approximately two feet in length.
3. Spray strips with Aleene’s® Crystal Clear Tacky Spray™, then wrap around entire bottle (sticky side down), making sure not to cover eyes. Refer to photo.

Thursday, September 30

Haunted Milk Carton House


This summer I scored a large bag of Little People for my daughter at the thrift store. Included were animals, knights and Little People dressed in their Halloween costumes. Tallulah has plenty of fun playing with her Little People as is, but I thought why not kick it up a notch and start getting her in the Halloween spirit. We missed the recycling last week so I had cardboard milk cartons starting to pile up and it dawned on me what cute Haunted Houses they would make!


SUPPLIES
Cardboard Milk Carton
Scissors
Paint Brush
Crafty Chica Little Chica Paint Pack
Paint Brush
Sandpaper
Craft Knife
Aleene's Acid Free Tacky Glue
Hambly Overlay
Vintage Photographs
Scrap Booking Paper
Halloween Themed Chip Board
Trim


The first thing I needed to do was use sandpaper to get the waxy topcoat off of my milk carton so I could paint it black.


Every haunted house needs a door and a window so your Little People can go inside and play. I used a craft knife to cut out the shapes from my milk carton.


I decided to use Aleene's Tacky Glue to attach a piece of clear Hambly overlay inside my window. From here hot pink and black became my theme.


I decked out my window in sparkly pink trim for a little extra some-somethin'.


To keep up with the hot pink theme I used some Hambly rub-on's that look like doilies/spider webs on the sides of my haunted house. I used Aleene's Acid Free Tacky Glue to adhere some vintage photographs of children that were kinda creepy.


I used a scalloped edge template and scissors to cut out paper shingles for the roof of my haunted house. I used Aleene's Tacky Glue to attach alternating strips of paper.


I added a few last minute frills like chipboard around the door and a rosette with another creepy kid over the door.

Seems like a lot of work, but actually a milk carton was transformed into a creepy casa in a couple of hours and most of that was paint and glue drying time.


All that is left to do is bust out the Little People and the haunted house is ready for action!

Have some extra milk cartons lying around? Check out these other crafty up-cycled options!

Halloween Cartons by Stampin Addicts


Halloween House by Little Lovely


Haunted Milk Carton by The Little Room

Craft on!Click here for today's daily giveaway!
Clicky Web Analytics
Pin It button on image hover

Subscribe to our newsletter

* indicates required
I am interested in products and inspiration for...
Close