Monday, September 7
DIY - Whimsical Glow in the Dark Pumpkins
Wednesday, October 1
DIY Glow In The Dark Pumpkins
Update: Since this glow pumpkin was posted, it's become the most popular post on our blog! YAY! Come check out all of my Halloween and Fall crafts!!!
Monday, September 16
Retro Halloween Tabletop Decor

Paper mache cones lend themselves to all manner of retrofabulous DIY projects, like these DIY Retro Tabletop Decor objets d'art. That's a fancy pants way of saying, stuff you can use to decorate for Halloween. I like these cones because they can be interpreted a lot of different ways, as Halloween party hats, Halloween trees or if you add black cardboard circles to the bottoms and take the felt balls off of the tops, fabulous witch's hats! There are so many yummy trims out there that would be perfect for these, from rick-rack to rhinestones to lace ribbon. If you want to take this further, make each hat slightly different but color coordinated. Add black glitter to give them a little more sparkle. These make delightful tabletop centerpieces for a party! Tulip Soft fabric paint works like a dream on the paper mache and dries to a perfect matte finish. Tacky Glue and a glue gun make quick work of adding trim. This is a great girl's night in project too. Have a glass of wine while the glue dries and then dive right in!
Wednesday, September 11
DIY Feather Painted Pumpkin
Friday, October 12
CRAFTY CHICA: Reverse Stencil Skull Shirt
I was at Dollar Tree recently and came across these giant felt skulls in the Halloween section. Hello, can you say "reverse stencil?"
All you need is the felt skull (if you can't find one, cut your own on a large piece of watercolor paper), a white shirt, Tulip Fabric Spray in black and a piece of cardboard to go inside the shirt while you spray.
Pre-wash the shirt.
Insert the cardboard inside.
Set down the stencil.
Spray on top. Scrunch the arms and spray them too.
Remove stencil, let set for a few hours.
Wash in cold water. Hang dry.
Other ideas!
- Use on a patterned shirt, or spray different colors before you spray the black. Decorate the skull with other colors of paints! Heck, throw on some glitter spray too!
Thursday, September 20
Framed Halloween Spiders (tutorial)
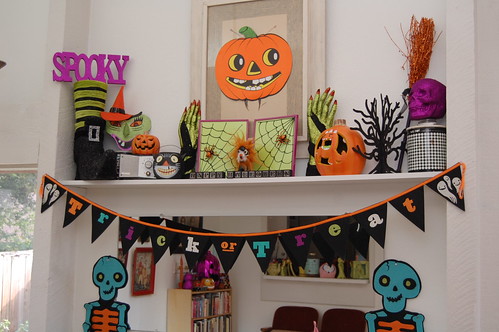

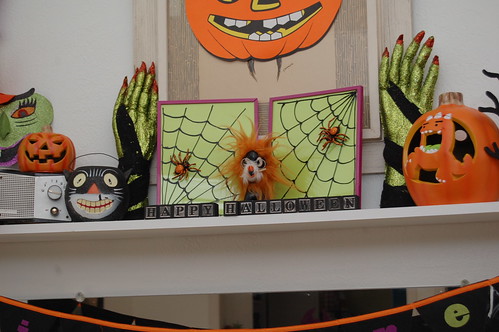
The first day of fall is right around the corner so I figure it is not too early to start Halloween tutorials on the blog. This is the first year I am venturing into the purple realm with my Halloween decor. For a long time I was a strictly orange, black and white kind of girl. Through the years lime green worked it's way in, but I held out with purple until this year. I was creating a vignette above my bar where two large thrifted purple frames I had fit perfectly. I was going to put in pictures of my kids in their Halloween costumes, but then spidery inspiration struck!
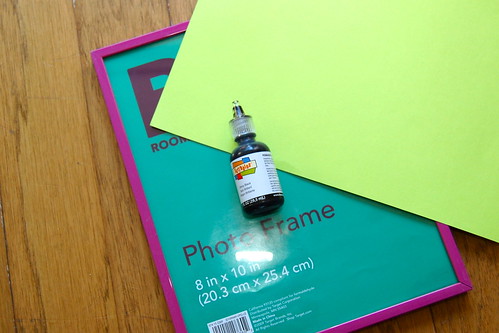
Supplies
Aleene's Tacky Glue
Picture frame
Colored paper
Black Scribbles Paint
Plastic spider
Orange Scribbles Paint
Orange Tulip Fashion Glitter

The first thing I did was cut a sheet of lime green paper to fit inside my purple frames.
Next up using black Scribbles Paint I drew a spider web on the glass of my frame. The nice thing about this paint is that when Halloween is over I can use a straight razor and peel it up.

While the paint on your spiderwebs are drying you can adorn your spiders. Mine were plain plastic spiders from the grocery store. I used orange Scribbles paint to add accents. While the paint was still wet I added glitter. Really, everything is better with glitter including plastic spiders.

Once everything is dry you can glue your spider to the picture frame. Wait for the glue to dry before you set it upright.

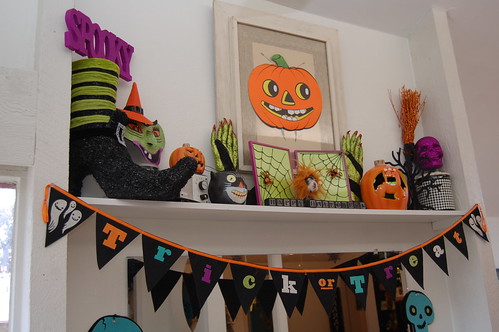
I think my new framed spider webs look mighty spiffy up on the shelf.
Check out more of my I Love to Create posts here. Check out more Halloween posts here.

Tuesday, October 26
Glow-in-the-Dark Ghoulish Tee

Here's a last-minute Halloween costume that easily transitions from day to night! Wear the T-shirt casually by day in all the sunny places, then skulk in the shadows at night and you'll take on an eerie glow. (A dark-colored tee ensures that the glow will be all the more dramatic.)
Materials:
-A plain T-shirt
-Scrap paper
-Tulip Neon Glow-in-the-Dark Paint in "Natural Glow"
-Black permanent marker (optional, for the stencil)
-Freezer or parchment paper (optional, for the stencil)
-Scissors (optional, for the stencil)
Make it:
1. Draw the outline of a skull (teeth, nasal cavities, eye sockets) on the stencil paper, then cut out the pieces. Insert a piece of scrap paper (like a paper grocery bag) between the layers of the T-shirt and lay it flat. Lay the stencil over the front of the shirt. (Note: If you're feeling brave, skip the stencil and freehand the design on the shirt.)

2. Squeeze out some glow-in-the-dark paint and generously sponge it onto the front of the T-shirt.

3. Cover the whole design evenly!

4. Peel off the stencil and let the paint dry completely.

5. Then slide out the scrap paper from between the layers and wriggle yourself in there instead. In other words, try on you shirt and find the light! (And pack a flashlight in order to recharge as needed throughout the witching hours.) I tried to take a cool picture of the glowing shirt in the dark, but alas, it proved too challenging for my weakling camera. But it looks SO ghoulishly good.

Craft on! Click here for today's daily giveaway!
Thursday, October 14
31 Days of DIY Halloween - BOO-ti-ful Spirits Banner

Would you believe this cute banner is made from a black t-shirt? Whether you’re making it for your front door, your office cubicle, or your Halloween party, it will be terrific when you turn out the lights, because the 3-D paint GLOWS in the DARK!
BOO-ti-ful Spirits Banner
Designed by Cheryl Ball
Materials:
– Aleene's® Fabric Fusion® Permanent Dry Cleanable Fabric Adhesive
– Tulip® Craft Mat™
– Tulip® 3D Fashion Paint™ Value Packs and Sets
10 pack Glo
– Ribbons – assorted colors desired
– Paper towels
– White chalk – sharpened to a point
– Scissors
– Straight pins
– T-shirt – Black – XL
– Patterns (click here)
Instructions:
1. Cut out banner pattern then pin to double layer of black T-shirt. Cut out then repeat step creating a total of four pennants.
2. Flip over design pattern. Using white chalk, lightly draw over pattern lines holding up to window if needed to see lines.
3. Position first pattern, chalk side down, on first fabric pennant and hold in place. Press fingers along pattern lines to transfer design to fabric. Repeat with all designs and pennant pieces.
4. Place fabric pennant on Craft Mat – it will prevent paint from seeping through to work surface and is easy to clean. Test flow of paint on paper towel using an even pressure on bottle for a smooth line. Starting with first pennant, outline each section then fill in with color shown, applying an even coating. Use a straight pin to pop any bubble that may form. Carefully slide off Craft Mat and let dry. Repeat for remaining three pennants.
5. Measure and cut a 6-ft. length of ribbon for hanger. Center pennants along ribbon spacing approximately 4” between and leaving longer tails at each end. Apply a thin bead of Fabric Fusion on ribbon, position banner section in place and press to secure.
6. Using ruler on Craft Mat, measure and cut 8” sections from ribbons, cutting enough for about four ribbons between each pennant and at ends. Tie around long hanger ribbon as shown.
Craft on! Click here for today's daily giveaway!
Wednesday, October 13
31 Days of DIY Halloween – Freaky Fun "Boo" Pillows
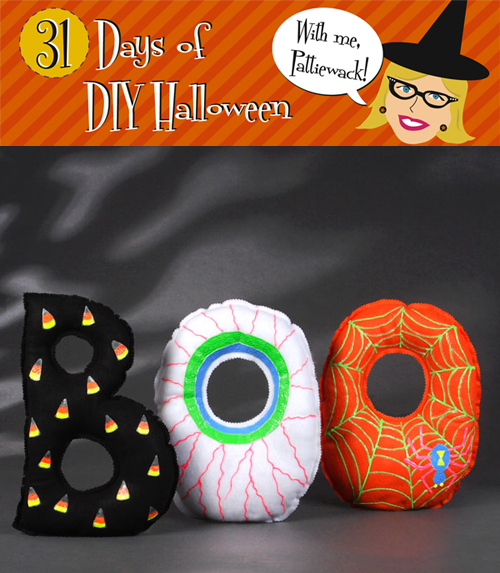
Cheryl Ball made these fun felt pillows and then painted them with Tulip® 3D Fashion Paint that really and truly glows in the dark! I want to sneak them to my house and put them on my black tweed couch for a quick Halloween makover. Do you think she’ll miss them?
Materials List:
– Tulip® 3D Fashion Paint™ Value Packs and Sets
Neon Glow
– Tulip® 3D Fashion Paint™
65177 Green Glow
– Felt yardage – ½ yard each – black, white, orange
– Paper towels
– Polyfill
– Sewing machine with matching thread
– Pinking shears
– Sewing needle
– Scissors
– White chalk sharpened to a sharp point
– Sewing pins
– Patterns (click here)
Instructions:
1. Enlarge pattern to about 16” tall – or desired size – then cut out.
2. Pin patterns onto double layers of felt. Sew right next to pattern. Remove pattern then use pinking shears to trim seams to about ½”.
3. Shake bottles of 3D Fashion Paint. Start flow of paint on paper towel using an even pressure on bottle for a smooth line.
4. Letter “B”: Use white chalk to draw about 1½” tall candy corn triangles onto front. Use Natural Glow to outline each triangle and fill in top third. Fill in second third with Neon Orange and remainder with Neon Yellow. Let dry then add a Natural Glow line between Yellow and Orange. Let dry.
5. Eyeball O: Squeeze a line of Neon Blue about 1” wide around center as shown then fill in. Add a ring of Neon Green around Blue. Use Neon Pink to create veins as shown, starting at center and working toward edge. Let dry then use Natural Glow to outline each ring and next to each vein. Let dry.
6. Spider Web O: Use white chalk to draw lines for web starting at center and moving toward edge. Draw on spider body, head and legs as shown. Fill in body and head with Neon Blue, legs with Neon Pink, and eyes and marking on back with Neon Yellow.
7. Use Green Glow for web, adding long lines first then filling in with curved lines between. Let dry. Use Natural Glow to outline entire spider and details then along each line of web. Let dry.
8. Carefully cut an opening on back of pillow. Fill each pillow with Polyfill, pin opening closed then use needle and thread to sew.
Craft on! Click here for today's daily giveaway!
Friday, October 8
31 Days of DIY Halloween – Jack-O-Lantern Shirt
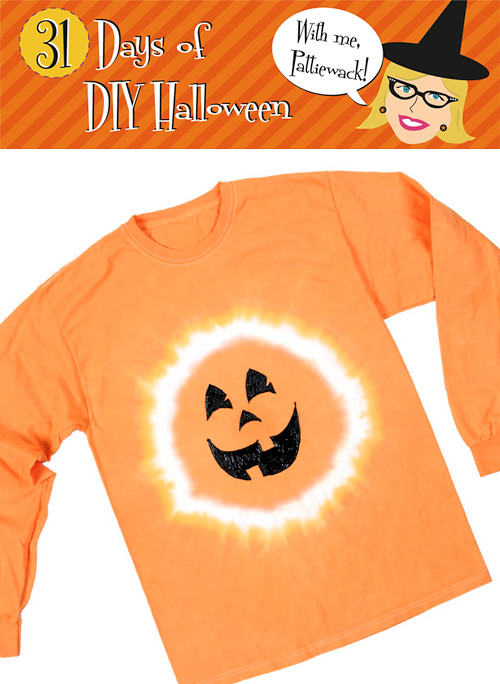
Don’t you love this Halloweenie pumpkin shirt? I do too! Believe me I could say otherwise because we made 135 of these fun shirts for a craft store chain to put in all their stores. Allee and I had buckets of dye, piles of shirts, and tables lined up with tie-dyed shirts ready for their faces. Cheryl Ball painted every single one with 3-D paint for their happy faces. The iLoveToCreate team really rocked it!
Materials:
– Tulip® One-Step Fashion Dye™ in Orange
– Tulip® Fashion Form™
– Tulip® 3D Fashion Paint™ in 65038 Black
– Tulip® Surface Cover™
– Plastic wrap
– Paper towels
– Scissors
– Chalk pencil or chalk sharpened to a point
– T-shirt – white – 100% cotton
Instructions:
1. Wash T-shirt to remove sizing; do not use fabric softener.
2. Cover work surface with Surface Cover and lay damp T-shirt flat on prepared surface. Starting just above center of shirt, pinch fabric and pull up into a tube shape. Tightly wrap a rubber band from dye box around fabric, about 4” below top point. Wrap another rubber band 2” below the first rubber band.
3. Wearing gloves from dye box, add water to Orange dye bottle to line indicated on bottle. Replace cap tightly and shake bottle until dye is completely mixed.
4. Squeeze Orange dye onto the first part of tube shape, completely covering with dye. Skip the 2” section between rubber bands then squeeze dye onto remainder of shirt. Cover shirt with plastic wrap and let set 6 to 8 hours or longer for most intense color.
5. Carefully cut rubber bands off of shirt and rinse shirt in warm water until excess dye is removed and water runs clear. Wash separately in a large load of water with hottest water suitable for fabric and a small amount of laundry soap. Dry separately.
6. Lay shirt on work surface and place Fashion Form between layers of shirt. Print out Jack-o-lantern face pattern and trace over pattern lines with chalk. Place pattern chalk side down on shirt and rub hand over the back of paper to transfer design in chalk onto shirt.
7. Start flow of Black Slick 3D Fashion Paint on paper towel to get a feel for bottle, using an even pressure on bottle for a smooth line. Outline then fill in each facial feature with Black Slick. Let dry flat.
Craft on! Click here for today's daily giveaway!


.png)


